
Mini Projector Resolution and Image Quality
Mini projector resolution refers to the pixel count used to create the projected image, while image quality combines native resolution, sharpness, brightness, contrast, lens quality, screen size, viewing distance, room light, and the quality of the source signal. Resolution determines the available image detail, but picture clarity remains conditional because optical quality, projection size, ambient light, and placement also influence the final result.
Screen size and viewing distance both affect perceived sharpness because displayed pixels become easier to notice as the image grows.
A mini projector used for movies may appear clear on a modest screen, yet the same projector can make presentation text harder to read when the image is enlarged or the room is brightly lit. Screen size and viewing distance both affect perceived sharpness because displayed pixels become easier to notice as the image grows. For example, a portable projector intended for documents or subtitles benefits from a native resolution that matches the level of detail you expect, making native resolution the primary specification to verify.
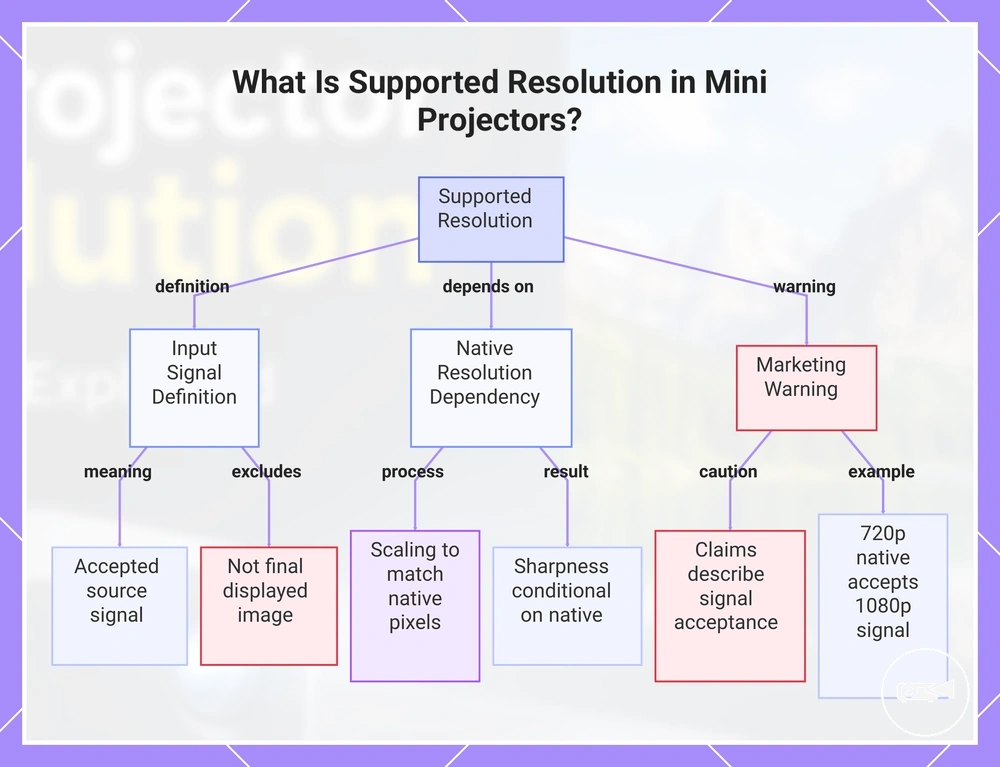
Supported resolution and native resolution are not the same specification.
Supported resolution and native resolution are not the same specification. According to Epson and BenQ projector documentation, supported resolution describes the source signal a projector can accept, while native resolution identifies the actual displayed pixel count produced by the imaging system; higher-resolution input is processed through scaling when necessary, so supported resolution alone does not guarantee the same displayed detail.
For broader buying guidance, see the mini projector guide , which places these image-quality attributes into the overall selection process.
Select a mini projector by treating native resolution as the primary image-quality attribute, then compare brightness, contrast, lens quality, screen size, and viewing conditions to judge expected picture clarity. For instance, a compact projector with an appropriate native resolution can still appear softer if projected onto an oversized screen or positioned out of focus. For broader buying guidance, see the mini projector guide, which places these image-quality attributes into the overall selection process.
Table of Contents
What resolution controls in a mini projector image
Resolution is the pixel detail a mini projector can display or process, depending on whether native resolution or supported resolution is being discussed. Native resolution defines the physical pixel count available to create displayed detail, while supported resolution identifies the source signal formats the projector can accept before scaling. According to projector guidance from ViewSonic and Epson, higher pixel counts allow more image detail to be displayed when the projector's native resolution supports it.
Resolution is the pixel detail a mini projector can display or process, depending on whether native resolution or supported resolution is being discussed.
What resolution controls in a mini projector image is the relationship between pixel count and displayed detail rather than the projector's entire picture quality. The illustration below highlights the distinction between native resolution, supported resolution, and the displayed image so these terms are not confused.
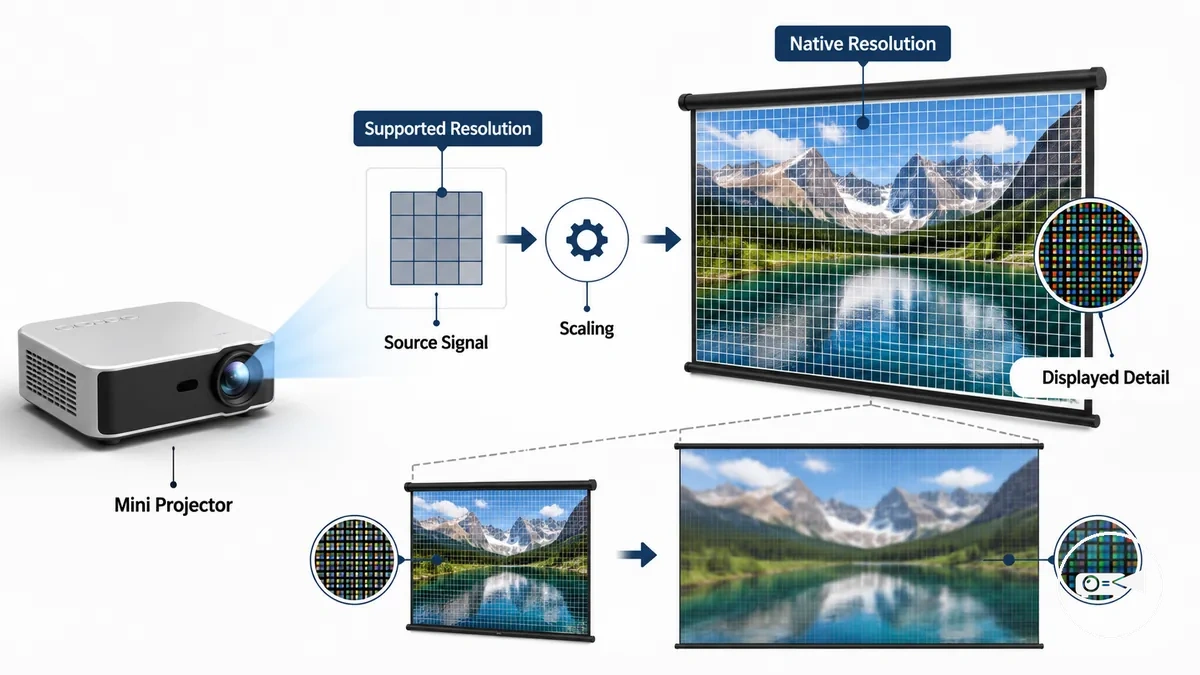
Resolution defines image detail, but it does not define focus, brightness, or screen size. A mini projector can accept a higher-resolution source signal and reduce it through scaling to match its native resolution, so supported resolution does not mean the same displayed detail. For example, a compact projector with a native resolution of 1280 × 720 pixels can accept a Full HD source signal, but the displayed image remains limited to its own native pixel count after scaling, which can make fine text appear softer on a large screen.
Native Resolution, Supported Resolution, and Real Displayed Detail
If a mini projector accepts a higher-resolution source signal than its native resolution, the displayed detail is still limited by the projector panel's physical pixel count. Native resolution determines how many pixels the projector can actually display, while supported resolution identifies which input formats it can accept through its video processing and scaling system. This distinction helps separate display quality from input compatibility and reduces buyer risk when comparing specifications.
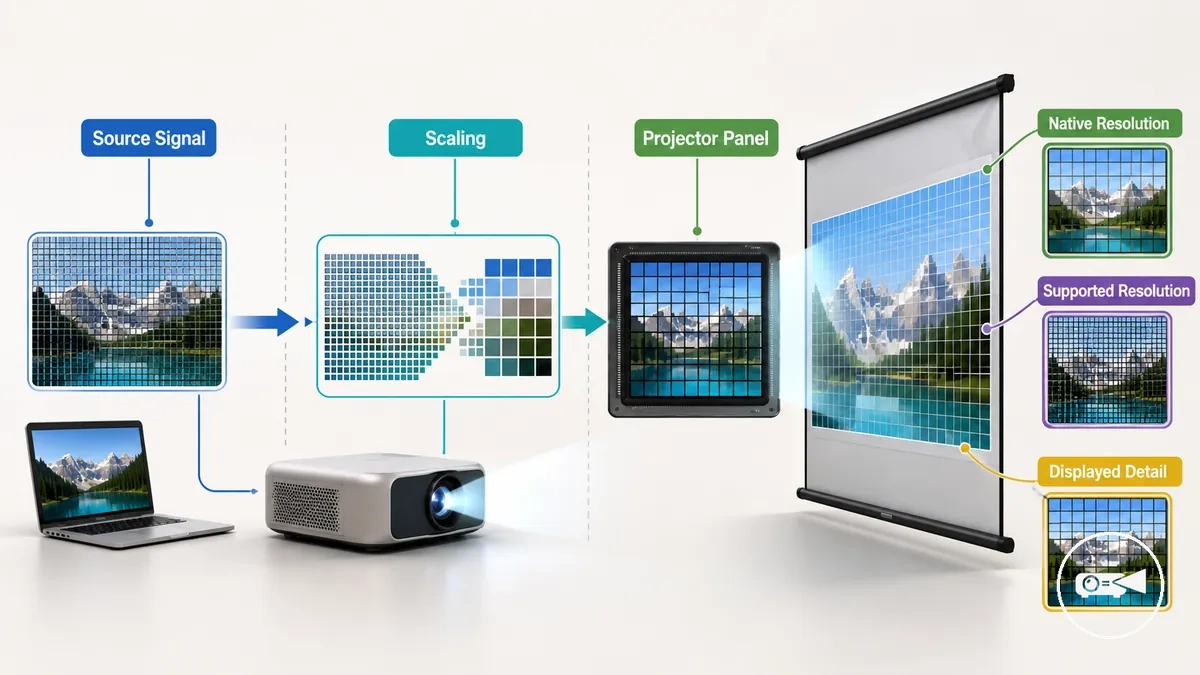
Native resolution, supported resolution, and real displayed detail describe different stages of the display chain.
Native resolution, supported resolution, and real displayed detail describe different stages of the display chain. The image below illustrates how the source signal, scaling process, and projector panel work together to determine the final picture shown on the screen.
| Option | Attribute | Trade-off | Best use case |
|---|---|---|---|
| Native 720p panel | Displays 1280 × 720 physical pixels regardless of whether the source signal is 720p, 1080p, or another supported format. | Higher-resolution inputs are scaled to the panel's pixel count, so fine image detail and text readability decrease more quickly on larger screen sizes. | Portable viewing, casual movies, and smaller projection sizes. |
| Native 1080p panel | Displays 1920 × 1080 physical pixels and reproduces a 1080p source without reducing its native pixel count. | 4K source signals are still scaled to 1920 × 1080 because the panel cannot display more physical pixels than it contains. | Larger screens, presentations, subtitles, and sharper image detail. |
| Higher supported resolution | Accepts higher-resolution source signals such as 1080p or 4K for processing. | Improves device compatibility, but does not increase the projector panel's native pixel count or displayed detail. | Connecting streaming devices, media players, and computers that output higher-resolution video. |
For example, a mini projector with a native 1280 × 720 panel that supports 1920 × 1080 input accepts the Full HD signal, scales it to 1280 × 720, and projects only that native pixel count. As explained in Lenovo's display documentation, scaling adapts the incoming signal to the fixed pixel grid of the display rather than increasing the number of physical display pixels.
The key comparison is that supported resolution measures input compatibility, whereas native resolution measures actual displayed pixels.
The key comparison is that supported resolution measures input compatibility, whereas native resolution measures actual displayed pixels. A higher-quality source signal can still improve picture clarity through better compression or cleaner scaling, but screen size, viewing distance, optics, and the projector's native resolution continue to determine the level of visible sharpness.
Native Resolution as the Physical Pixel Limit
When a mini projector receives a source signal with more pixels than its native resolution, the projector panel still displays only its fixed physical pixel count. Native resolution is the panel's built-in pixel grid, so it defines the maximum displayed detail regardless of the supported resolution accepted by the input system. As explained in the parent comparison, supported resolution affects signal compatibility, while native resolution remains the physical display limit.
As explained in the parent comparison, supported resolution affects signal compatibility, while native resolution remains the physical display limit.
Native resolution directly determines how much image detail the panel can reproduce, whereas perceived sharpness is also influenced by scaling, lens quality, screen size, and viewing distance. According to Lenovo's display documentation, scaling maps a higher-resolution source signal to the panel's fixed native pixel grid rather than increasing the number of physical display pixels.
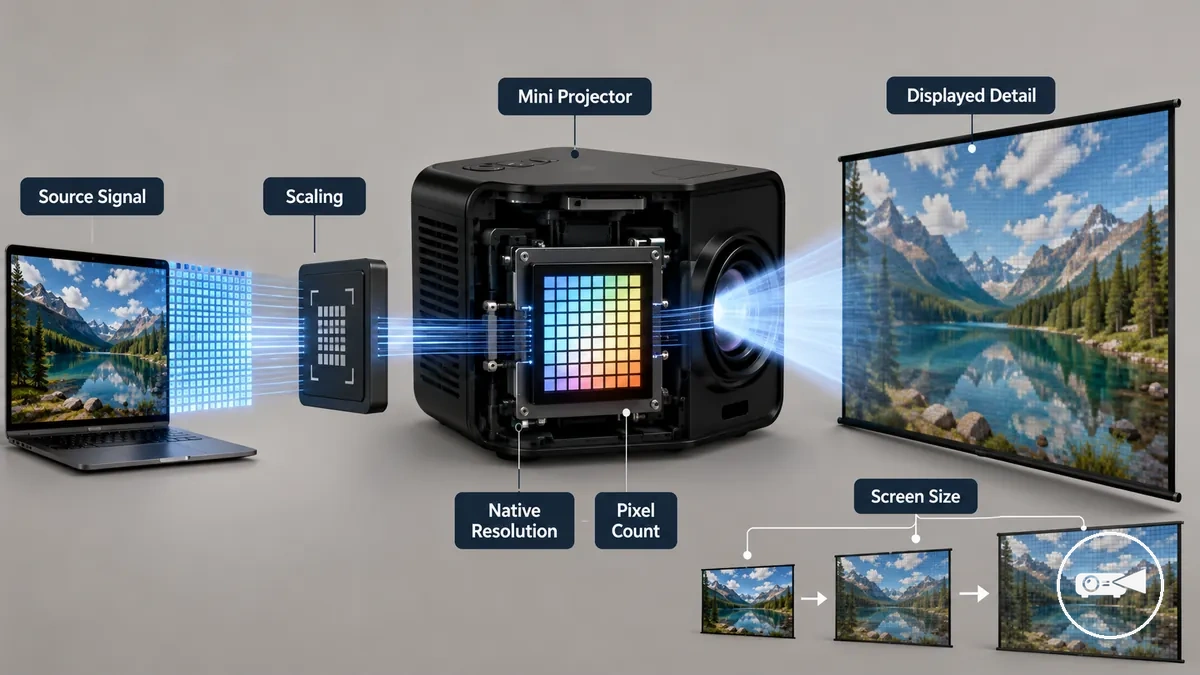
For example, a mini projector with a native 1280 × 720 panel that accepts a 1920 × 1080 source signal scales the image to 1280 × 720 before projection. The video remains compatible with the projector, but the displayed detail cannot exceed the panel's physical pixel count, so fine text and small image features appear less distinct as screen size increases or viewing distance decreases.
Supported Resolution as the Accepted Input Signal
A mini projector's supported resolution identifies the highest source signal it can accept before scaling or downsampling for display. This attribute describes input compatibility rather than the projector's physical pixel count, so the displayed detail still depends on the native resolution inherited from the parent comparison.
Supported resolution defines the accepted input signal, not the final image reproduced on the screen.
Supported resolution defines the accepted input signal, not the final image reproduced on the screen. According to projector manufacturer documentation, a projector can accept a higher-resolution source signal, such as 1920 × 1080 or 3840 × 2160, then scale it to match its native pixel count before projection. Image sharpness after processing remains conditional on native resolution, scaling quality, screen size, and viewing distance.
Image sharpness after processing remains conditional on native resolution, scaling quality, screen size, and viewing distance.
Note: Marketing claims that highlight supported 1080p or supported 4K describe signal acceptance rather than native display capability. For example, a mini projector with a native 1280 × 720 panel can accept a 1920 × 1080 source signal, but scaling reduces the image to the panel's available pixels, so displayed detail remains limited by the projector's native pixel count.
Note: Marketing claims that highlight supported 1080p or supported 4K describe signal acceptance rather than native display capability.
This chart explains what supported resolution means for mini projectors, how it differs from native resolution, and why marketing claims about supported 1080p or 4K refer to signal acceptance, not display capability.
Native resolution, supported resolution, and real displayed detail
Native resolution determines the real displayed detail only when the source signal matches or exceeds the projector's native pixel count. Native resolution, supported resolution, and displayed detail describe different stages of the projection process, so comparing them helps explain image clarity, compatibility, and buyer expectations. According to guidance from Lenovo and projector manufacturers, accepted input resolution and displayed output resolution are not the same specification.
The diagram below compares where each specification applies before and after scaling.
Native resolution, supported resolution, and real displayed detail describe different parts of the projection process. The diagram below compares where each specification applies before and after scaling.
| Option | Attribute | Trade-off | Best use case |
|---|---|---|---|
| Native resolution | Physical projector panel pixel count | Sets the maximum displayed detail regardless of a higher input signal | Estimating image sharpness and text readability |
| Supported resolution | Accepted source signal | Allows higher-resolution input but may require scaling before display | Checking device compatibility with video sources |
| Displayed detail | Pixels actually shown on the screen | Limited by native resolution, while perceived sharpness also changes with screen size and optics | Judging the final projected image |
For example, a mini projector with a native resolution of 1280 × 720 pixels can accept a 1920 × 1080 source signal if supported, but scaling reduces the image to the projector's native pixel count before projection. The higher-resolution input can preserve compatibility with the source device, yet it does not increase the projector's physical display resolution.
As explained in the previous section, resolution defines displayed detail rather than complete picture quality.
As explained in the previous section, resolution defines displayed detail rather than complete picture quality. Comparing native resolution with supported resolution reduces the risk of assuming that a 1080p or 4K input label guarantees the same visible detail on the screen.
480p and 720p for Basic Portable Viewing
If basic portable viewing is the goal, both 480p and 720p can be suitable under the right conditions, but 720p provides noticeably more displayed detail because of its higher native pixel count. The difference becomes more apparent as screen size increases, viewing distance decreases, or the source signal contains fine text and detailed graphics. Supported resolution only indicates the input formats a mini projector can accept, while scaling converts the source signal to the projector's native resolution for display.
The difference becomes more apparent as screen size increases, viewing distance decreases, or the source signal contains fine text and detailed graphics.
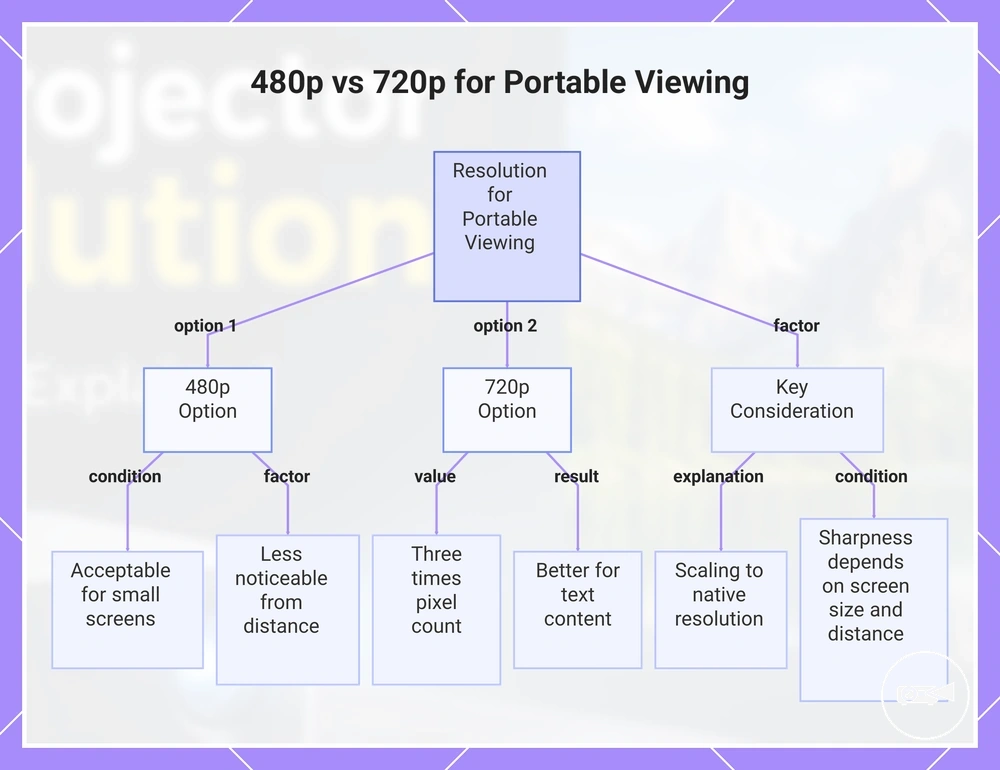
When projecting casual video onto a small screen, 480p can remain acceptable because its lower pixel count is less noticeable from a longer viewing distance. According to Trembit's video resolution guide, 480p has a native resolution of 640 × 480 pixels (307,200 pixels), while 720p uses 1280 × 720 pixels (921,600 pixels), giving 720p roughly three times the pixel count and better image sharpness for subtitles, menus, and text-heavy content projected at similar sizes.
Higher resolution does not automatically guarantee better viewing in every situation.
Higher resolution does not automatically guarantee better viewing in every situation. A 720p mini projector preserves more displayed detail than 480p, but perceived sharpness still depends on screen size, viewing distance, source quality, and the quality of scaling after the supported resolution is processed.
Under identical conditions, a native 720p projector retains more detail because its higher pixel count reproduces more of the available source signal.
For example, a 480p projection used for a movie on a small screen in a dark room can appear comfortable from a moderate viewing distance, while the same projector may struggle to keep small presentation text readable. Under identical conditions, a native 720p projector retains more detail because its higher pixel count reproduces more of the available source signal.
This chart compares 480p and 720p resolution options for portable viewing, showing when each is suitable and the key factors affecting image sharpness.
This chart compares 480p and 720p resolution options for portable viewing, showing when each is suitable and the key factors affecting image sharpness.
1080p for Sharper Movies and Everyday Use
If sharper movies and everyday viewing are the goal, a native 1080p mini projector provides more displayed detail than 720p because it reproduces a higher native pixel count. The improvement is most noticeable with a 1080p source signal on larger screen sizes or at closer viewing distances. Supported resolution only describes the input formats a projector accepts, while scaling determines how that signal is mapped to the native resolution.
The improvement is most noticeable with a 1080p source signal on larger screen sizes or at closer viewing distances.
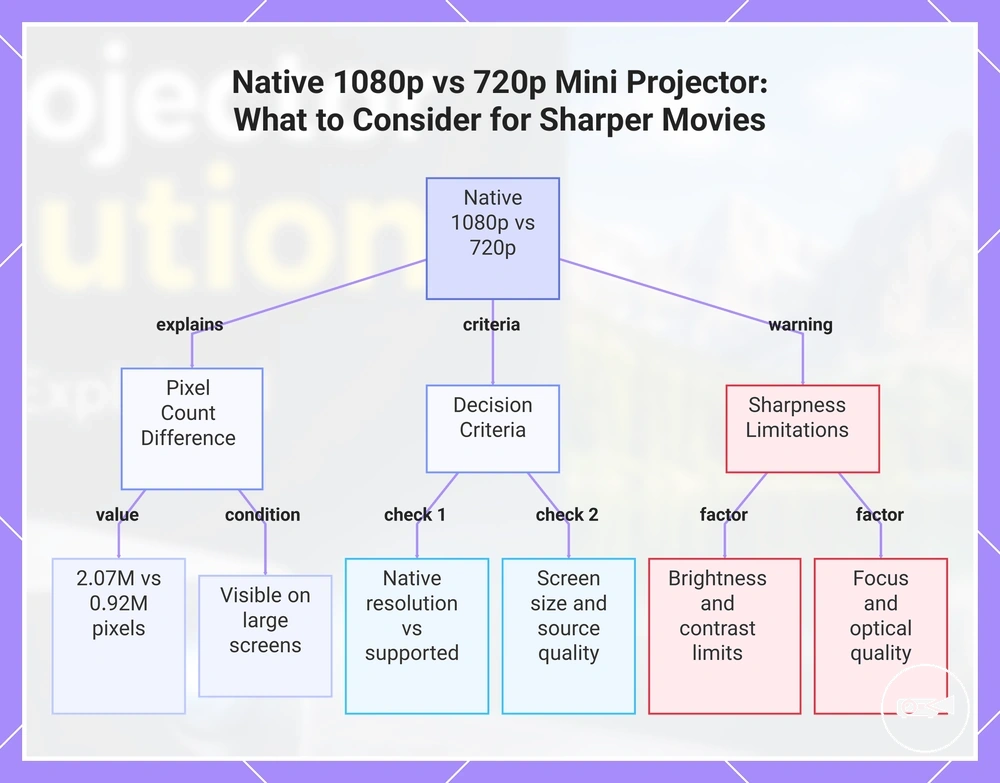
When watching streaming video or films on a medium or large projection, native 1080p displays 1920 × 1080 pixels, or 2,073,600 pixels, compared with 921,600 pixels for native 720p. For a quick decision, consider these criteria:
- Native resolution: Native 1080p preserves more displayed detail than supported 1080p that relies on scaling.
- Screen size and viewing distance: The higher pixel count becomes easier to see as the image grows or the audience sits closer.
- Source signal and lens quality: A Full HD source and a well-focused lens allow the additional image detail to remain visible.
Native 1080p has more pixel detail than 720p, but higher resolution alone does not guarantee a sharper image. Limited brightness, weak contrast, inaccurate focus, or lower optical quality can reduce the visible improvement even when the projector accepts or displays a Full HD source.
Native 1080p has more pixel detail than 720p, but higher resolution alone does not guarantee a sharper image.
For example, if you regularly stream 1080p movies onto a larger screen where facial details and subtitles are important, native 1080p becomes the more meaningful choice because it reproduces more of the available source detail instead of relying on additional scaling.
This chart compares native 1080p and 720p mini projectors, explaining the pixel count advantage, decision criteria, and limitations that affect visible sharpness.
This chart compares native 1080p and 720p mini projectors, explaining the pixel count advantage, decision criteria, and limitations that affect visible sharpness.
4K Support and 4K Native Resolution Limits
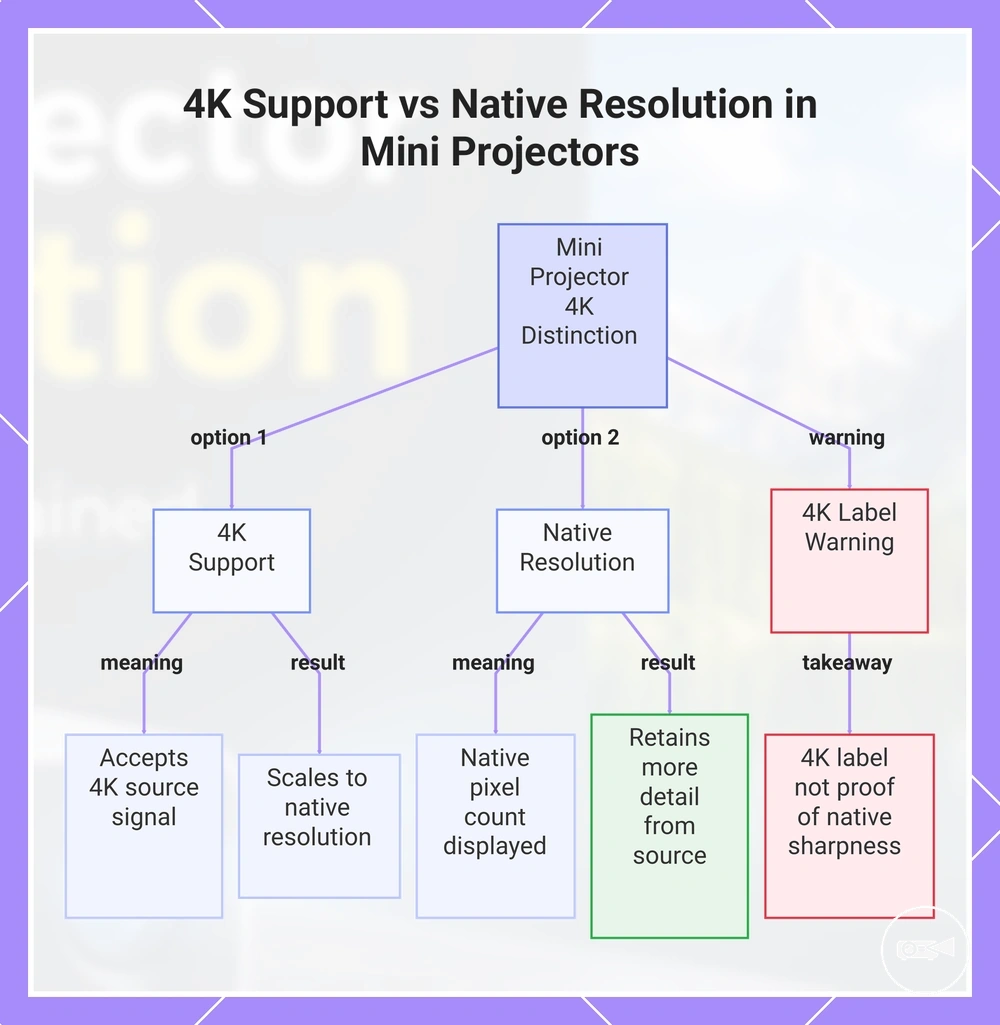
If a mini projector lists 4K support, its supported resolution can accept a 4K source signal, but its native resolution still sets the displayed pixel limit. Scaling converts the incoming signal to the projector's available pixel count, so 4K input compatibility does not create native 4K displayed detail. This distinction matters most when screen size and viewing distance make differences in sharpness easier to see.
This distinction matters most when screen size and viewing distance make differences in sharpness easier to see.
When comparing specifications, separate input support from native output:
- 4K support: The mini projector accepts a 4K source signal and scales it to its native resolution.
- 4K native resolution: The imaging panel provides a native 4K pixel count, allowing the projector to retain more displayed detail from a compatible source.
- Portable trade-off: A compact projector may improve source compatibility through 4K support while still displaying fewer pixels than a native 4K model.
A 4K label should not be treated as proof of native 4K sharpness. Perceived sharpness remains limited by the native resolution and can be reduced further by lower lens quality, weak focus, a large screen size, or scaling from a lower-quality source signal.
A 4K label should not be treated as proof of native 4K sharpness.
For example, a mini projector with a native 1080p panel and 4K supported resolution can play a 4K streaming source, but the image is scaled to 1080p rather than displayed with native 4K detail.
This chart compares 4K support and native resolution in mini projectors, explaining their meanings and a key warning about label interpretation.
This chart compares 4K support and native resolution in mini projectors, explaining their meanings and a key warning about label interpretation.
Native resolution, supported resolution, and real displayed detail
Native resolution determines the real displayed detail only when the source signal matches or exceeds the projector's native pixel count. Native resolution, supported resolution, and displayed detail describe different stages of the projection process, so comparing them helps explain image clarity, compatibility, and buyer expectations. According to guidance from Lenovo and projector manufacturers, accepted input resolution and displayed output resolution are not the same specification.
Native resolution, supported resolution, and real displayed detail describe different parts of the projection process.
Native resolution, supported resolution, and real displayed detail describe different parts of the projection process. The diagram below compares where each specification applies before and after scaling.
| Option | Attribute | Trade-off | Best use case |
|---|---|---|---|
| Native resolution | Physical projector panel pixel count | Sets the maximum displayed detail regardless of a higher input signal | Estimating image sharpness and text readability |
| Supported resolution | Accepted source signal | Allows higher-resolution input but may require scaling before display | Checking device compatibility with video sources |
| Displayed detail | Pixels actually shown on the screen | Limited by native resolution, while perceived sharpness also changes with screen size and optics | Judging the final projected image |
For example, a mini projector with a native resolution of 1280 × 720 pixels can accept a 1920 × 1080 source signal if supported, but scaling reduces the image to the projector's native pixel count before projection. The higher-resolution input can preserve compatibility with the source device, yet it does not increase the projector's physical display resolution.
The higher-resolution input can preserve compatibility with the source device, yet it does not increase the projector's physical display resolution.
As explained in the previous section, resolution defines displayed detail rather than complete picture quality. Comparing native resolution with supported resolution reduces the risk of assuming that a 1080p or 4K input label guarantees the same visible detail on the screen.
Brightness, Contrast, and Colour Clarity
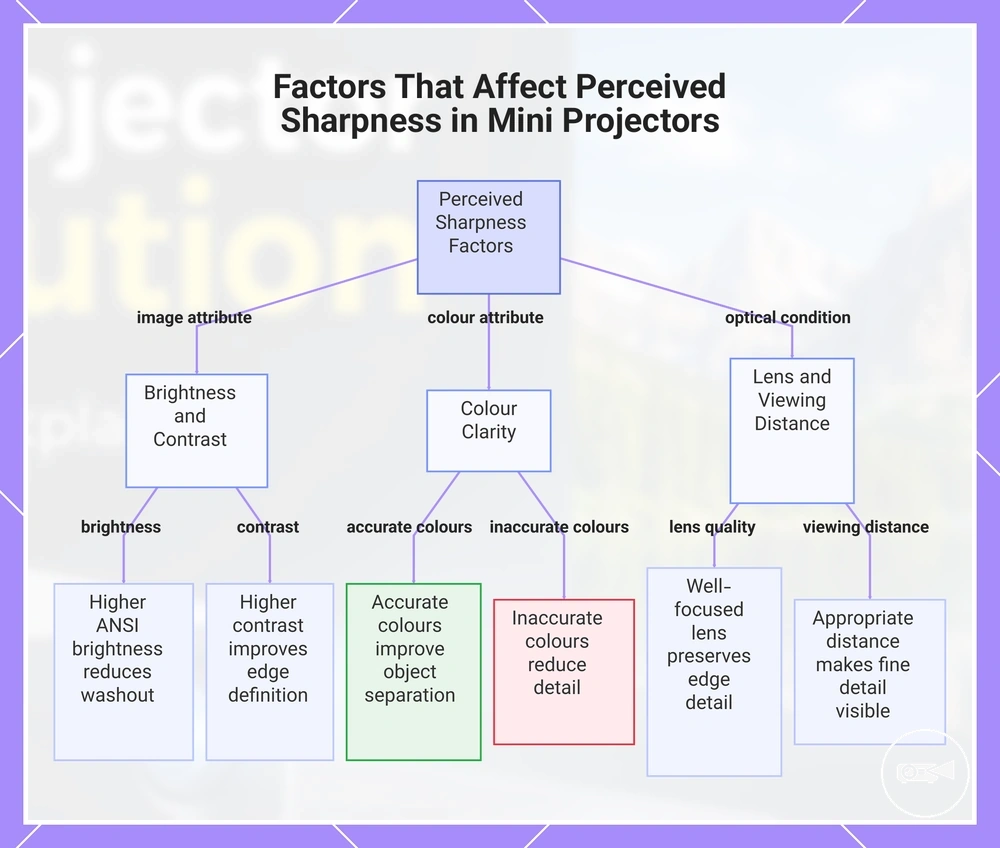
Even with the same native resolution, a mini projector can produce different image quality under different viewing conditions. Brightness, contrast, and colour clarity influence perceived sharpness, while lens quality, focus, room light, and viewing distance determine how much display detail remains visible. For example, a 1080p image can still appear washed out in a bright room even though its pixel count has not changed.
Resolution alone does not determine picture clarity.
Resolution alone does not determine picture clarity. The following factors change how sharp the image appears:
- Brightness: Higher ANSI brightness helps the image remain more visible when room light increases, reducing a washed-out appearance.
- Contrast: Higher contrast improves separation between bright and dark areas, making shadow detail and edge definition easier to distinguish in dark scenes.
- Colour clarity: Better colour accuracy improves object separation and perceived image quality, while inaccurate colours can reduce display detail.
- Lens quality and focus: A well-focused lens preserves edge detail, whereas poor focus softens the image regardless of native resolution.
- Viewing distance: Sitting at an appropriate distance for the projection size makes fine detail easier to perceive than sitting too far away.
These attributes complement rather than replace one another. If you need a deeper explanation of projector light output, see brightness and lumens, but remember that higher brightness alone cannot compensate for weak contrast, inaccurate colour clarity, or poor focus.
These attributes complement rather than replace one another.
This chart shows the key factors beyond native resolution that influence how sharp a mini projector image appears, including brightness, contrast, colour clarity, lens quality, and viewing distance.
Lens Quality, Focus, and Image Processing
A mini projector can display the same native resolution yet produce different image quality because lens quality, focus, and image processing affect perceived sharpness. Accurate lens alignment and correct manual or auto focus preserve edge detail, while brightness, contrast, colour clarity, room light, and viewing distance influence how clearly that detail is perceived. Digital processing can improve the appearance of the source, but it cannot replace optical sharpness.
Digital processing can improve the appearance of the source, but it cannot replace optical sharpness.
The following checklist helps verify which optical and processing attributes influence display detail:
- Lens quality and alignment: Better optical alignment keeps edge detail more consistent across the projected image, while weaker alignment can leave the centre clearer than the edges.
- Manual or auto focus: Correct focus preserves fine detail; inaccurate focus softens text, textures, and object boundaries.
- Keystone correction: Digital keystone improves image geometry, but stronger correction can reduce usable detail on setups that remap and rescale more of the image.
- Scaling: Scaling matches the source signal to the projector's native resolution, with detail reduced when the source and native pixel grids differ substantially.
- Sharpening and noise reduction: Moderate processing can improve perceived clarity, while aggressive sharpening can create artificial edges and strong noise reduction can remove fine texture.
Optical quality and digital correction should be judged together rather than as interchangeable fixes. For example, a well-focused mini projector with good lens quality can still appear softer when heavy keystone correction and strong noise reduction are applied to a low-quality source.
Room Conditions, Screen Size, and Viewing Distance
The same mini projector can produce different image quality when the room, screen size, or seating position changes. Room light, screen surface, projection size, throw distance, viewing distance, brightness, contrast, colour clarity, lens quality, focus, and source quality all influence perceived sharpness even though the projector's native resolution remains the same. A larger projected image spreads the available pixels over a wider area, making fine detail easier to notice at closer viewing distances.
Viewing conditions determine how much of the projector's available detail you perceive.
Viewing conditions determine how much of the projector's available detail you perceive. The table below summarises the main conditions that influence image sharpness while leaving the projector's native resolution unchanged.
| Condition | Effect on perceived clarity |
|---|---|
| Room light | Higher ambient light reduces contrast and can create a washed-out image, making fine detail less visible. |
| Screen surface | A smooth, even screen surface preserves edge detail better than an uneven or textured projection surface. |
| Projection size | A larger projection size spreads the same native pixels across a wider image, making source quality and viewing distance more noticeable. |
| Throw distance | Projector placement changes image size and affects focus conditions, but it does not increase native resolution. |
| Viewing distance | Closer seating reveals more display detail, while greater viewing distance reduces the visibility of fine image differences. |
| Source quality | Higher-quality source content preserves more image detail than compressed or lower-resolution video. |
For example, a 1080p film can appear sharper in a dim room on a moderate-sized screen than on a much larger projection viewed under bright room light. Placement and screen size influence perceived detail, but they do not change the mini projector's native resolution.
Native resolution, supported resolution, and real displayed detail
Native resolution determines the real displayed detail only when the source signal matches or exceeds the projector's native pixel count. Native resolution, supported resolution, and displayed detail describe different stages of the projection process, so comparing them helps explain image clarity, compatibility, and buyer expectations. According to guidance from Lenovo and projector manufacturers, accepted input resolution and displayed output resolution are not the same specification.
Native resolution determines the real displayed detail only when the source signal matches or exceeds the projector's native pixel count.
Native resolution, supported resolution, and real displayed detail describe different parts of the projection process. The diagram below compares where each specification applies before and after scaling.
| Option | Attribute | Trade-off | Best use case |
|---|---|---|---|
| Native resolution | Physical projector panel pixel count | Sets the maximum displayed detail regardless of a higher input signal | Estimating image sharpness and text readability |
| Supported resolution | Accepted source signal | Allows higher-resolution input but may require scaling before display | Checking device compatibility with video sources |
| Displayed detail | Pixels actually shown on the screen | Limited by native resolution, while perceived sharpness also changes with screen size and optics | Judging the final projected image |
For example, a mini projector with a native resolution of 1280 × 720 pixels can accept a 1920 × 1080 source signal if supported, but scaling reduces the image to the projector's native pixel count before projection. The higher-resolution input can preserve compatibility with the source device, yet it does not increase the projector's physical display resolution.
Comparing native resolution with supported resolution reduces the risk of assuming that a 1080p or 4K input label guarantees the same visible detail on the screen.
As explained in the previous section, resolution defines displayed detail rather than complete picture quality. Comparing native resolution with supported resolution reduces the risk of assuming that a 1080p or 4K input label guarantees the same visible detail on the screen.
Movies and Streaming
For movies and streaming, a mini projector delivers better image quality when the streaming source matches or exceeds the projector's native display resolution and the viewing environment supports clear image reproduction. In a dark room, reduced room light helps maintain brightness, contrast, and colour clarity, while good lens quality and accurate focus improve subtitle readability and perceived sharpness across the projected image.
Resolution is only one part of movie clarity.
Resolution is only one part of movie clarity. A larger projected screen spreads the available pixels over a wider area, making source quality, viewing distance, motion, and focus more noticeable; heavily compressed streams can appear softer than high-bitrate content even at the same resolution. This distinction helps explain why the same film can look clearer on one setup without changing the projector's native resolution.
This distinction helps explain why the same film can look clearer on one setup without changing the projector's native resolution.
For example, a streamed movie viewed in a dim room on a moderate-sized screen can preserve finer subtitle edges and shadow detail than the same stream projected much larger in brighter conditions. If movie viewing also places greater importance on motion handling and dark-scene performance, see mini projector image quality for movies for broader viewing considerations beyond resolution alone.
Text, Presentations, and Small Details
Text, presentations, and detailed content require a mini projector to preserve fine image quality because small characters and thin lines reveal loss of sharpness more readily than casual video. Higher native resolution, consistent focus, good lens quality, controlled room light, and suitable viewing distance help maintain readable text, clear spreadsheet lines, and distinct slide graphics by preserving brightness, contrast, and colour clarity.
Text, presentations, and detailed content require a mini projector to preserve fine image quality because small characters and thin lines reveal loss of sharpness more readily than casual video.
Use the following checklist to verify that text remains readable across the projected image:
- Match the source resolution to the projector's native resolution whenever possible to reduce unnecessary scaling.
- Check that focus remains uniform from the centre to the edges so small text stays equally sharp.
- Select a projection size that keeps fonts, spreadsheet rows, and fine slide details readable from the intended viewing distance.
- Reduce room light to improve contrast and minimise a washed-out image when displaying documents or presentations.
- Confirm that thin table borders, chart labels, and small interface elements remain clearly separated rather than blending together.
For example, a presentation containing spreadsheets and small text typically exposes soft focus sooner than a streamed video because readers must distinguish individual characters and narrow lines across the screen. Readability therefore depends on the combined effect of native resolution, focus uniformity, source resolution, and screen size rather than resolution alone.
Portable and Casual Viewing
Portable and casual viewing changes the acceptable image quality threshold because convenience often takes priority over fine detail during short sessions. A mini projector can provide satisfactory results for casual video on a modest projection size when room light is controlled, viewing distance is appropriate, and lens quality, focus, brightness, contrast, and colour clarity remain sufficient for the intended content.
Portable and casual viewing changes the acceptable image quality threshold because convenience often takes priority over fine detail during short sessions.
Use the following criteria to decide whether convenience or higher display detail matters more:
- Keep the projection size modest so the available resolution maintains clearer edge detail.
- Reduce room light to improve contrast and minimise a washed-out image.
- Check that focus stays consistent across the screen, especially near the edges.
- Short travel viewing, children's content, and casual streaming place less emphasis on fine image sharpness than long viewing sessions with detailed visuals.
- Choose a higher native resolution when larger projection sizes or closer viewing distances make fine detail easier to notice.
For example, a portable projector used on battery power for a short travel session in a dark room can prioritise convenience without requiring the same level of display detail expected for longer, clarity-focused viewing. The practical decision signal is whether portability and quick setup are more important than preserving fine visual detail.
Native resolution, supported resolution, and real displayed detail
Native resolution determines the real displayed detail only when the source signal matches or exceeds the projector's native pixel count. Native resolution, supported resolution, and displayed detail describe different stages of the projection process, so comparing them helps explain image clarity, compatibility, and buyer expectations. According to guidance from Lenovo and projector manufacturers, accepted input resolution and displayed output resolution are not the same specification.
According to guidance from Lenovo and projector manufacturers, accepted input resolution and displayed output resolution are not the same specification.
Native resolution, supported resolution, and real displayed detail describe different parts of the projection process. The diagram below compares where each specification applies before and after scaling.
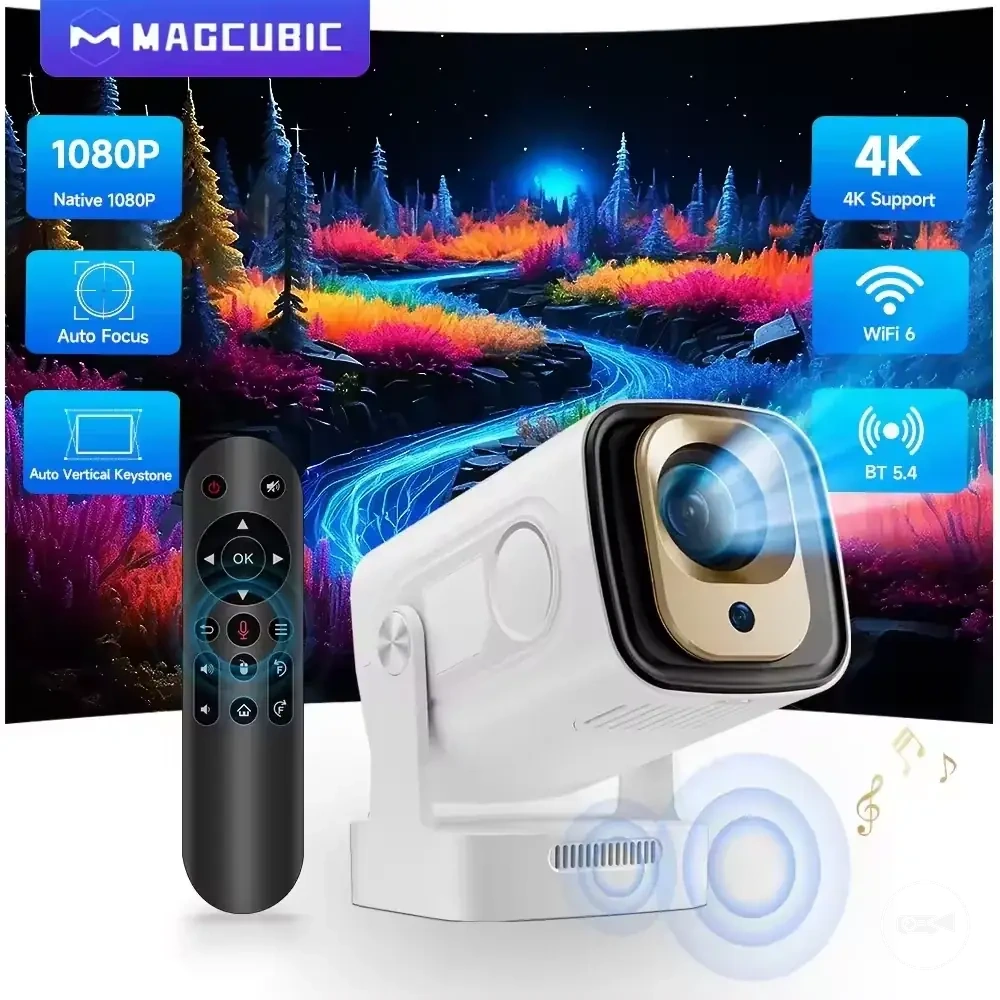
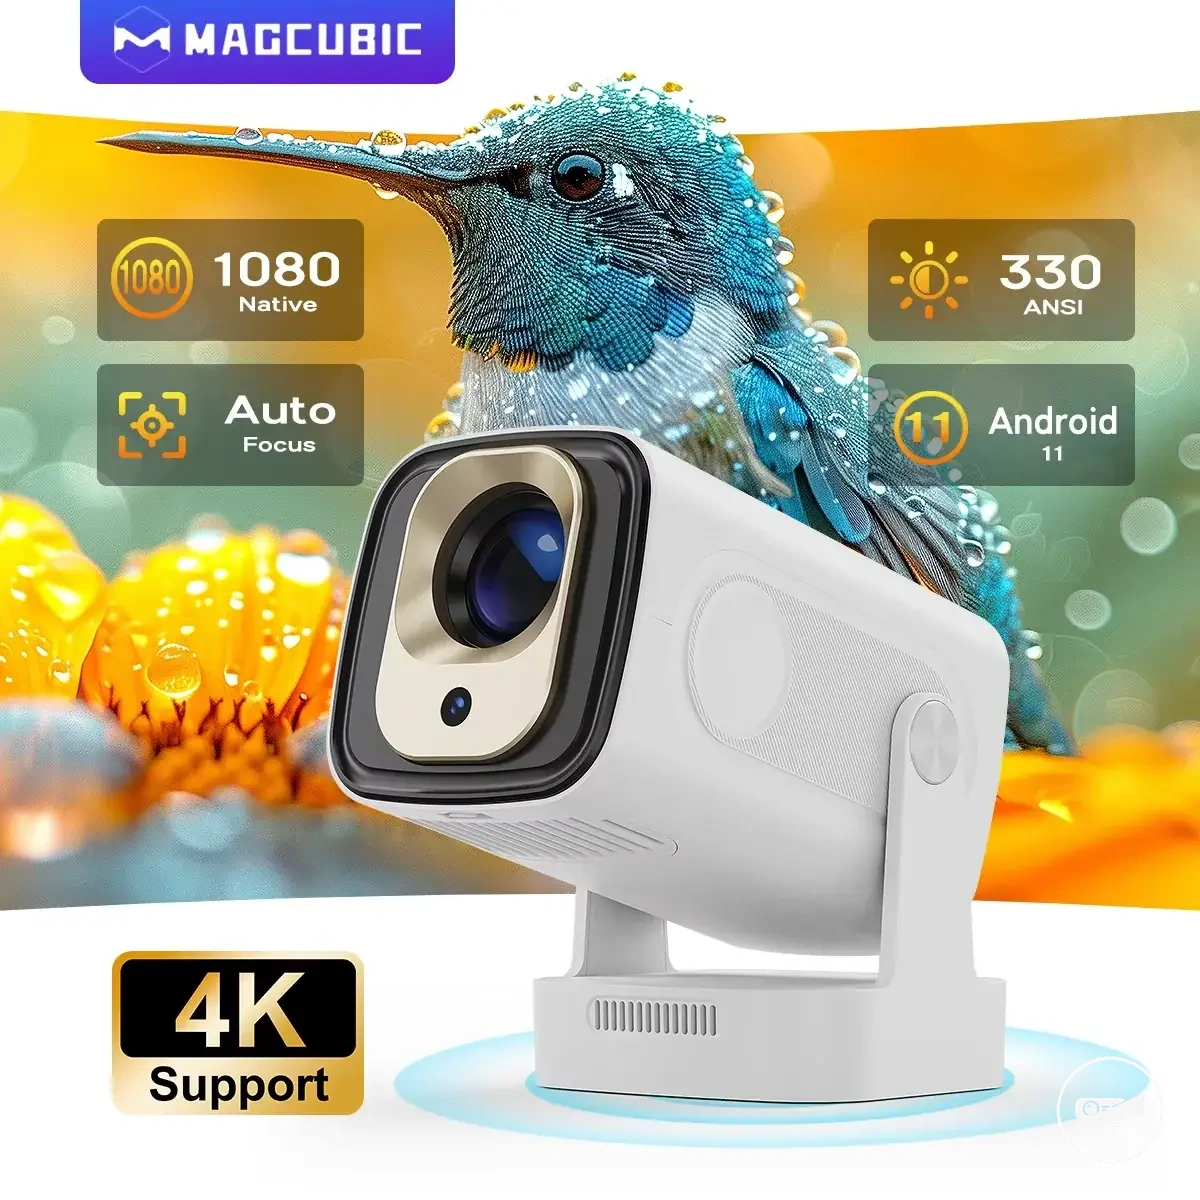
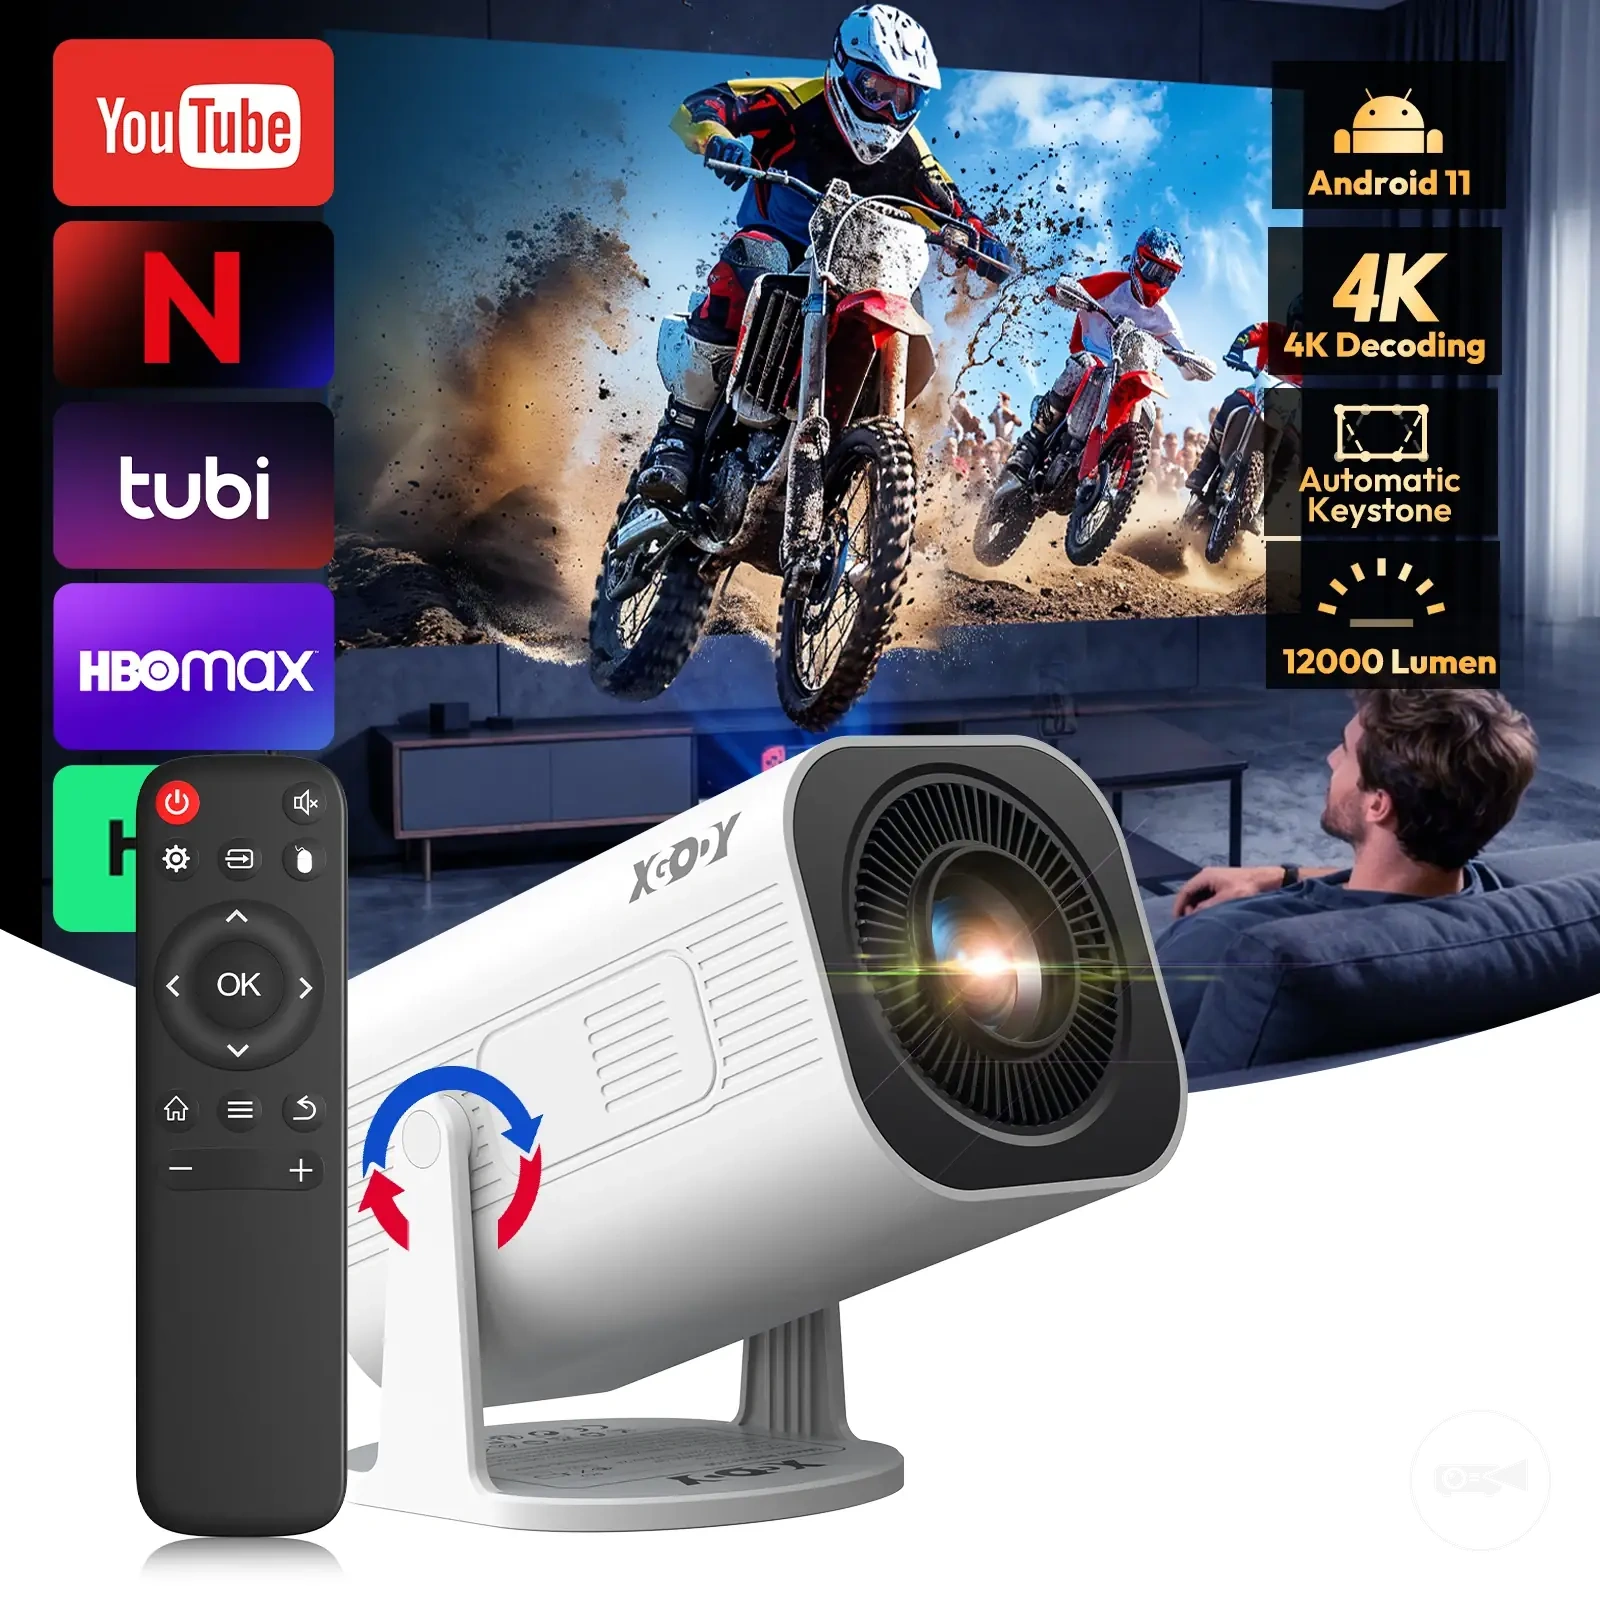
Here are product examples that may make comparison easier.
Here are product examples that may make comparison easier. Before buying, always review the compatibility criteria, essential features, and product details.
| Option | Attribute | Trade-off | Best use case |
|---|---|---|---|
| Native resolution | Physical projector panel pixel count | Sets the maximum displayed detail regardless of a higher input signal | Estimating image sharpness and text readability |
| Supported resolution | Accepted source signal | Allows higher-resolution input but may require scaling before display | Checking device compatibility with video sources |
| Displayed detail | Pixels actually shown on the screen | Limited by native resolution, while perceived sharpness also changes with screen size and optics | Judging the final projected image |
For example, a mini projector with a native resolution of 1280 × 720 pixels can accept a 1920 × 1080 source signal if supported, but scaling reduces the image to the projector's native pixel count before projection. The higher-resolution input can preserve compatibility with the source device, yet it does not increase the projector's physical display resolution.
For example, a mini projector with a native resolution of 1280 × 720 pixels can accept a 1920 × 1080 source signal if supported, but scaling reduces the image to the projector's native pixel count before projection.
As explained in the previous section, resolution defines displayed detail rather than complete picture quality. Comparing native resolution with supported resolution reduces the risk of assuming that a 1080p or 4K input label guarantees the same visible detail on the screen.
Native resolution, supported resolution, and real displayed detail
Native resolution determines the real displayed detail only when the source signal matches or exceeds the projector's native pixel count. Native resolution, supported resolution, and displayed detail describe different stages of the projection process, so comparing them helps explain image clarity, compatibility, and buyer expectations. According to guidance from Lenovo and projector manufacturers, accepted input resolution and displayed output resolution are not the same specification.
Native resolution, supported resolution, and displayed detail describe different stages of the projection process, so comparing them helps explain image clarity, compatibility, and buyer expectations.
Native resolution, supported resolution, and real displayed detail describe different parts of the projection process. The diagram below compares where each specification applies before and after scaling.
| Option | Attribute | Trade-off | Best use case |
|---|---|---|---|
| Native resolution | Physical projector panel pixel count | Sets the maximum displayed detail regardless of a higher input signal | Estimating image sharpness and text readability |
| Supported resolution | Accepted source signal | Allows higher-resolution input but may require scaling before display | Checking device compatibility with video sources |
| Displayed detail | Pixels actually shown on the screen | Limited by native resolution, while perceived sharpness also changes with screen size and optics | Judging the final projected image |
For example, a mini projector with a native resolution of 1280 × 720 pixels can accept a 1920 × 1080 source signal if supported, but scaling reduces the image to the projector's native pixel count before projection. The higher-resolution input can preserve compatibility with the source device, yet it does not increase the projector's physical display resolution.
As explained in the previous section, resolution defines displayed detail rather than complete picture quality. Comparing native resolution with supported resolution reduces the risk of assuming that a 1080p or 4K input label guarantees the same visible detail on the screen.
Focus, Lens, and Placement Causes
A soft image or blurry picture from a mini projector usually indicates a local optical or placement condition before it indicates a limit of native resolution. The most useful checks isolate whether the softness comes from focus, the lens, placement, projection angle, or keystone correction rather than from the video source itself.
Use the following checks to separate the most likely causes without turning diagnosis into a full setup procedure.
Use the following checks to separate the most likely causes without turning diagnosis into a full setup procedure.
- Lens cleanliness: A visibly dusty or marked lens can reduce picture clarity across the entire image.
- Focus setting: If the whole picture appears equally soft, focus may not match the current projection distance.
- Projection angle: An angled placement can reduce edge sharpness even when the centre looks clear.
- Surface flatness: An uneven projection surface can make different parts of the image appear to have different focus.
- Distance: Operating outside the recommended projection distance can make accurate focus harder to achieve.
- Keystone correction: Heavy keystone correction digitally reshapes the image and can increase edge softness while reducing display detail.
A blurry picture is not always caused by insufficient native resolution. For example, if the centre of the image is sharp but the edges remain soft, projection angle or keystone correction is a more likely cause than source quality; if the entire picture lacks detail after focus and placement checks, source quality, scaling, or compression is more likely limiting image sharpness.
Resolution Mismatch and Digital Correction Causes
A soft image or blurry picture from a mini projector can result from resolution mismatch, scaling, compression, or digital correction rather than from focus, lens, or placement alone. The likely technical cause is reduced detail during image processing when the source resolution does not match the projector's native resolution or when digital correction changes the displayed image.
Use the following checks to identify whether technical processing is reducing picture clarity.
Use the following checks to identify whether technical processing is reducing picture clarity.
- Source-to-projector mismatch: A source above or below the projector's native resolution requires scaling before display.
- Scaling: Image scaling can reduce visible detail, with the effect depending on the projector's processing quality.
- Compression: Low-quality files or heavily compressed video can remove fine texture before the image reaches the projector.
- Keystone correction: Strong keystone correction digitally reshapes the image and can increase edge softness while reducing display detail.
- Processing chain: If focus, lens, and placement checks are satisfactory but the picture remains soft, resolution mismatch or digital processing is the more likely cause.
A blurry picture is not always caused by low native resolution alone. For example, a high-resolution video that is heavily compressed or extensively corrected with keystone adjustment can still appear softer than expected, while improving source quality helps only within the mini projector's native resolution and optical limits.