
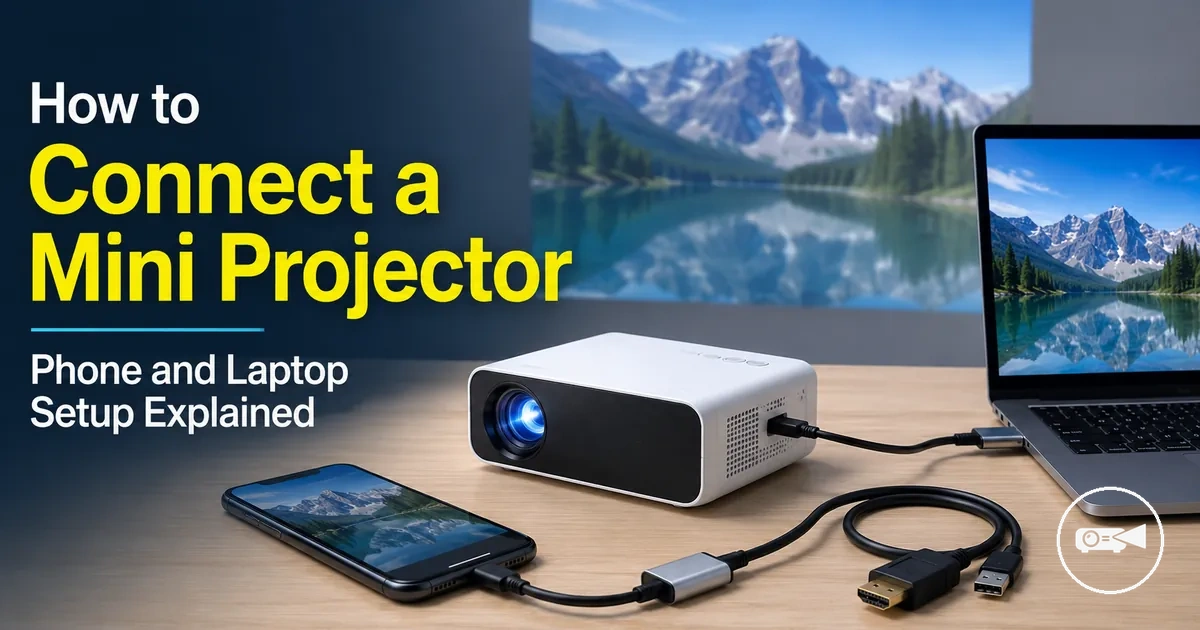
How to Connect a Mini Projector
Connect a mini projector by matching the projector input with the video output of the source device, then select the corresponding input source. The main connection variables are the available ports, the phone or laptop output, the cable or wireless method, and the selected projector input.
A mini projector with compatible screen mirroring or casting can use a wireless display connection over Wi-Fi.
A laptop with HDMI can use a direct HDMI cable, while a phone may require a USB-C or Lightning HDMI adapter that supports video output. A mini projector with compatible screen mirroring or casting can use a wireless display connection over Wi-Fi. Wired video and wireless display carry the picture, whereas Bluetooth audio pairs the projector or source device with a speaker for sound output.
A laptop with HDMI can use a direct HDMI cable, while a phone may require a USB-C or Lightning HDMI adapter that supports video output.
If the mini projector shows no signal, confirm that the selected input source matches the connected port, reseat the cable, and check that the adapter and source device support video output. For example, a laptop connected to HDMI 1 must use the projector's HDMI 1 input, and its display mode may need to be set to duplicate or extend the screen. Available ports, casting methods, permissions, and audio routing remain model-dependent, so deeper no-signal repair should follow the instructions for the specific projector and source device.
This connection check is separate from projector placement, image alignment, and the rest of the physical setup.
Before starting, identify the projector input and the source-device output, then choose one supported path: direct HDMI, a video-capable adapter, or a compatible wireless display method. This connection check is separate from projector placement, image alignment, and the rest of the physical setup.
Table of Contents
Mini Projector Connection Requirements Before You Start
Check that the mini projector, source device, and connection method are ready before attempting a connection. Connection readiness requires a powered projector, a matching projector input and source-device output, a complete signal path, and the correct input source selected so the video signal can reach the display.
Check that the mini projector, source device, and connection method are ready before attempting a connection.
The image below identifies the main connection requirements to verify before choosing a wired or wireless connection method.
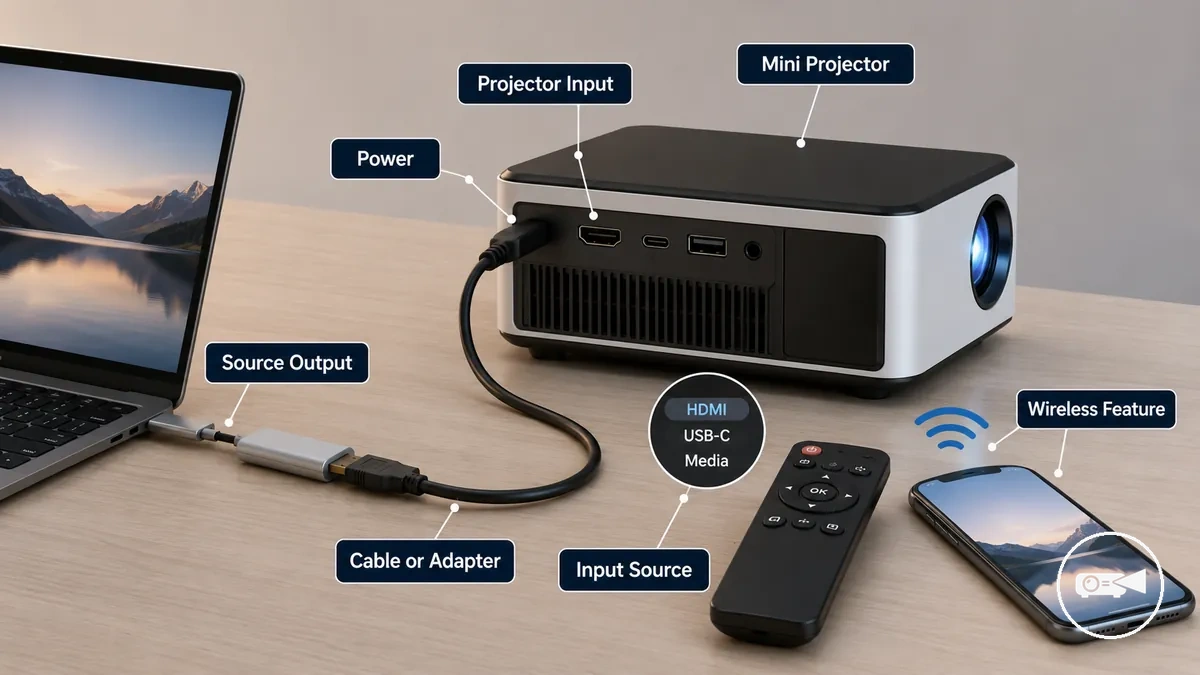
If a phone or laptop appears compatible but does not display an image, confirm that its device port supports video output, any required adapter carries video rather than only charging or data, and the necessary permission setting for screen mirroring or casting has been approved when using a wireless feature. These checks establish the required connection conditions before continuing with this mini projector guide.
Complete the checklist below before moving to connection-specific instructions.
If no image appears after connecting, first verify that the projector has power, the correct input source is selected, and the signal path is complete from the source device to the projector. For example, selecting HDMI 2 while the cable is connected to HDMI 1 results in a no-signal condition until the matching input is selected. Complete the checklist below before moving to connection-specific instructions.
- Confirm the mini projector is connected to a power supply or has enough battery power to remain switched on during use.
- Verify that the projector input matches the source-device output, such as HDMI to HDMI or a supported USB-C video connection through a compatible adapter.
- Check that the cable or adapter supports video output rather than charging or data transfer only.
- If using a wireless feature, confirm that both devices support the same casting or screen-mirroring method and are ready to establish the connection route.
- Allow any required permission setting on the phone or laptop so video output or wireless display can begin.
- If Bluetooth audio will be used, pair the audio device separately because Bluetooth carries sound output rather than the projected video.
These checks confirm connection readiness only and do not cover projector placement, screen positioning, or physical installation. Continue with the mini projector setup steps when you are ready to position and configure the projector.
Ports, Cables, and Adapters for Mini Projector Connections
A mini projector connection is compatible when the mini projector port matches the source output through the correct cable, adapter, or wireless feature. HDMI provides a direct video and audio connection, while USB-C, Lightning, AV cable, and wireless casting each require a compatible condition between the source output and the projector input. Matching the projector port to the source output determines the correct connection route.
Matching the projector port to the source output determines the correct connection route.
The image below identifies the ports, cables, and adapters that decide how the video signal reaches the mini projector and helps distinguish physical video connections from wireless display and Bluetooth audio options.
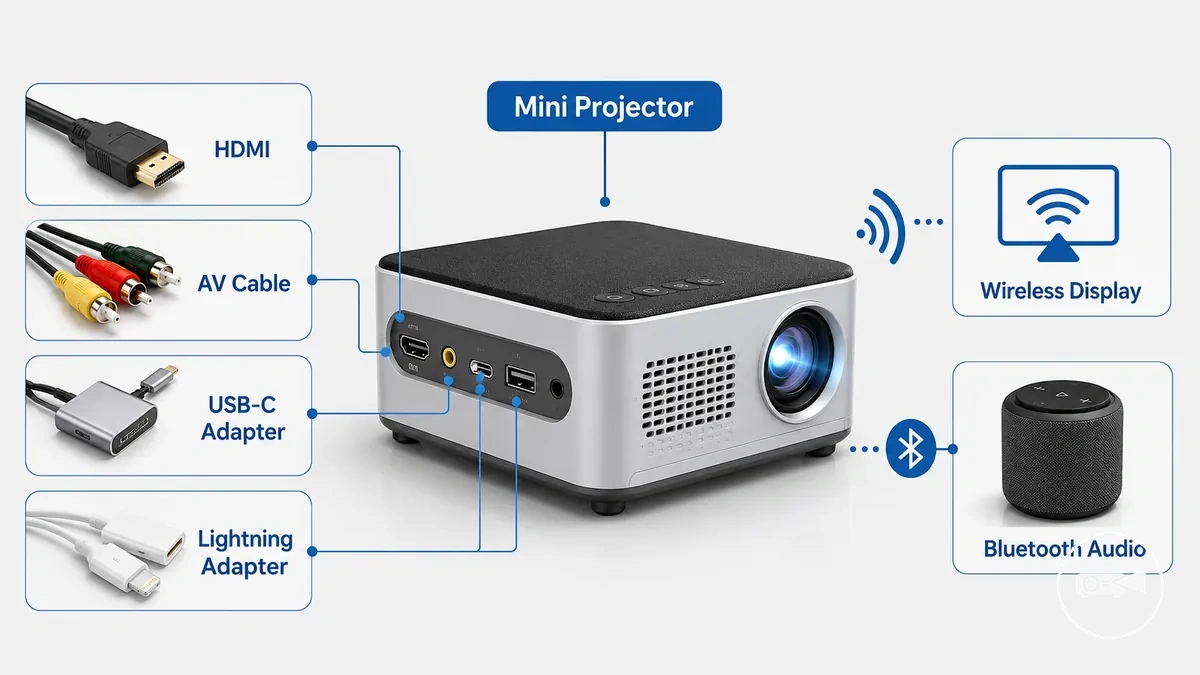
If a phone or laptop does not share the same connector as the projector, a compatible adapter must support video output instead of charging or data only. For example, a USB-C charging cable without DisplayPort Alt Mode support can charge a phone but still produce no image on the projector. The comparison below summarises the criteria for mini projector connectivity.
| Connection route | Required port or feature | What must match | Possible outcome |
|---|---|---|---|
| HDMI | HDMI projector port and HDMI source output | HDMI cable connected to the selected input source | Video and audio can pass through one cable when both devices support HDMI output. |
| AV cable | AV projector input and compatible AV source output | Matching analogue connectors and the correct input source | Analogue video and audio can display when both devices support AV connections. |
| USB-C adapter | USB-C source output with video support | USB-C adapter and source device that support video output | Video can display; USB-C ports limited to charging or data produce no image. |
| Lightning adapter | Lightning device with a video-capable adapter | Lightning adapter connected to a compatible projector input | Video can display when the adapter supports video output; unsupported adapters result in no signal. |
| Wireless display | Wi-Fi and supported wireless casting feature | Compatible casting method, permission approval, and correct input source | Video and audio can display wirelessly after screen mirroring is established. |
| Bluetooth audio | Bluetooth support on paired devices | Successful audio pairing with a speaker or audio device | Transfers sound only and does not transmit the projected video. |
Bluetooth audio supports sound playback only and is not a replacement for a video cable or wireless display connection between a source device and a mini projector.
HDMI and AV Cable Connections
HDMI and AV cable connections are compatible when the cable matches both the projector input and the source output. An HDMI cable carries a digital video signal and audio through one connection, while an AV cable carries analogue video and audio through a composite AV connection used by compatible devices. This distinction separates HDMI from AV for wired mini projector connections.
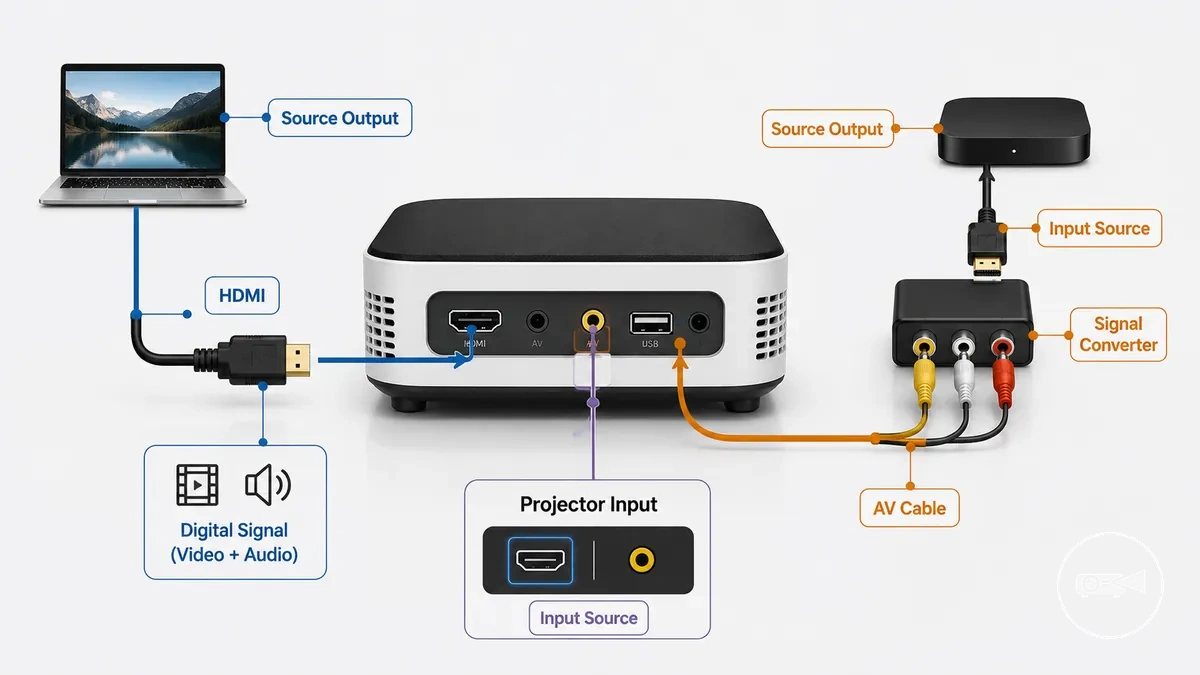
If an older source device provides only composite AV but the projector expects HDMI, a compatible signal converter is typically required because the two signal types are different. The points below compare the common wired connection conditions.
- HDMI cable: Requires an HDMI projector input and an HDMI source output. It carries digital video and audio through one cable when both devices support HDMI, but it cannot connect directly to a composite AV input without compatible signal conversion.
- AV cable: Requires a composite AV projector input and a matching composite AV source output or a compatible adapter. It carries analogue video and audio and is commonly used with older media players, DVD devices, or legacy game consoles.
- Input source: Select the projector input source that matches the connected HDMI or AV cable; otherwise, the projector is likely to display no image even when the cable is physically connected.
- Signal behaviour: HDMI and AV use different signal formats. For example, connecting an HDMI-only laptop to an AV-only projector requires a compatible HDMI-to-AV converter rather than a passive cable because the digital signal must be converted into a composite analogue signal.
USB-C and Lightning Phone Adapters
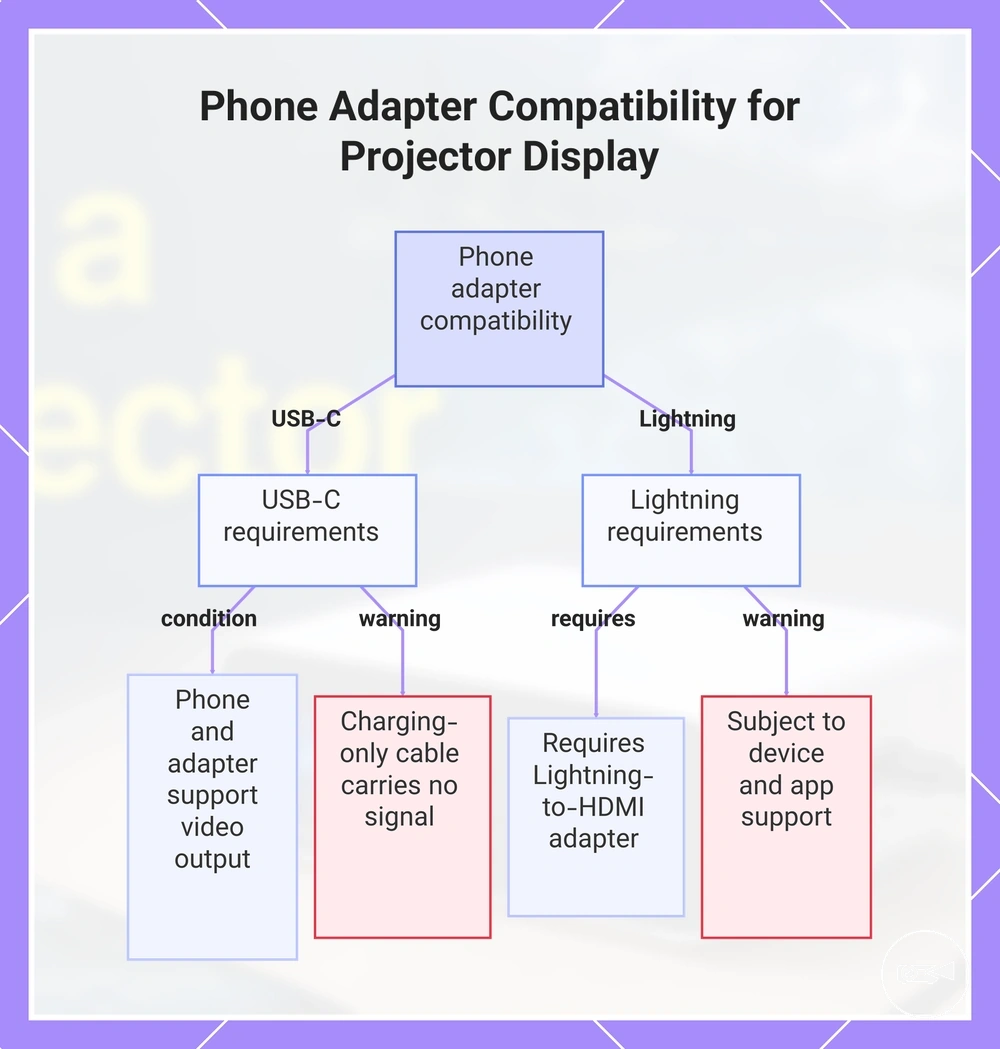
USB-C and Lightning phone adapters are compatible with a mini projector only when the phone adapter supports video output and matches the projector input. A USB-C connector alone does not indicate display support, and a Lightning connection requires a compatible HDMI adapter for a wired video signal. Adapter capability matters more than connector shape alone.
- USB-C: A USB-C phone connector supports a projector display only when both the phone and the USB-C display adapter support video output to the projector input. A charging-only cable transfers power but carries no display signal.
- Lightning: An iPhone with a Lightning connector requires a compatible Lightning-to-HDMI adapter connected to an HDMI projector input for wired screen mirroring. App playback and video output remain subject to device and app support.
- Phone adapter: Match the phone adapter to both the phone connector and the projector input. For example, a USB-C phone with DisplayPort Alt Mode requires a compatible USB-C-to-HDMI display adapter before it can send a video signal to an HDMI projector.
- Charging-only cable: A charging-only cable cannot replace a display adapter because it supplies power without transmitting the video output needed for screen mirroring on the projector.
This chart shows the key compatibility requirements for USB-C and Lightning phone adapters when connecting to a mini projector, including the warning about charging-only cables.
Wireless Display Adapters and Built-In Casting
Wireless display is compatible when the mini projector or a wireless display adapter supports the same casting method as the source device, and the required Wi-Fi connection, pairing, and permissions are available. Built-in casting uses the projector's integrated wireless receiver, while an external wireless display adapter connects through the projector's HDMI input.
These conditions determine whether the display session can begin without turning this into a full setup process.
If the projector and source device cannot detect each other, first confirm that the required network connection or pairing method is active and that the source device has approved any screen mirroring permissions. These conditions determine whether the display session can begin without turning this into a full setup process.
If the projector and source device cannot detect each other, first confirm that the required network connection or pairing method is active and that the source device has approved any screen mirroring permissions.
The following checklist helps confirm wireless display compatibility:
- Casting support: Verify that both the source device and the projector wireless feature or wireless display adapter support the same screen mirroring technology before attempting to connect.
- Network state: Use the Wi-Fi or direct pairing method required by the selected casting system. If the required network condition is not met, the projector will not appear as an available display.
- Receiver mode: Select the projector's built-in casting mode or the HDMI input connected to the wireless display adapter so the source device can locate the correct receiver.
- Permissions: Accept any permission prompts for screen mirroring or local network access. Without these permissions, the source device may connect but fail to transmit video.
- Display quality: Wireless display can introduce higher latency or lower image quality than a direct cable connection because the video signal is transmitted wirelessly. In normal mini projector use, Bluetooth audio is not the video path for screen mirroring.
How to Connect a Phone to a Mini Projector
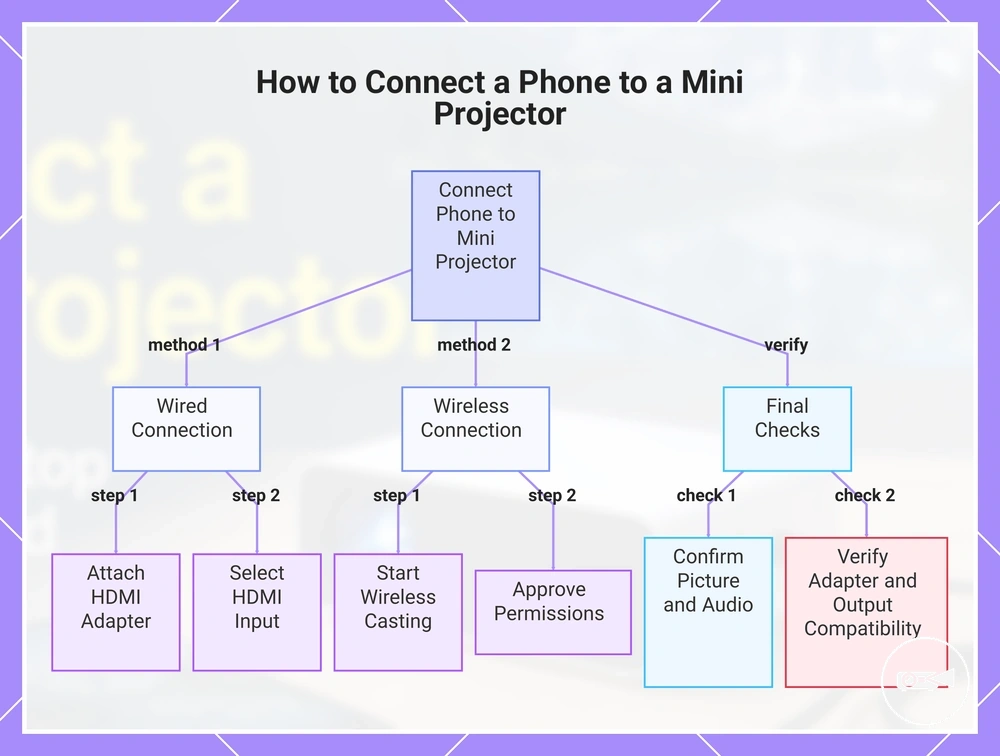
You can connect a phone to a mini projector with a compatible HDMI adapter or by using wireless casting, depending on the phone's supported video output and the projector's connection features. A wired connection requires a compatible adapter that supports video output, while wireless casting requires compatible screen mirroring support. Choose the connection method that matches your phone and mini projector before starting.
Follow these steps to complete the phone-to-projector connection.
If your phone supports the selected connection method, complete the setup by following the matching connection path. For example, a phone with video output can use an HDMI adapter, while a phone and mini projector that both support screen mirroring can connect through wireless casting. Follow these steps to complete the phone-to-projector connection.
- Check the available input on the mini projector. If you are using a cable, confirm that the required HDMI input is available before connecting the adapter.
- Choose the correct connection method. Use a compatible HDMI adapter when the phone supports video output, or select wireless casting if both the phone and mini projector support screen mirroring.
- Connect the phone or start pairing. Attach the HDMI adapter for a wired connection, or begin wireless casting and complete the required Wi-Fi pairing when using a wireless connection.
- Select the correct input source on the mini projector. Choose the HDMI input for a wired connection or the projector's casting mode for wireless display.
- Approve any permission prompt on the phone. Screen mirroring or local network permission must be accepted before the projector can display the phone screen when requested by the operating system.
- Confirm that both picture and audio are working. If no image appears, check for unsupported video output or an adapter mismatch, and note that protected content in some apps may not allow screen mirroring or external display playback.
This chart shows the two main connection methods (wired and wireless) and the final verification steps to successfully connect a phone to a mini projector.
Android Phone Connections
An Android phone connects to a mini projector through a compatible HDMI adapter when the phone supports USB-C video output, or through casting when both devices support screen mirroring. Check USB-C video support or casting support first because the USB-C connector alone does not confirm display output.
- Check whether the Android phone supports USB-C video output or wireless casting. If the USB-C port is for charging only, use a compatible casting method instead of an HDMI adapter.
- Connect the Android phone with a compatible HDMI adapter or start casting to the projector's wireless receiver. If you use casting, complete pairing and accept any permission prompt required for screen mirroring.
- Select the correct projector input. Choose the HDMI input for a wired connection or the projector's casting mode when using the wireless receiver.
- Confirm that the projector displays the phone screen. If no image appears, verify USB-C video support, check that the HDMI adapter matches the phone connection, or confirm that the selected casting method is supported by the projector's wireless receiver.
iPhone Connections
An iPhone connects to a mini projector by using a compatible Lightning adapter or USB-C display adapter with HDMI, or through compatible wireless casting. Choose the correct connection method based on the iPhone connector type and available casting support before starting.
- Identify whether the iPhone uses a Lightning connector or USB-C. Use a compatible Lightning adapter or USB-C display adapter for an HDMI connection if you are using a cable.
- Connect the display adapter to the iPhone and plug the HDMI cable into the projector, or start wireless casting if the projector supports screen mirroring through a compatible wireless receiver. Approve any permission request shown on the iPhone.
- Select the correct projector input. Choose the HDMI input for a wired connection or the projector's casting mode for wireless casting.
- Confirm that both image and audio are playing through the projector. If an app uses protected playback, screen mirroring or HDMI output for that content may be restricted even when the iPhone connection is working correctly.
How to Connect a Laptop to a Mini Projector
A laptop connects to a mini projector through HDMI, USB-C video output, or a compatible wireless display connection when both devices support the selected method. Start by identifying the laptop's display output, then match it with the correct projector input using HDMI, USB-C video output, or wireless display.
Once the projector is detected, follow these steps to complete the connection.
If the projector does not display the laptop screen after connecting, confirm that the selected projector input matches the active connection and then choose the appropriate display mode on the laptop. Once the projector is detected, follow these steps to complete the connection.
| Connection route | Use this when |
|---|---|
| HDMI | Both the laptop and mini projector include HDMI ports. |
| USB-C video output | The laptop supports USB-C video output and a compatible cable or adapter is available. |
| Wireless display | Both the laptop and mini projector support the same wireless display or screen mirroring technology. |
- Identify the laptop's display output and choose the matching connection route. If USB-C is available, confirm that the port supports video output before using a USB-C cable or adapter.
- Connect the HDMI cable, USB-C display adapter, or wireless display connection, then verify that the mini projector detects the connected source.
- Select the matching projector input. Choose the HDMI input for a wired connection or the wireless display source for a wireless connection.
- After the projector detects the laptop, choose the required display mode. Select Duplicate screen to mirror the laptop display or Extend display to use the projector as a second display.
- Adjust the display resolution only if the projected image is cropped, distorted, or not displayed correctly. Use a resolution supported by both the laptop and the mini projector.
- Check the audio routing if sound should play through the projector. HDMI commonly carries audio when supported, while wireless display or other connection methods may require selecting the projector as the active audio output device.
How to Connect a Mini Projector Wirelessly
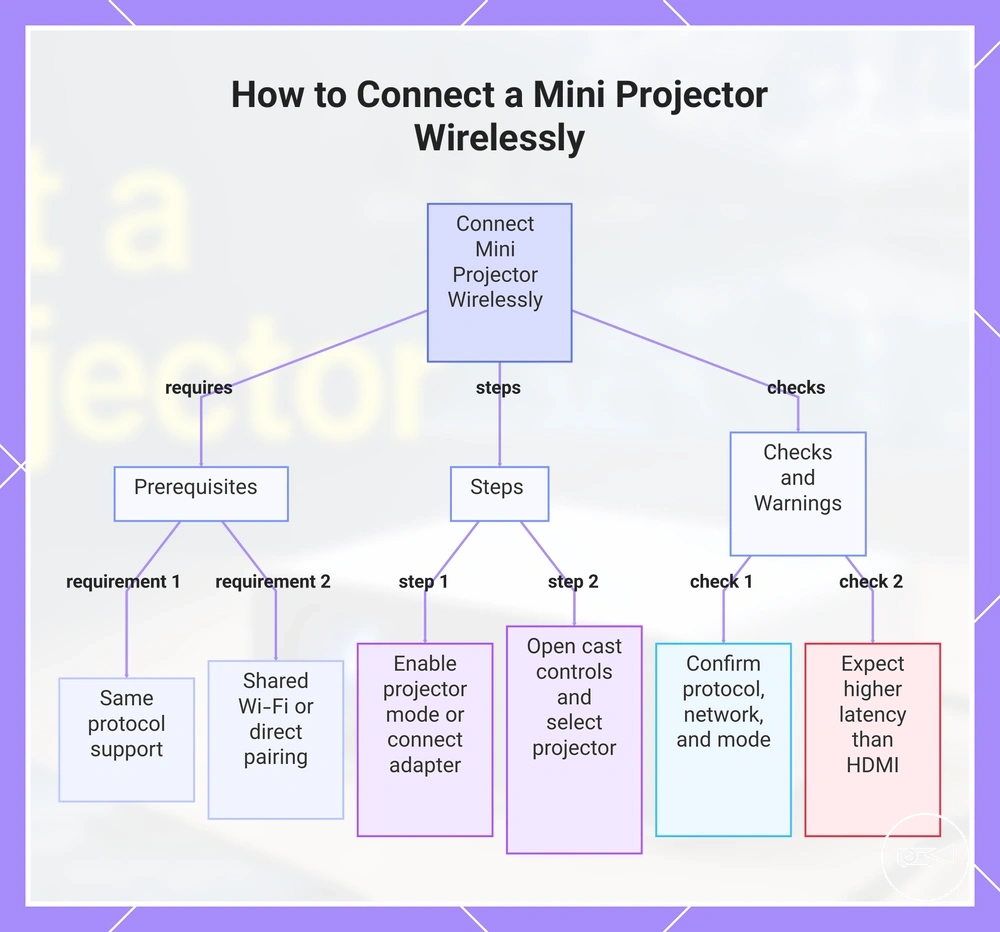
A mini projector can connect without a physical video cable by using a compatible wireless display method such as Wi-Fi casting, screen mirroring, or an external wireless display adapter connected to the projector's HDMI input. Choose the connection method supported by both the mini projector and the source device because they must use the same wireless route to establish a display connection.
Follow these steps to complete the connection.
If the connection is not detected, first confirm that the projector wireless mode is enabled and that the required network or direct pairing condition is satisfied. Shared Wi-Fi is commonly required for casting, while some wireless receivers support direct pairing without joining the same network. Follow these steps to complete the connection.
- Enable the projector wireless mode or connect an external wireless display adapter to the projector's HDMI input if the projector does not provide built-in wireless display support.
- Connect the source device to the required shared Wi-Fi network or complete direct pairing when the projector or wireless receiver supports that connection method.
- Open the source device's cast screen or screen mirroring controls, then select the mini projector or wireless receiver from the available devices.
- Approve any permission request displayed on the source device or projector, then wait for the display connection to finish.
- Verify that the projected image appears correctly. Wireless display latency and image quality can differ from an HDMI connection because they depend on the selected casting method, network state, and wireless receiver.
- Confirm that both devices support the same wireless display protocol.
- Verify that the required shared Wi-Fi connection or direct pairing method is active.
- Check that the projector is in the correct receiver or casting mode before attempting to connect.
- Expect higher latency than a direct HDMI connection when using Wi-Fi casting or screen mirroring.
This chart shows the prerequisites, steps, and key checks for wirelessly connecting a mini projector to a source device.
Bluetooth Audio Setup for a Mini Projector
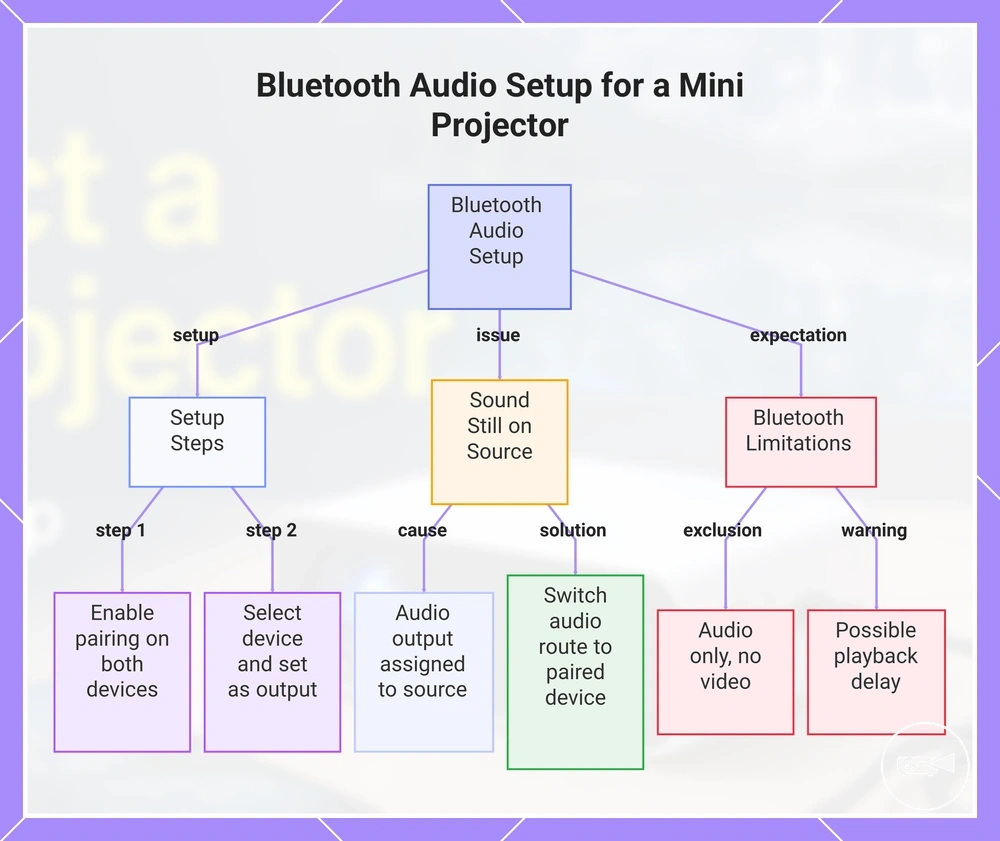
Bluetooth audio on a mini projector is normally used to route sound to or from compatible speakers or headphones rather than transmit the projected image. Pair the audio device through the projector's Bluetooth settings, then select it as the active audio output. In normal use, Bluetooth is intended for sound instead of video.
In normal use, Bluetooth is intended for sound instead of video.
If the picture appears on the projector but sound continues to play through the phone or laptop, the audio output is still assigned to the source device. Switch the audio route to the paired Bluetooth device or projector output setting, then complete the pairing process by following these steps.
- Open the mini projector's settings and enable Bluetooth audio or pairing mode.
- Place the Bluetooth speaker or headphones into pairing mode so the projector can detect the audio device.
- Select the detected speaker or headphones from the projector's Bluetooth device list and complete the pairing request.
- Choose the paired device as the active audio output if multiple sound outputs are available.
- Play a video or music file to confirm that sound is routed through the paired device. Wireless sound can introduce playback delay, so audio sync may differ from a wired connection.
- Bluetooth is used for audio routing and does not normally carry the projected video.
- If sound remains on the phone or laptop after the image appears on the projector, change the source device's selected audio output to the paired Bluetooth device when required.
- The speaker or headphones must remain connected after pairing for continuous playback.
- Playback delay depends on the mini projector, the paired audio device, and the Bluetooth connection, so perfect lip sync should not be expected.
This chart shows the setup process, common issue, and key expectations for using Bluetooth audio with a mini projector.
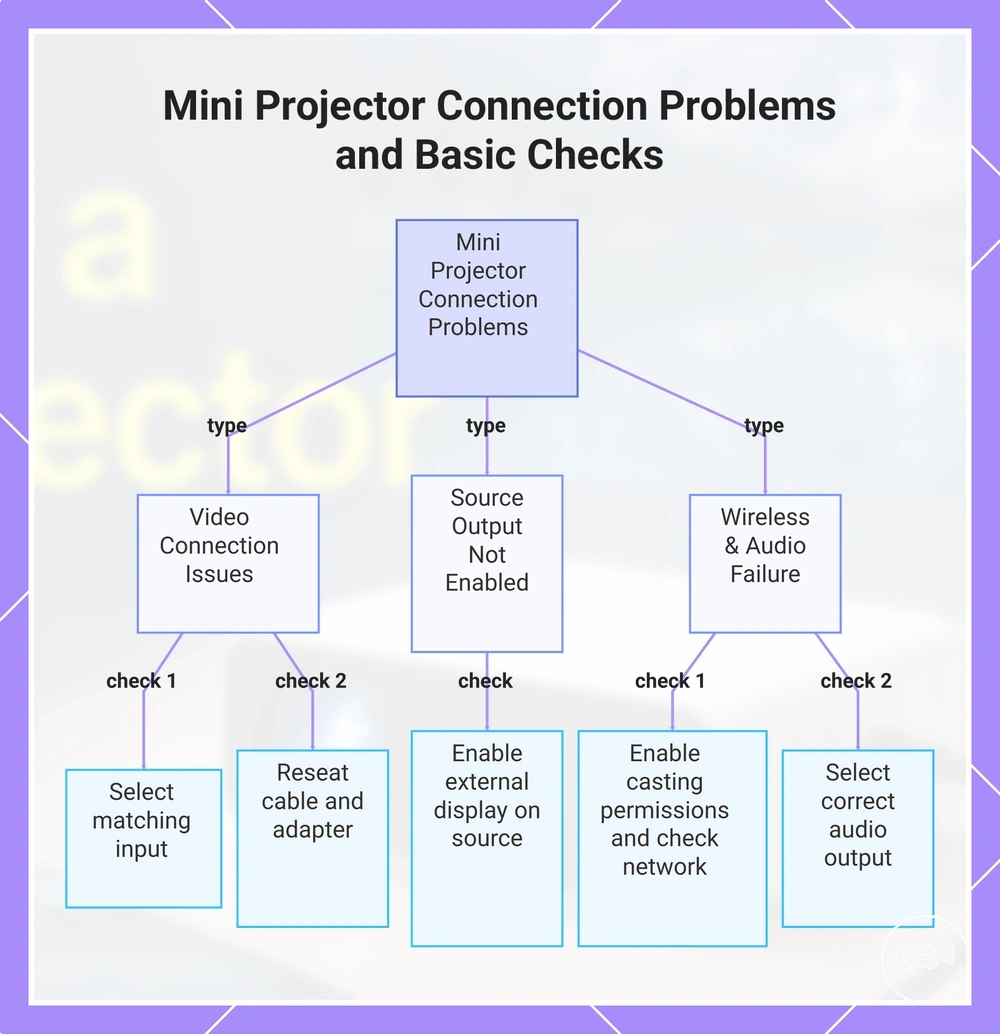
Mini Projector Connection Problems and Basic Checks
If a mini projector shows no signal, no image, or no sound, the connection problem is most likely linked to input selection, a cable mismatch, an adapter mismatch, the source output setting, wireless permissions, or audio routing. Start with these connection-focused checks before moving to a deeper diagnostic path.
Start with these connection-focused checks before moving to a deeper diagnostic path.
Use the symptom to identify the likely cause, verify the relevant condition, and then apply the next basic action. Work through this checklist from the simplest checks to the deeper connection checks.
- Symptom: No signal. Likely cause: Incorrect input selection. Check: Confirm that the mini projector is set to the same input used by the connected cable or adapter. Next action: Select the matching input and test the connection again.
- Symptom: No image. Likely cause: A loose cable, cable mismatch, or adapter mismatch. Check: Reseat both ends and confirm that the connector and adapter type match the mini projector and source device. Next action: Reconnect the compatible cable or adapter and retest the display.
- Symptom: No image after the source device is connected. Likely cause: The source output is not assigned to the external display. Check: Confirm that the phone or laptop has enabled its external display or screen-sharing output. Next action: Select the projector as the active display output.
- Symptom: Wireless casting does not start. Likely cause: Wireless permissions are blocked or the network state does not meet the connection requirement. Check: Confirm that casting permission is enabled and that the projector and source device are using the required shared network or direct pairing state. Next action: Correct the permission or network condition and retry the connection.
- Symptom: No sound. Likely cause: Audio routing is assigned to the wrong output or Bluetooth pairing is incomplete. Check: Confirm that the selected output setting points to the mini projector, its speaker, or the intended paired audio device. Next action: Change the audio output and test playback again.
If no signal persists after these basic checks, continue with the dedicated no signal troubleshooting guide for a deeper diagnostic path.
If no signal persists after these basic checks, continue with the dedicated no signal troubleshooting guide for a deeper diagnostic path.
This chart groups the basic connection checks for common mini projector problems by symptom type, showing the recommended action for each issue.
No Image or No Signal Checks
No image or no signal usually means the projector input, signal path, adapter support, or display-output setting does not match the active connection. Check each image-related item in order before moving beyond basic connection diagnostics.
- Projector input: Confirm that the selected projector input matches the connected input source. If the image appears after changing the input, the incorrect input was selected; if no signal remains, continue to the next check.
- Cable and signal path: Disconnect and reconnect the cable securely at both ends. If the image returns, the signal path was interrupted by a loose connection; if the screen stays blank, continue with the adapter check.
- Adapter support: Verify that the adapter supports video output for the connected source device rather than charging or data transfer only. If a compatible adapter restores the image, the previous adapter did not support the required video signal; if not, check the display-output setting.
- Display-output setting: Enable the source device's external display, duplicate screen, or screen-mirroring option as appropriate. If the projector shows the image, the source output was previously inactive; if no image remains, continue with the final check.
- Signal-path confirmation: Test the same source device, cable, or adapter with another compatible display when available. If the alternate display works, the original projector input or connection remains the likely point to recheck; if it also shows no signal, the cable, adapter, or source output is the most likely connection issue.
No Sound or Bluetooth Pairing Checks
No sound is usually caused by the selected audio output, Bluetooth pairing state, cable capability, or app behavior rather than the video connection. Use these audio-specific checks to identify whether the sound should play through the projector speaker, headphones, or another audio route.
- Audio output: Confirm that the source device is sending audio to the intended output. If the projector speaker starts playing sound after changing the output setting, the previous audio route was incorrect; if silence continues, proceed to the next check.
- Bluetooth pairing: Verify that the paired speaker or headphones are connected as the active playback device. If sound returns after reconnecting the pairing, the previous pairing state was incomplete; if not, continue with the cable check.
- Cable capability: Confirm that the connected cable supports audio as well as video where required. If replacing the cable restores sound, the original cable could not carry the expected audio signal; if video works but no sound is heard, continue with the app check.
- App behavior: Check that the app is not muted and is using the expected audio output. If audio plays correctly in another app but not the current one, the sound issue is likely limited to that app's output setting.
- Delay or silence: A short delay can occur after changing an audio route or wireless sound connection. If video appears while audio remains silent, recheck the selected audio output because the source device may still be routing sound to another speaker or headphones.