How to Set Up a Mini Projector
Mini projector setup starts by placing the projector on a stable support, aiming it at a clear projection surface, connecting power, and adjusting the projected image for first use. A usable viewing setup requires controlled room light, suitable placement, image alignment, focus, an active input source, and open ventilation space.
The support position should remain level and secure while the power and source cables reach their connections without tension.
For first use, choose a flat screen or smooth wall, position the mini projector so its viewing direction is unobstructed, and route each cable where it will not be pulled or create a trip hazard. The support position should remain level and secure while the power and source cables reach their connections without tension. Use the mini projector guide for broader buying and feature context; this setup process does not replace detailed connectivity instructions, blurry-image repair, overheating fixes, or buying advice.
These checks establish the placement, power, alignment, source-confirmation, and airflow requirements for the setup.
Common setup problems begin when the projector is angled sharply, placed on an unstable surface, positioned outside the distance supported by its manual, or operated with blocked vents. Correct the physical placement first, centre the projected image on the screen, adjust focus until visible text and edges appear sharp, and use keystone only when the model provides that control and physical realignment cannot square the image. These checks establish the placement, power, alignment, source-confirmation, and airflow requirements for the setup.
This keeps the projector aligned physically and uses the model-dependent control only for the remaining distortion.
For example, if the image is wider at the top than at the bottom, level and reposition the mini projector before applying keystone correction. This keeps the projector aligned physically and uses the model-dependent control only for the remaining distortion.
Mini projector setup moves from preparing the room to confirming a stable picture and signal.
Mini projector setup moves from preparing the room to confirming a stable picture and signal. Complete the phases in this order while following the device manual for model-specific distances, controls, inputs, and accessory fit.
- Select a smooth projection surface and reduce direct light falling on the screen or wall.
- Place the mini projector on a level, stable support at a height and angle that centre the image.
- Leave the intake and exhaust vents uncovered and keep loose objects away from the airflow path.
- Connect the specified power supply and arrange cables along a secure path without tension.
- Choose a supported input source and confirm that the projector displays its signal.
- Move or level the projector to align the image, then adjust focus and any available keystone control.
- Play a short sample and confirm that the image remains sharp, centred, stable, and unobstructed.
Table of Contents
Mini projector setup requirements before first use
Mini projector setup requirements before first use include verifying the projector, power adapter, projection surface, support, input source, and essential accessories before switching the device on. Confirming these items in advance reduces setup delays and helps provide stable operation, reliable signal detection, good image quality, and safe use.
The checklist below verifies the required items before powering on.
Missing small items can interrupt first-use setup even when the mini projector itself is functioning correctly. A missing remote, an incompatible HDMI cable, an uneven support surface, or a power outlet beyond the adapter's reach can delay image configuration or signal confirmation. The checklist below verifies the required items before powering on.
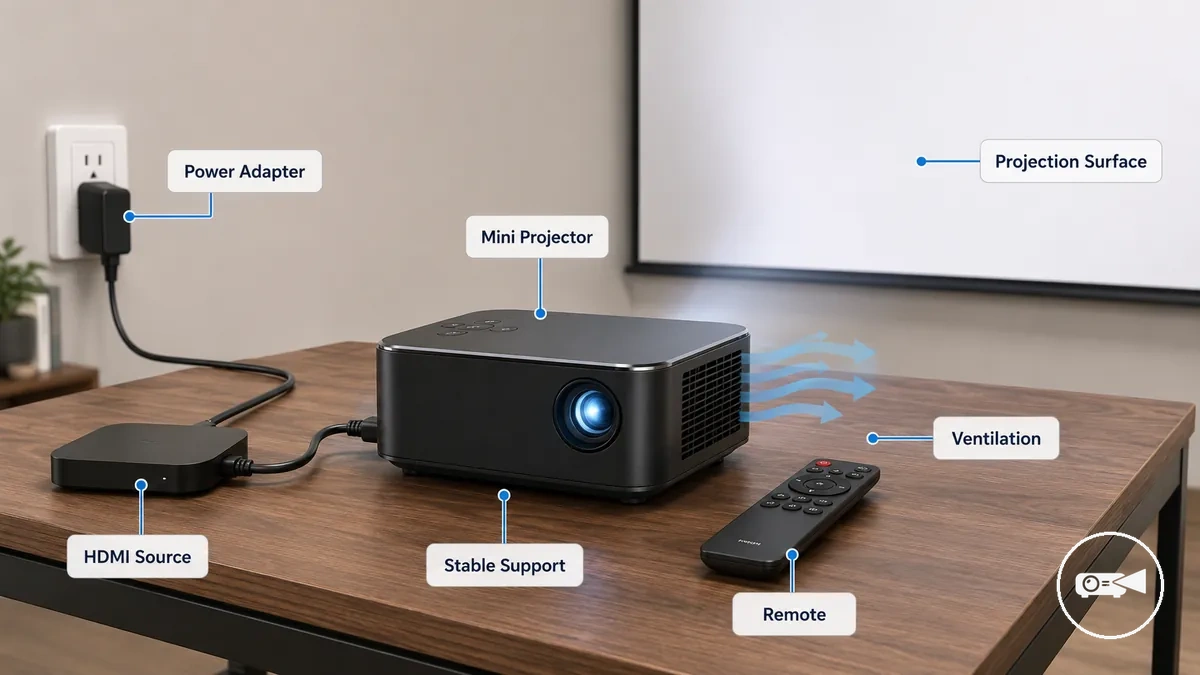
- Setup item – Mini projector: Verify the projector is free from visible damage and positioned for first use. Required condition: The unit is ready for operation. Effect: Physical issues are identified before setup begins.
- Setup item – Power adapter: Verify the supplied power adapter matches the projector model and can reach a nearby electrical outlet without placing strain on the cable. Effect: The projector receives safe and stable power.
- Setup item – Projection surface: Verify a flat wall or projection screen is available. Effect: A smooth viewing surface supports clearer image alignment and focus.
- Setup item – Support: Verify the projector rests on a stable tabletop, stand, or tripod. Effect: A level support reduces image movement during setup.
- Setup item – HDMI cable and input source: Verify the cable type matches a supported input on both the projector and the source device. Effect: The projector can detect and display the incoming signal.
- Setup item – Remote: If the projector model includes a remote, verify it is available and any required batteries are installed. If no remote is supplied, confirm the projector provides built-in controls. Effect: Setup menus remain accessible.
- Setup item – Ventilation: Verify the intake and exhaust vents remain unobstructed before powering on. Effect: Airflow supports normal operating temperatures during first use.
- Setup item – Edge case: If no flat wall or screen is available, postpone image alignment until a suitable projection surface is available. Effect: An uneven viewing surface can distort the projected image and make alignment more difficult.
Room, screen, and viewing position for setup
A common mini projector setup uses a living room, bedroom, or meeting space where room light changes throughout the day and the projection surface is either a flat wall or a portable screen. Choosing these room conditions before placing the projector helps reduce unnecessary repositioning and supports comfortable viewing. Room light, projection surface, and viewing position are the main factors that shape image clarity and viewing comfort.
Room light, projection surface, and viewing position are the main factors that shape image clarity and viewing comfort.
Room, screen, and viewing position for setup become easier to evaluate with the annotated example below, which shows how room light, the projection surface, and the seating line work together before the projector is placed.
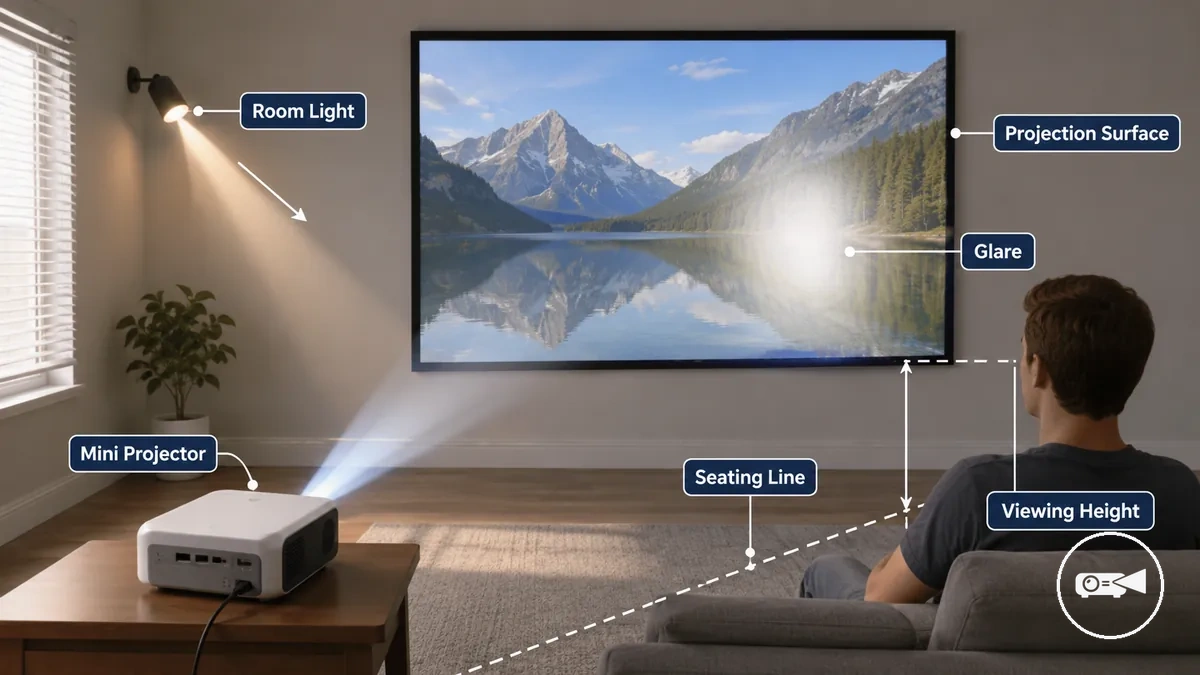
Bright room light and reflective surfaces increase glare, while an uneven or textured wall can make the projected image appear less uniform. A flat white or light-coloured wall is suitable when its surface is smooth, whereas a portable screen offers a more consistent projection surface if the wall is textured or unavailable. For example, a temporary setup in a rented apartment may work well with a portable screen that can be removed after use instead of relying on an uneven painted wall.
Viewing position should place the seating line directly in front of the screen or wall at a comfortable viewing height.
Viewing position should place the seating line directly in front of the screen or wall at a comfortable viewing height. Avoid seating where direct light reflects from the projection surface into the viewer's eyes because glare reduces viewing comfort. When room light, the projection surface, and the seating position have all been checked, the room is ready for projector placement.
Avoid seating where direct light reflects from the projection surface into the viewer's eyes because glare reduces viewing comfort.
Room, screen, and viewing position for setup can be organised with the following criteria to verify the room conditions that affect image clarity and comfort.
| Setup factor | What to check | Why it matters |
|---|---|---|
| Room condition | Reduce direct room light and identify possible glare sources. | Lower glare improves image clarity and viewing comfort. |
| Projection surface | Choose a flat wall or smooth portable screen with a light-coloured surface. | A flat surface produces a more even projected image. |
| Viewer position | Keep the seating line facing the projection surface at a natural viewing height. | Direct viewing improves comfort and reduces distracting reflections. |
Mini projector placement and support position
Mini projector placement should keep the projector stable, the lens centred on the screen, and the cables connected without creating a trip hazard. Position the projector on a stable support with the lens direction aimed at the screen centre, and make sure the cable path reaches the power outlet and video source without stretching. Stable support, suitable height, distance from screen, and safe cable reach are the key placement criteria.
Stable support, suitable height, distance from screen, and safe cable reach are the key placement criteria.
Mini projector placement and support position become easier to assess with the annotated example below, which shows how support stability, lens direction, placement distance, and cable routing work together before image adjustment.
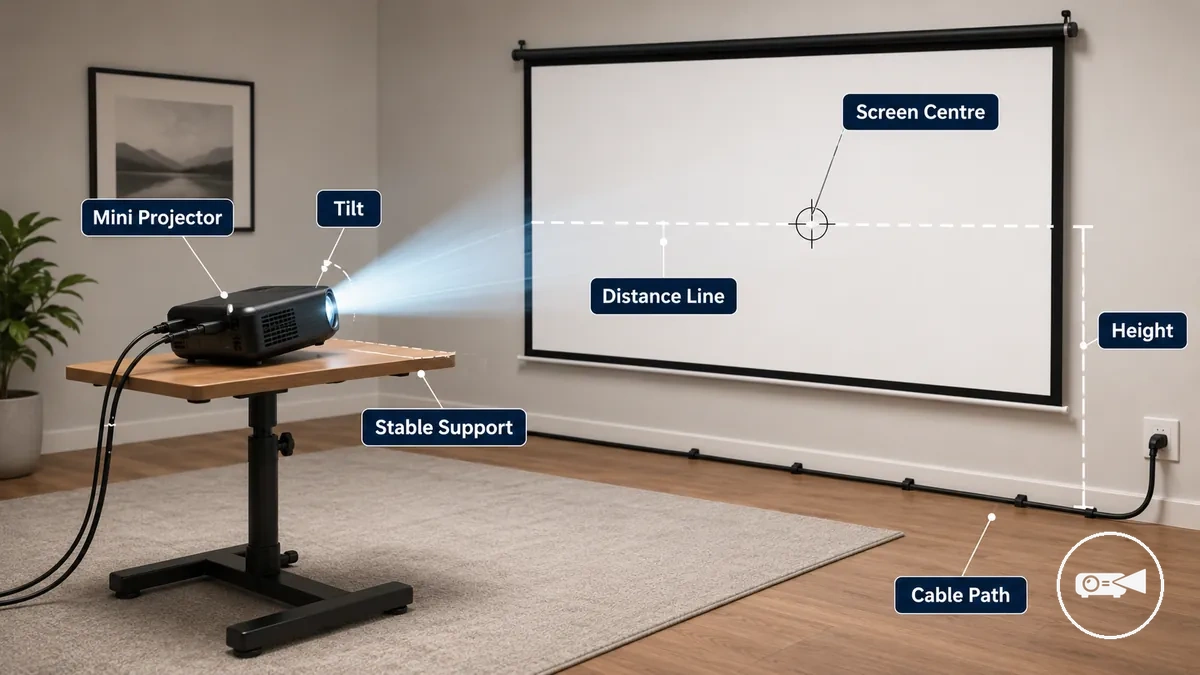
An unstable support or incorrect tilt can distort the image shape and increase the chance of the projector being moved accidentally. Keep the support surface level, aim the lens toward the screen centre, and route the power and HDMI cables away from walkways to reduce trip risk. For example, placing the cables behind a table instead of across the floor helps maintain both safety and projector position. The distance from screen should match the projector's supported throw ratio rather than a universal placement distance.
If you need to determine image size from placement distance, see throw distance and screen size .
A table suits many temporary viewing setups, while a tripod or adjustable stand is useful when the projector height needs frequent adjustment. A ceiling or wall mount is appropriate when the room supports a fixed installation and the mounting points match the projector. If you need to determine image size from placement distance, see throw distance and screen size. Choose the support option that best matches the room layout, viewing setup, and required stability.
Choose the support option that best matches the room layout, viewing setup, and required stability.
Mini projector placement and support position can be checked quickly with the following checklist to confirm stable physical placement before powering on.
- Place the projector on a stable support to minimise movement and keep the image aligned.
- Aim the lens direction at the screen centre to maintain a balanced image shape.
- Select a distance from screen that matches the projector's supported throw ratio.
- Adjust the projector height to reduce the need for excessive tilt.
- Route the cable path safely to the outlet and video source to reduce trip hazards.
- Choose a table, tripod, stand, or mount according to whether the setup is temporary or fixed.
Tabletop, tripod, stand, or mount support
The right support depends on the required height, stability, adjustability, and cable clearance for the viewing setup. Each support option suits a different placement condition rather than serving as a universal solution. The available support options are tabletop, tripod, stand, and mount.
The available support options are tabletop, tripod, stand, and mount.
For example, a temporary movie night often benefits from a portable support, while a semi-permanent media room can justify a fixed mounting point. Tabletop, tripod, stand, or mount support should match how often the projector is repositioned and how much height adjustment the setup requires.
Tabletop, tripod, stand, or mount support can be compared using the following criteria.
Tabletop, tripod, stand, or mount support can be compared using the following criteria.
- Tabletop: A flat, stable surface provides reliable support at low height. Its limitation is limited adjustability, so it is safest for temporary setups where cable clearance can be kept away from walkways.
- Tripod: An adjustable support provides flexible height and portability. Its limitation is reduced stability on uneven flooring, so it is safest when the legs are fully extended on a firm surface and cables remain clear of foot traffic.
- Stand: A dedicated stand provides stable support with improved cable clearance around the viewing position. It is suitable when moderate height adjustment is required and the projector remains in the same location during use.
- Mount: A mount suits a semi-permanent setup when a suitable mounting point allows secure alignment. Its limitation is reduced portability, making it most appropriate for dedicated rooms where the projector position changes infrequently.
Height, angle, and throw distance fit
Height, angle, and throw distance should align before focus adjustment so the image position and screen fill are correct. Set the lens height as close as practical to the screen centre and keep the projector angle level before fine adjustment. Throw distance is model-dependent and should follow the projector manual or its specified throw ratio for the intended screen size.
Verify the local geometry before adjusting focus or keystone.
If tilt is excessive, the image shape becomes more trapezoidal and requires more keystone correction. If the throw distance is too short or too long for the selected screen size, the image will underfill or exceed the screen and may move outside the usable focus range. For example, repositioning the projector until the image fits the screen at the stated throw ratio reduces reliance on digital correction. Verify the local geometry before adjusting focus or keystone.
If tilt is excessive, the image shape becomes more trapezoidal and requires more keystone correction.
Height, angle, and throw distance fit can be checked with the following criteria before image adjustment.
- Height: Align the lens height as closely as practical with the screen centre so the image position remains vertically centred.
- Angle: Keep the projector angle level and use only the tilt required by the room layout to limit image-shape distortion.
- Distance: Match the throw distance to the model's throw ratio and intended screen size rather than using a universal distance.
- Screen fill: Confirm that the image fills the screen without exceeding its edges before applying focus or keystone correction.
Power access and cable clearance
Poor power access or loose cable placement increases trip risk and can pull the projector out of position. Place the mini projector so the power adapter reaches the outlet without tension and the cables remain clear of the support surface edges. Safe placement requires adequate outlet reach and cable clearance.
Safe placement requires adequate outlet reach and cable clearance.
Power access should keep the cable path outside the walking path, position the power adapter away from the projector's heat area, and leave the support surface stable under normal cable movement. Route the HDMI cable with enough slack to prevent strain at the projector and source device, and use an extension cable only when its rating suits the connected load and its path does not create a trip hazard. If a power bank or replacement adapter is considered, use it only when the projector manufacturer specifies compatible voltage, current, connector, and power-delivery requirements.
Power access and cable clearance can be verified with this checklist before use.
Power access and cable clearance can be verified with this checklist before use.
- Outlet reach: Confirm that the power adapter reaches the outlet without stretching or pulling against the projector.
- Extension cable: Keep the extension cable outside the walking path and use it only when its rating matches the connected load.
- HDMI cable: Leave enough slack at the projector and source device to prevent connector strain while maintaining signal clearance.
- Adapter position: Keep the power adapter outside the projector's heat area and place it where its weight cannot drag the cable.
- Support surface: Confirm that cable movement does not shift the projector or reduce the stability of the support surface.
Screen alignment and projected image size
Screen alignment should be corrected before fine focus so the projected image fits the intended display area. Aim the lens direction toward the screen center before making smaller image adjustments. Correct alignment keeps the image edges balanced around the screen center and inside the visible boundaries.
Aim the lens direction toward the screen center before making smaller image adjustments.
If the projected image is oversized, off-center, or cropped, reposition the projector before relying on digital correction. Move the projector farther from the surface to increase image size or closer to reduce it, subject to the model's supported throw range. Keep the lens direction square to the wall or screen so the image edges remain aligned with the surface boundaries. If the projector provides optical zoom, use that model-supported control only for final image-size refinement after basic distance and alignment are correct.
Keep the lens direction square to the wall or screen so the image edges remain aligned with the surface boundaries.
For wall projection, use the intended viewing area as the boundary reference; for screen projection, use the physical frame as the fit reference. For example, adjust distance first when the image extends beyond the available surface, then use zoom only if the projector model includes that control. When the projected image is centered, fully visible, and within the chosen boundaries, the setup is ready for focus and keystone adjustment.
Screen alignment and projected image size can be checked with this checklist to verify image fit before focus.
Screen alignment and projected image size can be checked with this checklist to verify image fit before focus.
- Screen center: Confirm that the projected image is centered on the intended screen or wall area.
- Image edges: Check that every edge remains inside the visible surface boundaries without cropping.
- Lens direction: Keep the lens facing squarely toward the projection surface to reduce off-center distortion.
- Distance: Reposition the projector when the image size is larger or smaller than the available display area.
- Zoom: Use zoom only when the projector model supports it and only after the basic alignment and distance are correct.
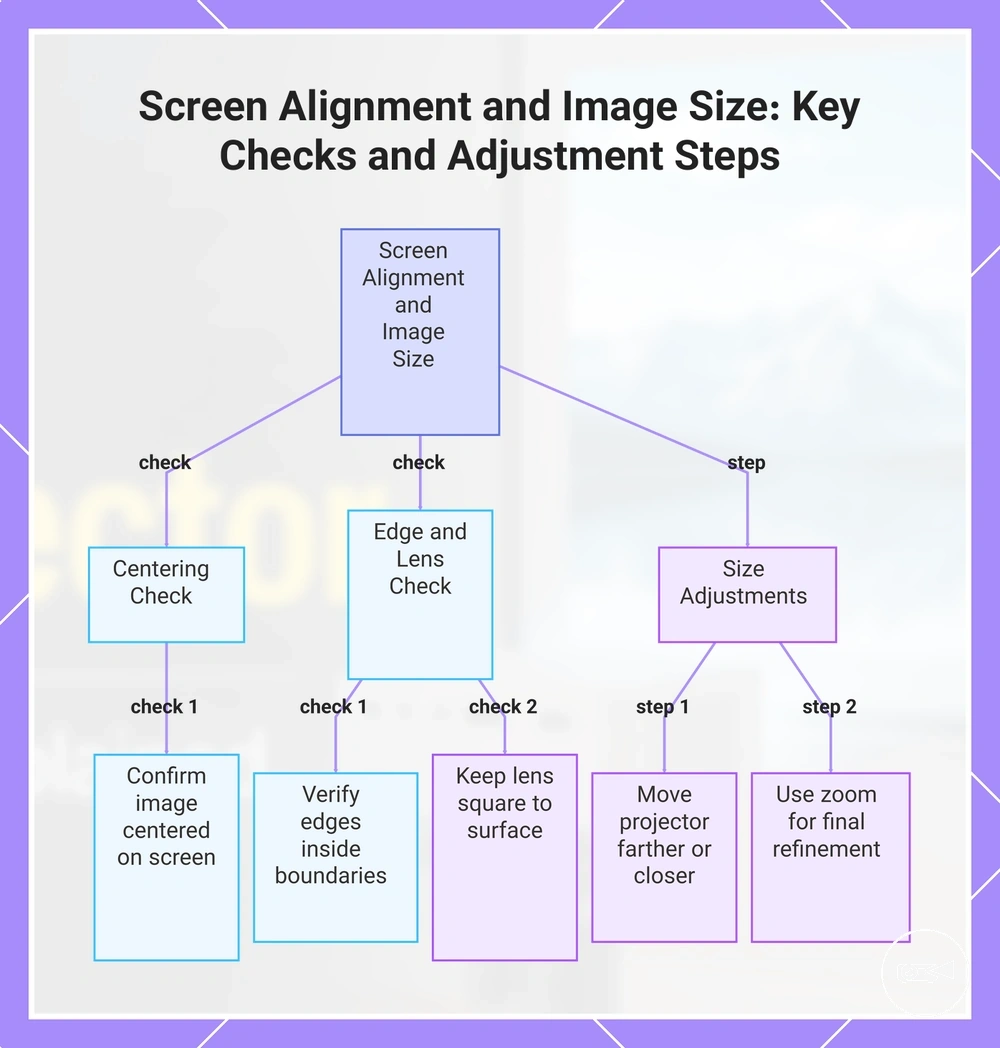
This chart outlines the essential alignment checks (centering, edges, lens direction) and the correct sequence of size adjustments (distance first, then zoom) to ensure the projected image fits the display area before focusing.
Focus and keystone adjustment
Focus sharpens the image, while keystone correction squares the image shape after the projector is physically positioned. Complete placement and screen alignment before using either control. Adjust focus first, then apply only the keystone correction needed to refine the shape.
Complete placement and screen alignment before using either control.
Physical placement should correct most image angle problems before digital keystone is used. Improve the lens position and reduce the difference between the projector angle and screen angle so the projected image is naturally close to rectangular. Heavy keystone correction can reduce edge sharpness, so use auto-focus, automatic keystone, a remote setting, or a menu control only when the projector model provides that feature.
Continue only while each visual check shows normal improvement.
Use the following Focus and keystone adjustment steps to create a sharp image and square the picture after placement is stable. Continue only while each visual check shows normal improvement.
- Confirm the starting position: Keep the lens position facing the screen as squarely as practical, then check that the image shape is already close to rectangular before applying digital correction.
- Set the focus: Turn the focus ring or use the focus control until the centre of the projected image appears sharp, then check text and fine details from the normal viewing position. If the model includes auto-focus, let that cycle finish before making a manual adjustment.
- Check edge sharpness: Compare the centre with all four image edges and corners. If one side remains softer than the other, improve the physical angle or lens-to-screen position before increasing keystone correction.
- Correct the image angle: Use the keystone control to reduce the remaining trapezoid shape, then stop when the vertical and horizontal edges appear square to the screen. Use only the correction range available in the model's menu or remote setting.
- Recheck focus after keystone: Inspect the centre and edges again because digital correction can change apparent picture sharpness. Make a small focus-ring adjustment only if the full image becomes clearer rather than sharpening one area while softening another.
- Verify the final image: View the projected picture from the normal seating position and confirm that the image shape is square and the edge sharpness is acceptable. Avoid adding more keystone once the shape is aligned, because stronger correction does not replace improved placement.
If persistent blur remains after the normal focus and keystone steps, use fix a blurry projector image as the separate troubleshooting guide rather than continuing to increase digital correction.
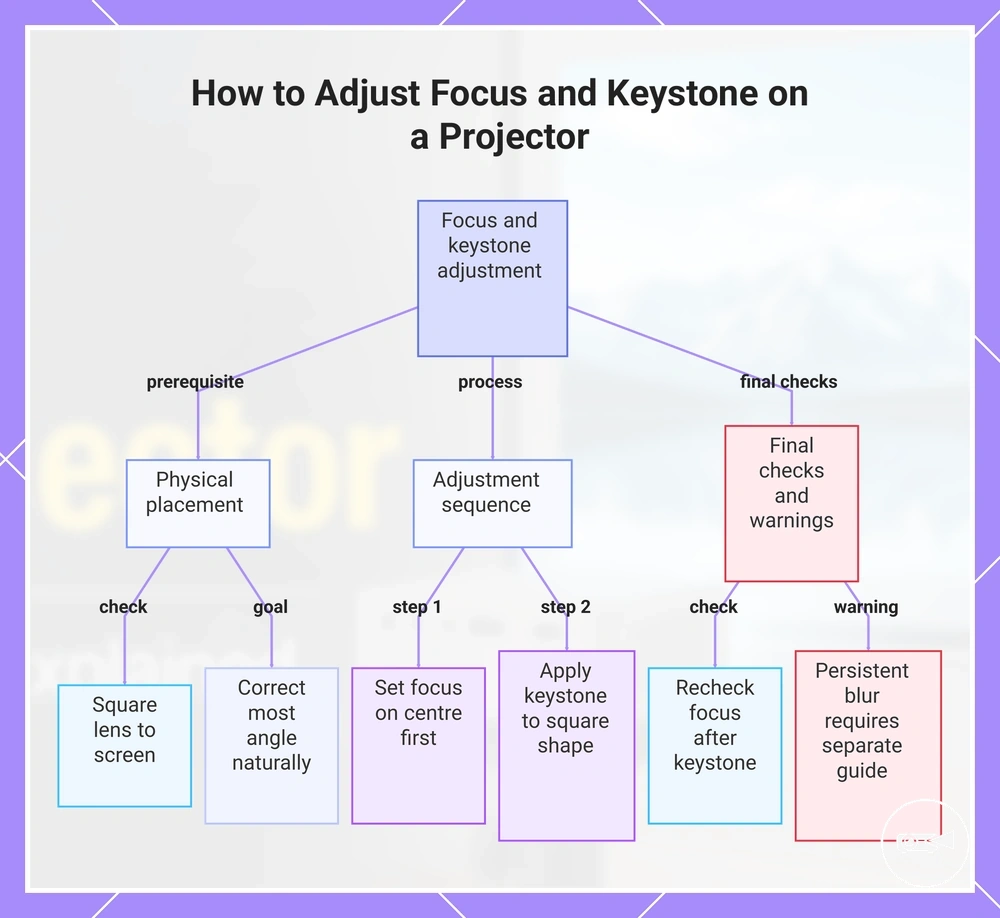
This chart shows the step-by-step process for adjusting focus and keystone correction, including physical placement, sequential adjustments, and final checks to achieve a sharp, square image.
This chart shows the step-by-step process for adjusting focus and keystone correction, including physical placement, sequential adjustments, and final checks to achieve a sharp, square image.
Manual focus ring or auto-focus adjustment
The focus method depends on the projector control type. Manual focus uses the focus ring, while auto-focus uses a supported automatic trigger or remote setting. Both methods should be judged by sharpness at the image center and corners.
The focus method depends on the projector control type.
Manual focus ring or auto-focus adjustment can be completed with these local checks.
- Manual focus: Turn the focus ring slowly until the center looks clear, then compare the corners and edge sharpness. Stop at the setting that gives the most balanced picture sharpness across the image.
- Auto-focus: If the projector includes auto-focus, trigger it with the assigned button, remote setting, or menu option for that model, then wait for the adjustment to finish before changing the focus manually.
- Lens and distance check: Confirm that the lens surface is clear and recheck focus after changing the image distance, because either condition can reduce sharpness at the center or corners.
- Model-dependent control: Menu labels and auto-focus behaviour are not standard across mini projectors, so use the focus control identified for the specific model rather than assuming the same remote setting applies.
Keystone correction and image angle
Keystone correction changes the image shape to reduce trapezoid distortion caused by the projector angle. It helps square the image when the projector is not centred on the screen plane, but its correction limits become more noticeable as the projector angle increases. Heavy digital correction should be avoided because it can reduce image quality.
Heavy digital correction should be avoided because it can reduce image quality.
Keystone correction adjusts image shape, but it does not replace physical repositioning. Positioning the projector so the lens faces the screen plane more directly usually produces more even image corners before digital correction is applied. Check the projector angle first, then use the keystone setting only to correct the remaining vertical distortion or horizontal distortion if those controls are available.
Keystone correction and image angle can be checked with this sequence.
Keystone correction and image angle can be checked with this sequence.
- Position the projector so the image is as close to square as possible before opening the keystone setting.
- Apply vertical distortion correction, or horizontal distortion correction if the projector provides it, until the image corners align with the screen edges.
- Inspect all four image corners and reduce the amount of digital correction if heavy adjustment makes the picture appear less uniform.
- Confirm the final image shape, and physically reposition the projector instead of increasing keystone correction when large adjustments are still needed.
First-time power and source confirmation
First-time power and source confirmation means the projector powers on and displays the intended source. A successful first-use validation confirms that the selected input, playback signal, and basic audio are ready after physical setup and image adjustment. This section confirms setup readiness rather than providing a full connectivity tutorial.
Use the source check sequence to verify each setup condition.
If the projector menu appears but your media does not, the selected input source is more likely to require attention than projector placement. If image alignment is correct but no playback signal is visible, confirm that the selected input matches the connected HDMI device or the active wireless mode before changing projector position. Use the source check sequence to verify each setup condition.
For detailed connection instructions, see connect a mini projector .
If HDMI or wireless mode is being used, confirm that the source device is operating in the same input mode selected on the projector without expanding into device-specific connection steps. For detailed connection instructions, see connect a mini projector.
First-time power and source confirmation can be completed with these checks to confirm the setup is ready for normal use.
First-time power and source confirmation can be completed with these checks to confirm the setup is ready for normal use.
- Press the power button and confirm that the startup screen or projector menu appears.
- Use the remote to select the correct input source for the connected HDMI device or the active wireless mode.
- Confirm that the media device is powered on and transmitting a playback signal.
- If the projector menu is visible but media is not, treat the selected input as the first check before adjusting projector placement.
- Verify that speaker output is active by confirming audible playback or selecting the intended audio output when multiple outputs are available.
- Start playback and confirm that both picture and sound are present before considering the setup complete.
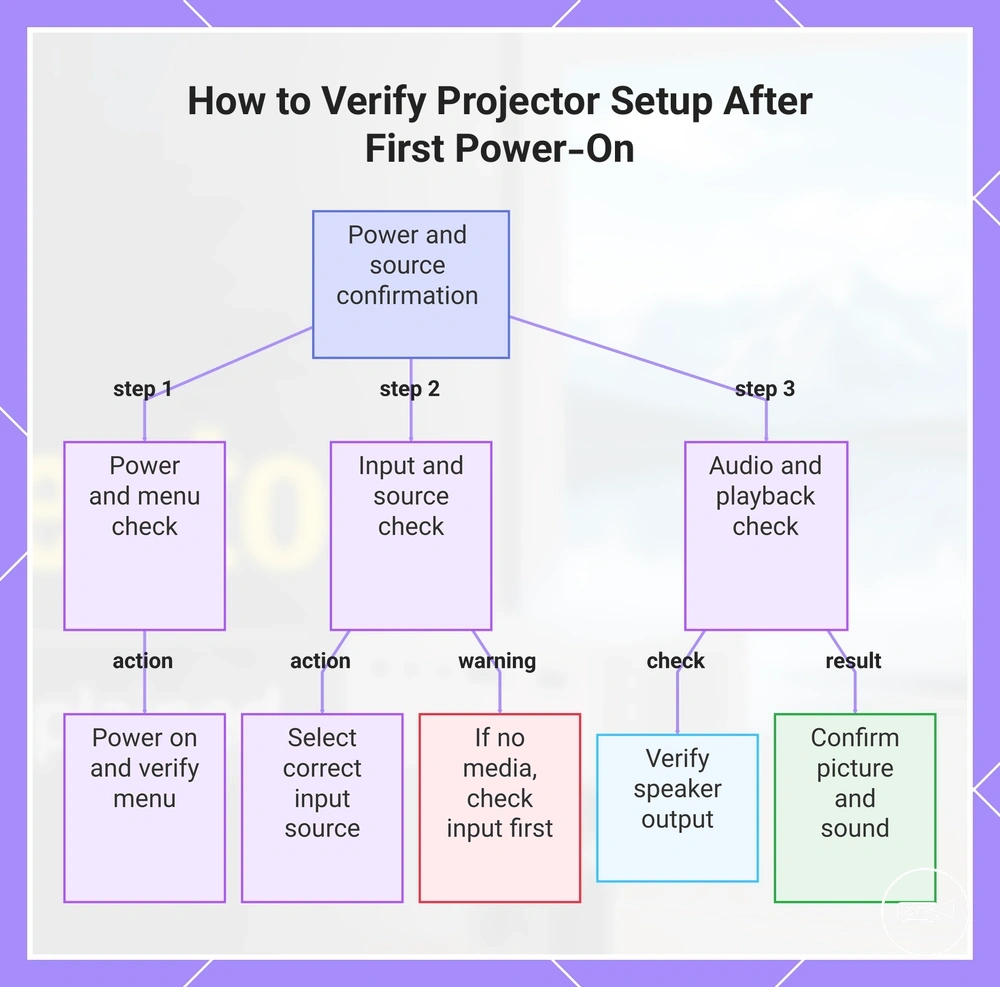
This chart shows the sequence of checks to confirm that the projector powers on and displays the intended source, including power, input, and audio verification.
Basic input signal check
The selected input must match the connected HDMI cable or the active wireless mode before a visible signal can appear. The source device should already be sending an input signal, and the projector menu should display the selected input rather than an unused source. Complete this visible-signal check before moving beyond basic source confirmation.
Complete this visible-signal check before moving beyond basic source confirmation.
If an adapter or wireless mode is being used, confirm that it is compatible with the source device and the selected input before repeating the signal check. This confirms local setup conditions without expanding into a no-signal troubleshooting guide.
Basic input signal check can be completed with this checklist.
Basic input signal check can be completed with this checklist.
- Confirm that the selected input matches the connected HDMI cable or the active wireless mode.
- Check that the HDMI cable is fully seated at both the projector and the source device.
- Verify that the source device is powered on and actively sending a visible input signal.
- Open the projector menu and confirm that the selected input is the active input mode.
- If an adapter is required, confirm that it is compatible with the connected source device before repeating the signal check.
Quick audio and playback check
Playback is confirmed when both video and sound respond as expected. The playback app should display moving video while the selected speaker output produces audible sound at the current volume setting. Complete the following local playback checks to confirm that media playback is working correctly.
Playback is confirmed when both video and sound respond as expected.
If the built-in speaker, an external speaker, Bluetooth, or a cable output is being used, confirm that the intended audio output is selected and that the source device volume is not muted. Some devices separate video output and audio output settings, so verify both if video plays but sound is routed elsewhere.
Quick audio and playback check can be completed with this checklist.
Quick audio and playback check can be completed with this checklist.
- Press play and pause in the playback app to confirm that video and playback controls respond normally.
- Adjust the volume on the source device and verify that the selected speaker output produces audible sound.
- Confirm that the built-in speaker or the connected external speaker is the active audio output.
- If Bluetooth or a cable output is in use, verify that the correct audio route remains selected during playback.
- Check that the playback app is sending audio to the intended output device instead of another connected audio destination.
Common first-time mini projector setup mistakes
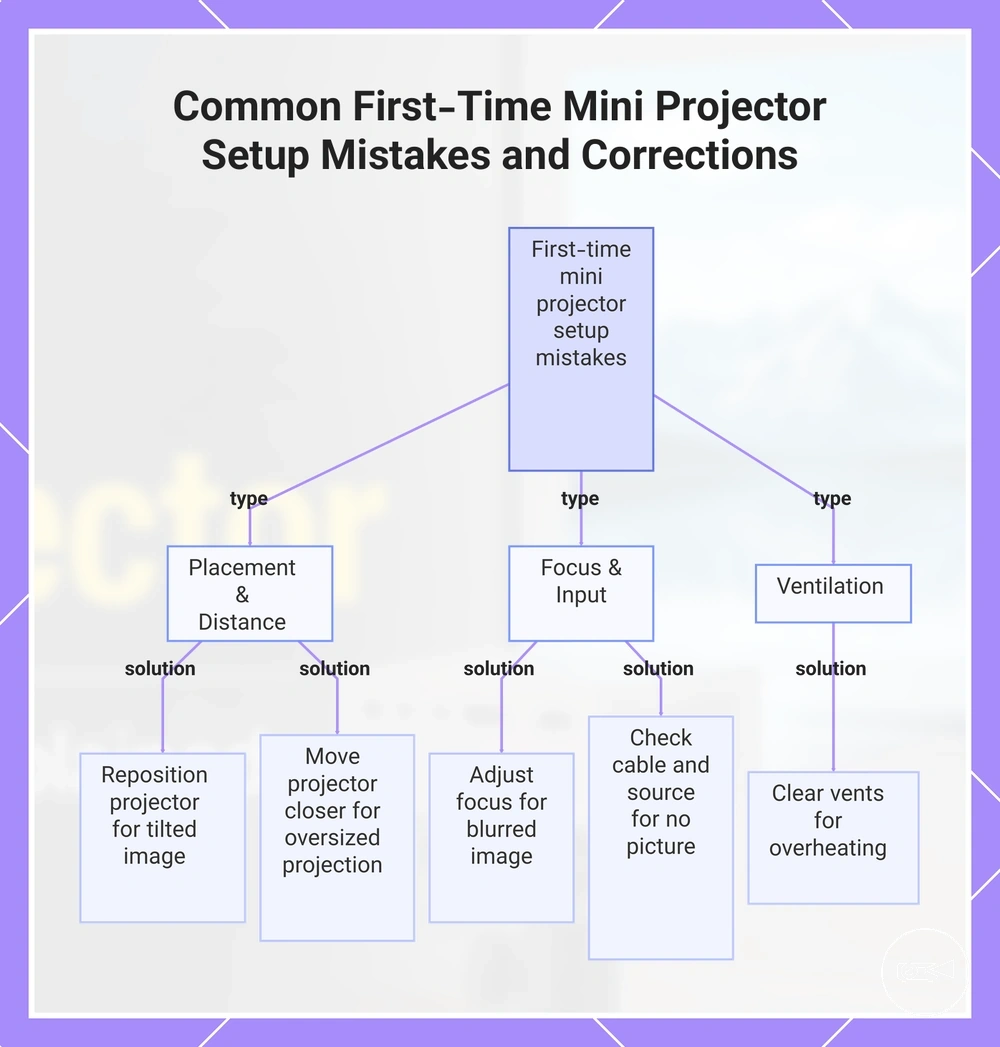
Common first-time mini projector setup mistakes are preventable causes of poor image, no picture, or unsafe operation during first-time setup. Most setup mistakes are corrected by checking placement, alignment, focus, cables, source selection, and ventilation before assuming a hardware problem. The mistake-and-correction list below pairs each mistake with a visible symptom and a safer correction.
The mistake-and-correction list below pairs each mistake with a visible symptom and a safer correction.
Most first-time setup mistakes can be corrected by rechecking placement, input selection, focus, and airflow. A tilted image, oversized projection, or no picture often results from an incorrect setup condition rather than a defective projector. If these basic corrections do not resolve the symptom, continue with the relevant troubleshooting section instead of repeating the same setup checks.
This section is limited to setup-specific corrections.
This section is limited to setup-specific corrections. Persistent blur, no picture, or overheating after these checks may require deeper troubleshooting beyond normal first-time setup.
- Incorrect placement: An uneven projector angle can produce a tilted image. Place the projector squarely in front of the screen, then use keystone correction only for minor adjustments.
- Incorrect projection distance: Positioning the projector too far from the screen can create an oversized projection that extends beyond the display area. Move the projector until the image fits the screen before making further adjustments.
- Incorrect focus: An incorrect focus setting leaves text and images blurred. Adjust focus only after the projector reaches its final placement.
- Incorrect cable or source selection: A loose cable or the wrong input source can result in no picture. Secure the cable and confirm that the selected source matches the connected media device.
- Blocked vents: Obstructed ventilation reduces airflow and increases heat during operation. Keep all vents unobstructed to maintain normal cooling.
- Skipping image alignment: Poor alignment can distort image shape even when focus is correct. For example, if one side of the image appears higher than the other, reposition the projector before making fine keystone adjustments.
This chart categorizes the most frequent setup mistakes for mini projectors, showing the visible symptom and the recommended correction for each.
Ventilation, stability, and safe operating space
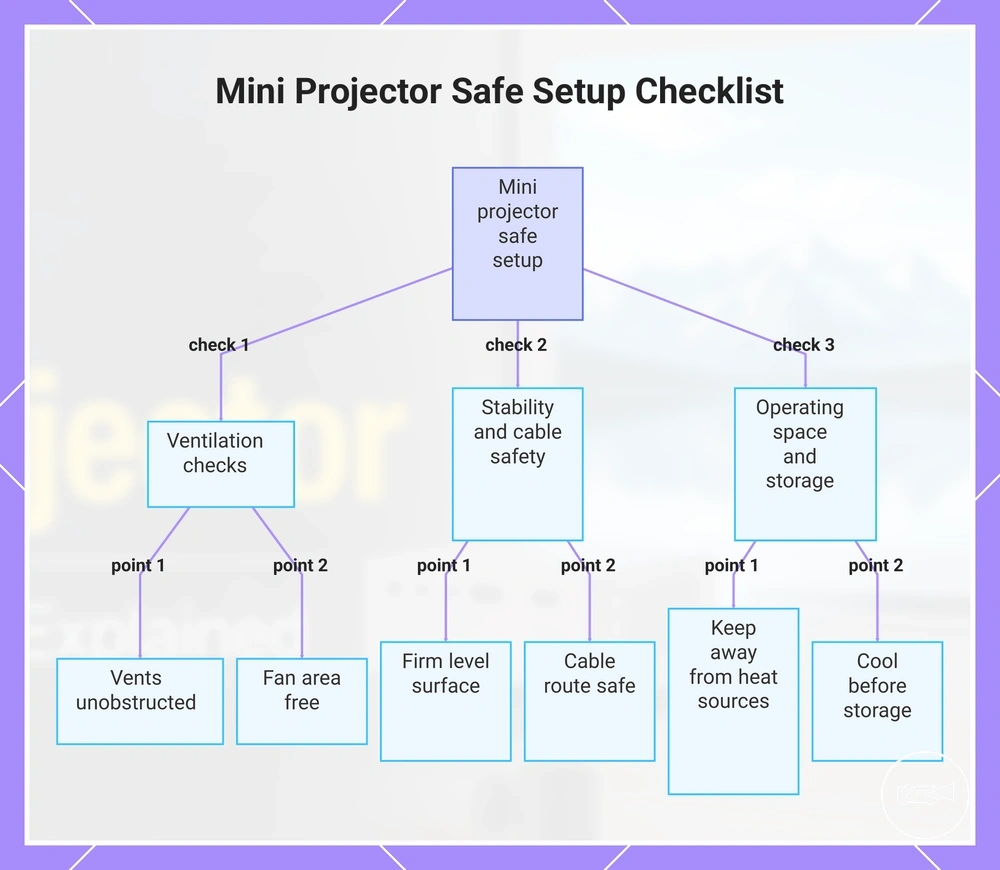
Safe setup requires open airflow, stable support, and clear space around the mini projector. Before viewing, confirm that ventilation, the fan area, the support surface, the cable route, and the surrounding space allow safe operation. These checks complete the final safety confirmation before first use.
These checks complete the final safety confirmation before first use.
Blocked vents, nearby fabric, or placement close to heat sources can restrict airflow and increase the risk of excessive operating temperatures. An unsafe cable route can also pull the projector from its stable support or create a trip risk. To prevent mini projector overheating, keep the vents and fan area unobstructed and follow the operating clearance specified for your model because clearance requirements are manufacturer-dependent.
An unsafe cable route can also pull the projector from its stable support or create a trip risk.
After viewing, allow the projector to cool before storage after use, then place it in a clean, dry location where the vents remain unobstructed. Longer-term cleaning and storage belong to maintenance rather than first-time setup, which marks the boundary of this section.
Longer-term cleaning and storage belong to maintenance rather than first-time setup, which marks the boundary of this section.
Use this Ventilation, stability, and safe operating space checklist to confirm that the projector is ready for safe operation before viewing.
- Ventilation: Verify that all vents are open and nothing restricts normal airflow.
- Fan area: Keep the fan area free from nearby fabric or other objects that could block cooling air.
- Stable support: Place the projector on a firm, level surface that remains stable throughout use.
- Cable route: Position power and signal cables so they do not pull on the projector or create a trip risk.
- Safe operating space: Keep the projector away from heat sources and use the model-specific operating clearance stated in the product manual.
- Storage after use: Let the projector cool before storing it, and avoid covering the vents during storage.
For routine cleaning, longer-term care, and storage beyond first-time setup, see mini projector maintenance.
For routine cleaning, longer-term care, and storage beyond first-time setup, see mini projector maintenance .
This chart shows the key safety checks for setting up a mini projector, covering ventilation, stability, cable safety, operating space, and post-use storage.