
Mini Projector No Signal Troubleshooting
A mini projector shows no signal when it cannot detect or accept a usable video signal from the selected input source. Troubleshooting should follow the signal path from the source device to the projector before any reset or model-dependent setting change.
A mismatch or inactive state at any point can prevent the projector from receiving a usable image.
The signal path includes the source device output, selected video input, signal format, and any HDMI cable, adapter, or port between them. A mismatch or inactive state at any point can prevent the projector from receiving a usable image. For example, a laptop can remain powered on while the mini projector displays no signal because the laptop is not sending video through the connected HDMI output.
For broader setup context before isolating the failed connection, use the mini projector guide .
The same symptom can appear after changing a source device, connecting through an adapter, selecting the wrong input source, or starting a wireless display session without the required casting mode, Wi-Fi connection, or source-device permission. A reset or power cycle should come after the input state and source output are confirmed because reset options and their effects are model-dependent. For broader setup context before isolating the failed connection, use the mini projector guide.
The next section clarifies what the no-signal state means before the fix sequence begins.
This page addresses signal detection rather than a blurry image, low brightness, sound-only playback, or general setup. The next section clarifies what the no-signal state means before the fix sequence begins.
Table of Contents
What No Signal Means on a Mini Projector
A no-signal message on a mini projector is a status that means the projector is powered on but is not receiving or recognizing a usable video input from the source device. The mini projector is functioning as the display device, but the connection path is not delivering a recognizable video signal.
The mini projector is functioning as the display device, but the connection path is not delivering a recognizable video signal.
What No Signal Means on a Mini Projector becomes clearer in the annotated image below, which highlights the source device, the connection path, and the point where the usable video input is missing or not recognized.
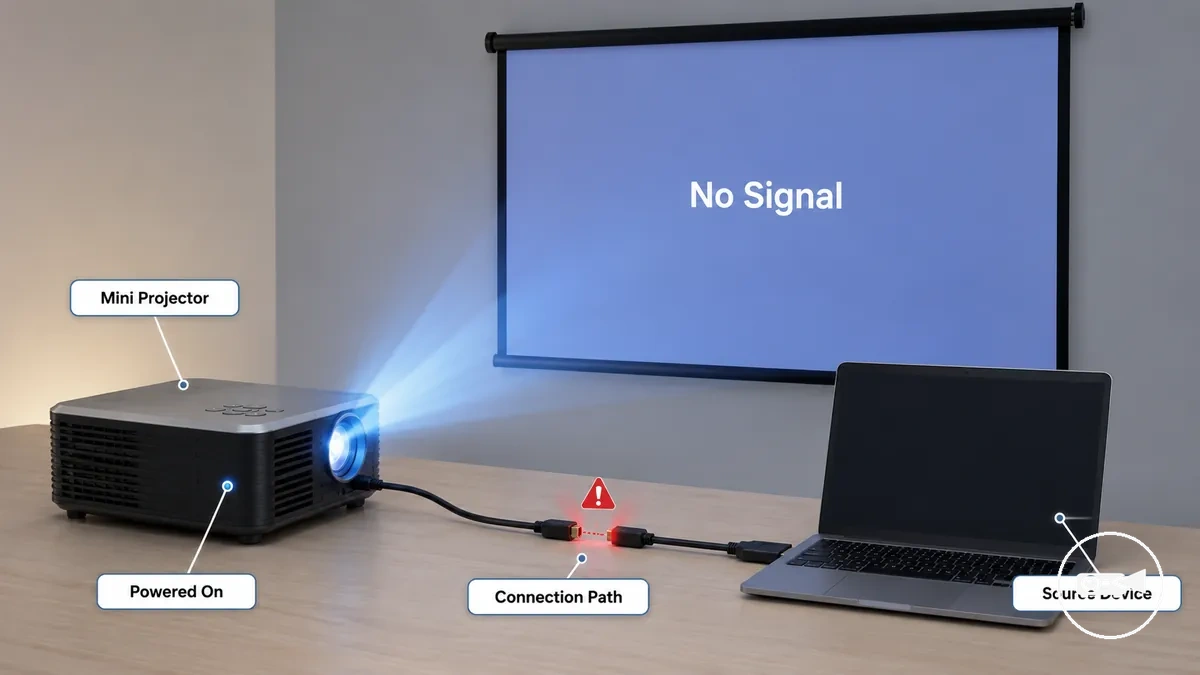
A no-signal message can appear even when a cable is physically connected because a physical connection does not confirm that an active video feed is reaching the selected input. For example, a laptop can remain connected through HDMI while sending video to a different display output or while the projector is set to a different input source, leaving the projector powered on without a usable signal. Manufacturer support documentation, including guidance from Miroir, describes this condition as the projector waiting for a valid input rather than indicating a confirmed hardware fault.
What No Signal Means on a Mini Projector depends on whether the projector lacks a recognized input or has a different display problem.
What No Signal Means on a Mini Projector depends on whether the projector lacks a recognized input or has a different display problem.
- No signal: The projector is powered on but is not receiving or recognizing a usable video input from the source device.
- Black screen: A video signal may already be present, but the displayed image is not visible because of a different display or playback condition.
- Poor image: A usable video signal is present, but the image quality is degraded rather than missing.
Connection type affects whether the incoming signal can be recognized. For more information about supported connection methods, see mini projector connectivity.
Common Causes of Mini Projector Signal Loss
Signal loss usually occurs because the video chain is interrupted between the source device and the mini projector. The most common cause groups include the wrong input source, an inactive display output, a loose HDMI connection, an adapter mismatch, an unsupported signal format or HDMI handshake, wireless connection failure, and a possible failed port.
Signal loss usually occurs because the video chain is interrupted between the source device and the mini projector.
Common Causes of Mini Projector Signal Loss are easier to understand with the diagram below, which highlights where the video chain can break between the source device and the projector input.
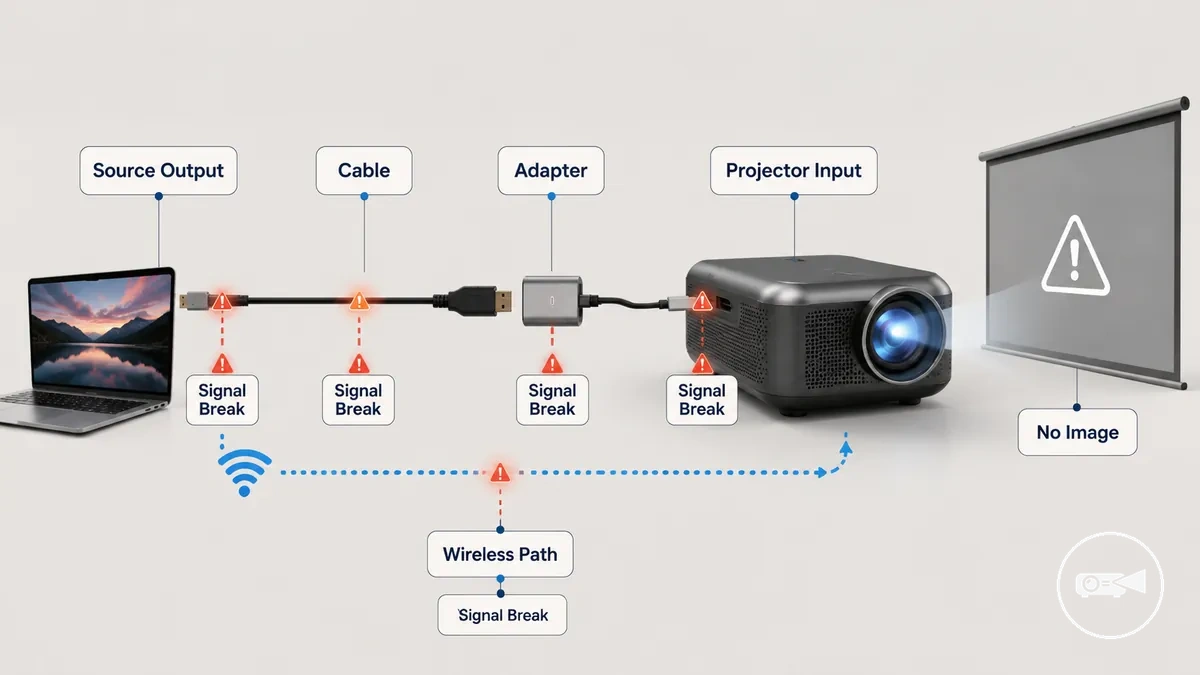
Use the table to identify which part of the video chain is interrupting the signal instead of assuming every no-image symptom has the same cause. Simple configuration issues are usually checked first, while compatibility or hardware-related conditions become more relevant after the basic signal path has been verified. For example, selecting the wrong input source produces the same no-image symptom as a disconnected HDMI cable because the projector listens to a different signal path.
| Cause group | Signal-chain part | Failing condition | What to check next |
|---|---|---|---|
| Wrong input | Projector part | Incorrect input source is selected | Confirm that the selected input matches the connected source device. |
| Inactive source output | Source device | Inactive display output prevents video transmission | Verify the source device is actively sending video to the projector. |
| Loose HDMI cable | Cable connection | Loose or intermittent HDMI connection interrupts the signal path | Reconnect both cable ends and test with a known-good cable if needed. |
| Adapter mismatch | Adapter | Adapter does not support the required video signal conversion | Check that the adapter supports the connected source and projector interface. |
| Unsupported format or HDMI handshake | Signal format | Signal format or HDMI handshake is not recognized by the projector | Try a compatible output resolution or test with another source device. |
| Wireless failure | Wireless connection | Wireless video session is not established | Reconnect both devices and confirm the wireless link is active. |
| Possible port fault | Projector or source port | A known-good connection still produces no image | Test another compatible port using a known-good cable before suspecting a failed port. |
Check the simplest cause groups first because input selection, source output, and connection issues are more common than compatibility problems or a possible failed port.
Wrong Input Source or Inactive Video Output
Wrong input source or inactive video output can prevent a mini projector from displaying an image even when the cable is connected. A correct projector input must match the connected source device, and the source device must actively send video through its selected output.
Wrong input source or inactive video output can prevent a mini projector from displaying an image even when the cable is connected.
Wrong Input Source or Inactive Video Output is illustrated below to show how a connected cable can still produce no signal when the selected projector input or video output is inactive.
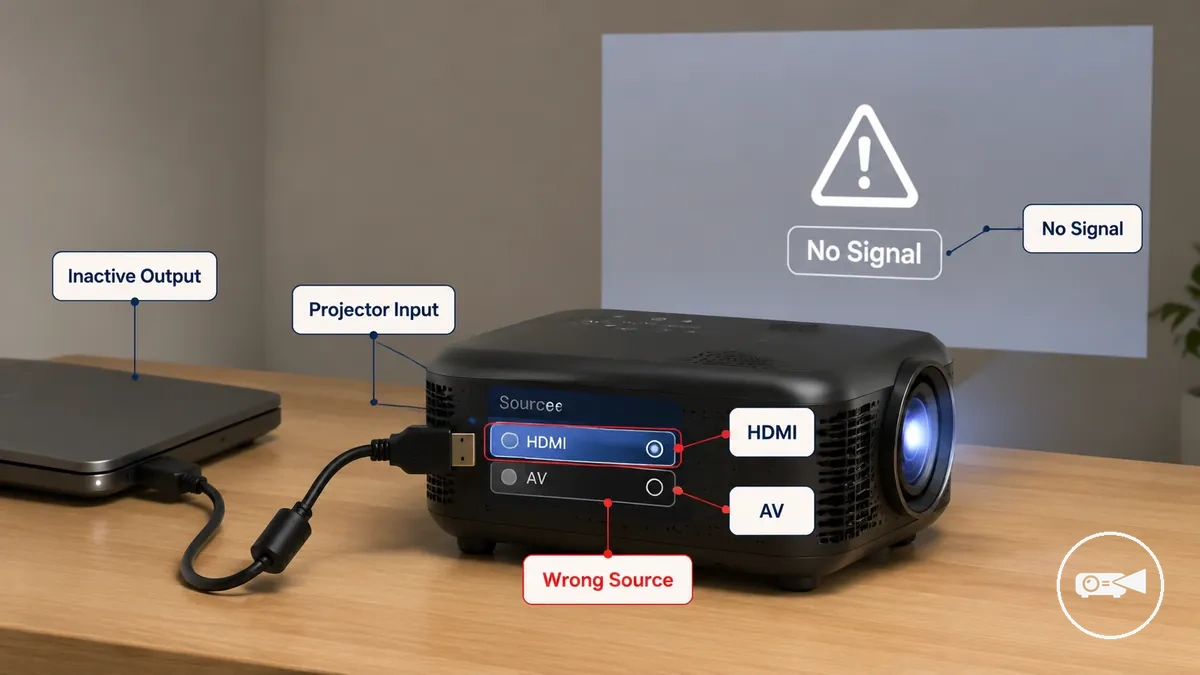
For example, a laptop connected with an HDMI cable can still display a no-signal message if the projector is listening to the AV input instead of HDMI, or if the laptop display mode has not activated the external display.
- Projector input: Confirm the selected input matches the connected HDMI or AV source.
- Laptop display mode: Check that the external display output is active instead of displaying only on the laptop screen.
- Phone video output: Verify that both the phone and its adapter support wired video output before expecting a signal.
- Streaming device wake state: Ensure the source device is awake and transmitting an active video signal.
- Remote source cycling: Use the source button to cycle through available inputs until the connected source is selected.
Loose Cable, Damaged Port, or Adapter Mismatch
A loose cable, damaged port, or adapter mismatch can interrupt the video signal even when the connection appears secure. Verify cable fit, port condition, and adapter capability before considering replacement because a physically connected cable does not confirm a working video path.
For example, a USB-C adapter or phone adapter can provide charging or audio without supporting video output.
For example, a USB-C adapter or phone adapter can provide charging or audio without supporting video output. Testing the connection with a compatible video-capable adapter or a known-working cable is more reliable than replacing parts based only on physical fit.
- HDMI cable: Confirm HDMI seating by ensuring the connector is fully inserted and does not lose contact when gently moved.
- AV cable: Check AV plug alignment so each connector is fully seated in the matching input jack and does not shift during use.
- USB-C adapter or phone adapter: Verify the adapter supports video output instead of only charging or data transfer before expecting an image.
- Projector or source port: Inspect for visible port damage, bent contacts, or excessive movement, then repeat the test with a known-working cable if available.
- Cable condition: If the picture appears and disappears when the cable is lightly moved, intermittent contact is present and should be confirmed before replacing the cable, port, or adapter.
Unsupported Resolution, Timing, or HDMI Handshake
A compatibility failure occurs when the source output and projector do not share a usable resolution, refresh rate, or video-support condition. The physical connection may be present, but unsupported resolution, display timing, HDMI handshake, EDID recognition, HDCP, or adapter limitations can prevent a usable image. Unlike a loose cable or wrong input, a handshake issue occurs after the devices attempt to recognise each other.
Unlike a loose cable or wrong input, a handshake issue occurs after the devices attempt to recognise each other.
Lowering the source output resolution or refresh rate, then testing another compatible source, can show whether the failure is format-related rather than physical. For example, a projector may accept a lower video format while protected content remains unavailable when the connected path does not meet the required HDCP condition. Supported formats and adapter capabilities differ by device, so confirm the result against the projector, source, and adapter specifications.
| Compatibility issue | Plain meaning | Likely sign | Safer check |
|---|---|---|---|
| Unsupported resolution | The source output uses a resolution the projector does not accept. | A blank screen or unsupported-format message appears. | Select a lower resolution listed as supported by the projector. |
| Refresh timing | The refresh rate or display timing falls outside the projector's accepted settings. | The image is missing, unstable, or intermittent. | Choose a lower supported refresh rate and test the same source again. |
| HDMI handshake or EDID | The source and display do not complete capability recognition through EDID. | The connected display is not recognised or produces no usable image. | Reconnect the devices, restart the signal path, or test another compatible source. |
| HDCP or protected content | The connected path does not meet the content-protection condition required by the app or source. | Menus may appear while protected content remains unavailable. | Check whether the source, adapter, and projector support the required protected-content path. |
| Adapter limitation | The adapter supports charging or data but not the required video output. | The device connects without producing an image. | Confirm that the adapter supports video output from the specific phone or laptop. |
First Checks Before Replacing Anything
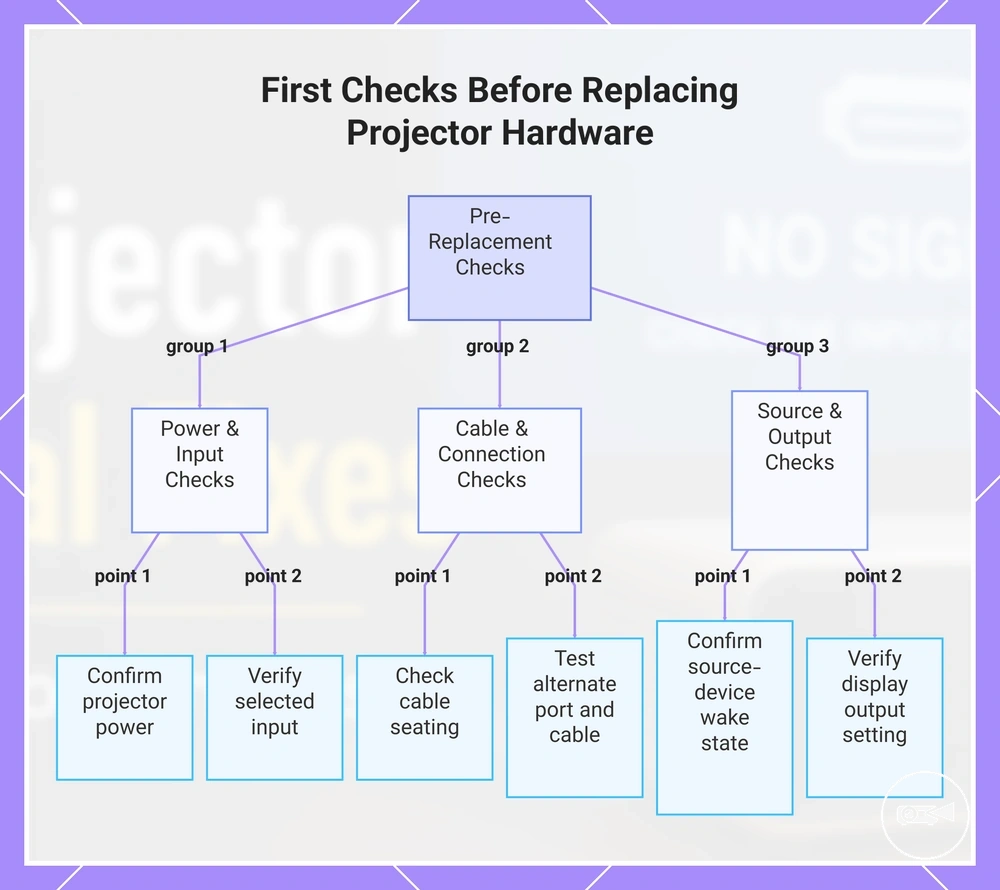
Complete these first checks before replacing anything because simple conditions often interrupt the signal without indicating a failed cable, adapter, port, or projector. Confirm power, the selected input, cable seating, the source-device wake state, and the display output setting before moving to deeper troubleshooting.
Check one variable at a time so each result has a clear meaning.
Check one variable at a time so each result has a clear meaning. If one change restores the image, you have identified the most likely cause; if nothing changes, continue to the next verification point instead of assuming a hardware fault.
- Confirm projector power: Make sure the projector is fully powered on rather than in standby. If its menu or startup screen appears, projector power is confirmed and the signal path should be checked next.
- Verify the selected input: Use the source button to match the active input with the connected port. If the picture appears after changing the input, the issue was the selected input rather than the connection.
- Check cable seating: Reseat both ends of the cable until each connector is fully inserted. If the image returns, incomplete cable seating was likely preventing a stable signal.
- Confirm the source-device wake state: Unlock or wake the connected laptop, phone, streaming device, or media player. If the projector detects the source after waking it, the previous signal was inactive rather than missing.
- Verify the display output setting: Confirm that the source is configured to send video to an external display. If enabling external display restores the picture, the connection was present but the source output was disabled.
- Test an alternate port and alternate cable: Try another compatible port or a known-good cable while changing only one item at a time. If one change restores the image, that comparison identifies the most likely point requiring further attention.
- Follow the restart order: Power off both devices, reconnect them, turn on the mini projector first, select the correct input, and then start the source device. If the image appears after this power cycle, device recognition during startup was likely affecting the connection.
If the issue relates to projector placement, initial power configuration, or screen adjustment instead of signal detection, refer to the mini projector setup guide before continuing with signal-specific troubleshooting.
This chart shows the initial checks to perform when a projector has no image, grouped into power/input, cable/connection, and source/output categories.
This chart shows the initial checks to perform when a projector has no image, grouped into power/input, cable/connection, and source/output categories.
Input Source and Display Output Fixes
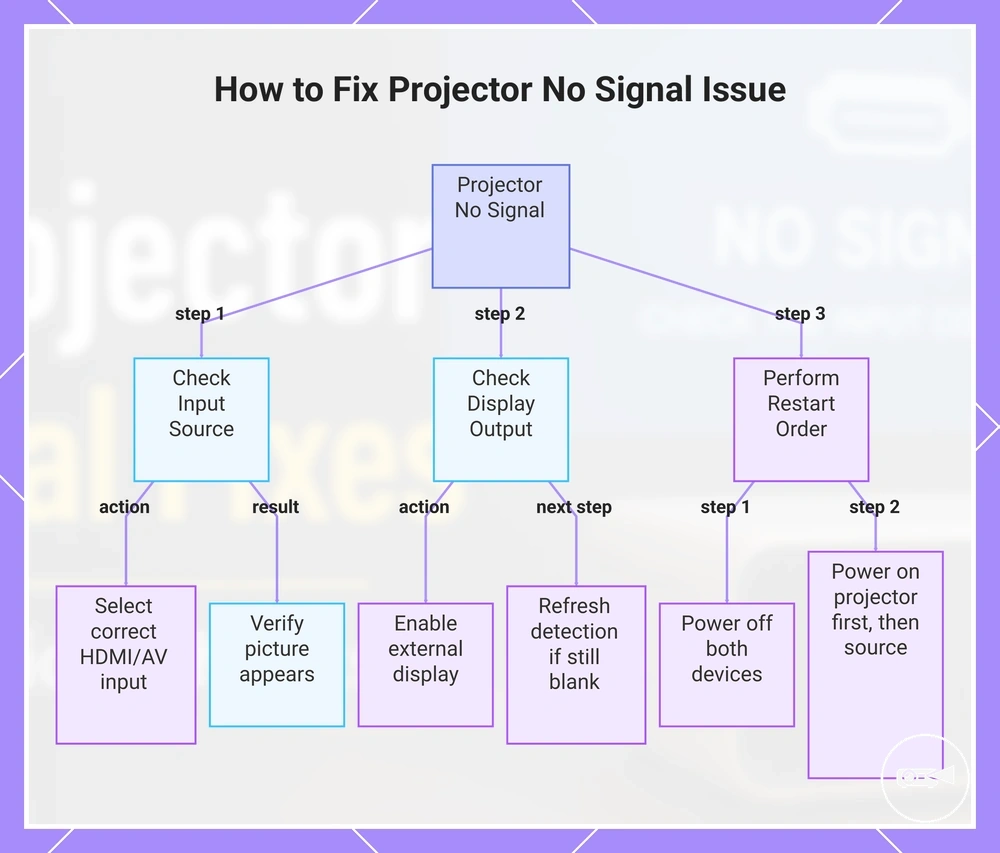
No signal often occurs because the projector's input source and the source device's display output are not aligned. Match the projector's selected input with an active display output before assuming that the connection itself has failed.
If the projector is using the wrong input, correct that first.
If the projector is using the wrong input, correct that first. If the correct input is already selected but no image appears, verify the source device's display output and then repeat the restart order so both devices can detect the active signal.
- Select the correct input source: Press the source button until the connected HDMI input or AV input is selected. If the picture appears, the previous input selection did not match the connected source.
- Enable the correct display output: Activate the external display on the source device and choose duplicate mode or extend mode if those display modes are available. If the projector begins showing the desktop or media, the display output is now active.
- Refresh external display detection: If no image appears, repeat external display detection from the source device. If the projector is detected after this step, wait for the display output to switch before changing other settings.
- Repeat the restart order: Turn off both devices, reconnect them, power on the projector first, select the correct input source, and then start the source device. If the image appears after restarting, the signal was likely restored during device recognition.
- Scenario check: If the projector reports a connected device but the screen remains blank, the projector input is likely correct while the source device is still sending an inactive or unsupported display output. Confirm the display output before moving to later compatibility troubleshooting.
This chart shows the step-by-step troubleshooting process for a projector displaying no signal, including checking input source, display output, and performing a restart order.
HDMI and AV Cable Signal Fixes
HDMI and AV cable signal problems should be isolated before replacing any hardware. Test HDMI seating, cable direction, cable length, and a known-good cable first so the result indicates whether the cable, adapter, or port is causing the no-signal condition.
Change only one cable-related variable at a time to avoid masking the fault.
Change only one cable-related variable at a time to avoid masking the fault. Each test should end with an observable result that helps determine whether the cable signal path, adapter direction, or port selection requires further attention.
- Check HDMI seating: Disconnect and reconnect the HDMI cable until both connectors are fully inserted. If the image appears, incomplete HDMI seating was interrupting the cable signal.
- Test a shorter cable: If you are using a long HDMI cable, temporarily connect a shorter cable. If the shorter cable restores the image, the original cable path is more likely to be the source of the signal problem.
- Use a known-good alternate HDMI cable: Replace the existing cable with a known-good cable that works with another display. If the signal returns, the original HDMI cable is the likely fault; if no signal remains, continue isolating the adapter or projector port.
- Verify AV plug alignment: Match each AV cable plug to the correct colour-coded or labelled AV input. If the picture appears after correcting the alignment, the issue was incorrect AV plug alignment rather than a failed cable.
- Confirm adapter direction and port selection: Ensure the adapter supports the required signal direction and that the source device is connected to the selected projector input. If changing the adapter orientation or port restores the image, the cable itself is less likely to be defective.
- Repeat the power-cycle order: Turn off both devices, reconnect the cable, power on the projector first, then start the source device. If the image returns after restarting, the signal was restored during device detection.
| Test | If signal returns | If no signal remains |
|---|---|---|
| Known-good cable | The original cable is the most likely fault. | Continue testing the adapter or projector port before replacing hardware. |
| Port selection | The previous input selection or port was preventing the signal. | Continue isolating the adapter or source device. |
| Adapter direction | The adapter orientation or signal support was preventing the connection. | The projector port or source device requires further troubleshooting. |
Phone and Laptop No Signal Fixes
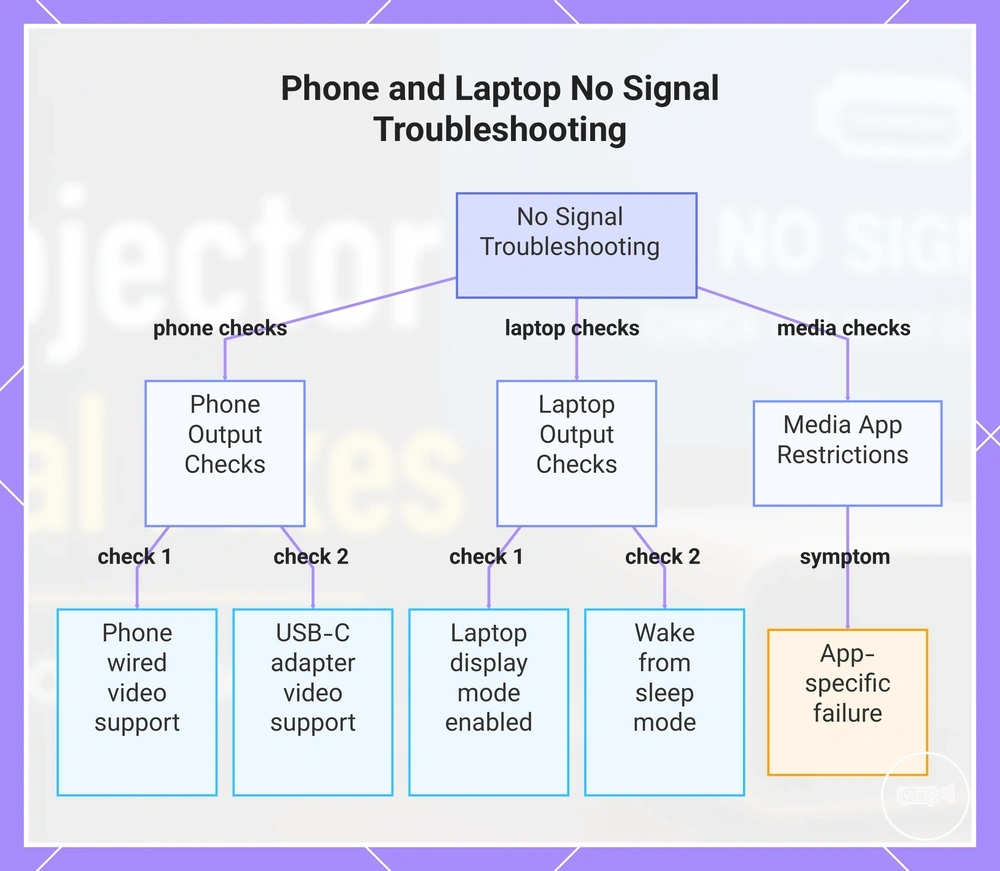
Phone no signal and laptop no signal issues are often caused by the source device's output capability or display settings rather than the mini projector itself. Confirm that the device can send a video signal and that external display output is enabled before troubleshooting the projector.
Confirm that the device can send a video signal and that external display output is enabled before troubleshooting the projector.
Check the source device one setting at a time so each result isolates whether the problem is the phone, USB-C adapter, laptop display mode, or media output instead of the projector.
For example, a phone connected through a charge-only USB-C port can charge normally but still display no image because no video signal is transmitted.
A phone must support wired video output for a projector to receive a signal, and the USB-C adapter must support video transmission instead of charging only. For example, a phone connected through a charge-only USB-C port can charge normally but still display no image because no video signal is transmitted.
If media playback fails only in one application, app restrictions may block external playback even though the projector connection is working.
Laptop no signal problems commonly occur when the laptop display mode leaves the external display disabled or when sleep mode suspends video output. If media playback fails only in one application, app restrictions may block external playback even though the projector connection is working. When these troubleshooting checks are complete and the issue appears to be the connection method instead of the signal path, see how to connect a mini projector.
- Phone output capability: If the phone does not support wired video output, the projector cannot receive a video signal.
- USB-C adapter: Verify that the USB-C adapter supports video output. A charge-only USB-C adapter or charge-only USB-C port supplies power but does not transmit video.
- Laptop display mode: If external display output is disabled, switch to duplicate or extend mode and check whether the projector detects the signal.
- Media output: If only one streaming or media app shows a blank screen, app restrictions are more likely than projector failure.
- Sleep or disabled external display output: Wake the laptop and confirm that disabled external display output has been re-enabled before repeating the signal test.
This chart shows the key checks to identify whether a no-signal issue is caused by the source device's output capability or display settings rather than the mini projector.
Wireless Display Signal Problems
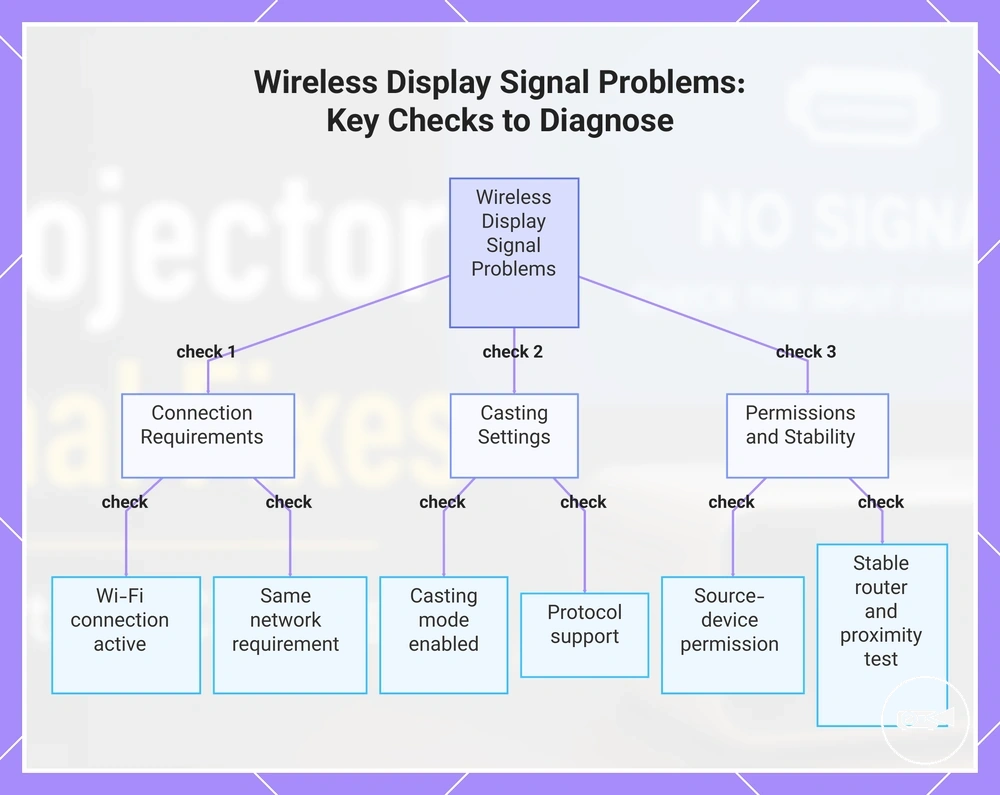
Wireless display signal problems are usually caused by the wireless connection path rather than the mini projector itself. Successful wireless casting requires a valid Wi-Fi connection, the correct casting mode, compatible protocol support, and source-device permission before a display signal can reach the projector.
Continue checking wireless-specific conditions before changing projector settings or replacing hardware.
If an HDMI connection displays an image while wireless casting still reports no signal, the fault is likely limited to the wireless display path instead of the projector. Continue checking wireless-specific conditions before changing projector settings or replacing hardware.
If an HDMI connection displays an image while wireless casting still reports no signal, the fault is likely limited to the wireless display path instead of the projector.
Wireless support differs between projectors and source devices, so confirm that both devices support the same casting technology and required permissions before expecting wireless display to work.
- Wi-Fi connection: Confirm that the required Wi-Fi connection is active. If the wireless network is unavailable, the projector cannot establish a wireless display session.
- Casting mode: Verify that screen mirroring or the correct casting mode is enabled. If casting mode is disabled, no display signal is transmitted.
- Same-network requirement: When the selected casting protocol requires it, connect both devices to the same network. If they are connected to different networks, device discovery or casting can fail.
- Protocol support: Check that both devices support the same wireless display protocol, such as Miracast or an AirPlay-like compatibility mode. Unsupported protocol combinations prevent a wireless display connection.
- Source-device permission: Confirm that the operating system or app allows wireless casting. For example, an app may block casting of protected content even though screen mirroring is available.
- Router stability and hotspot: If the wireless display disconnects repeatedly, test with a stable router or supported hotspot and move the source device closer to the projector. If stability improves, the issue is likely limited to the wireless connection rather than the projector.
This chart shows the main checks to perform when a wireless display shows no signal, helping to isolate the issue to the wireless connection path rather than the projector.
Resetting a Mini Projector After Signal Failure
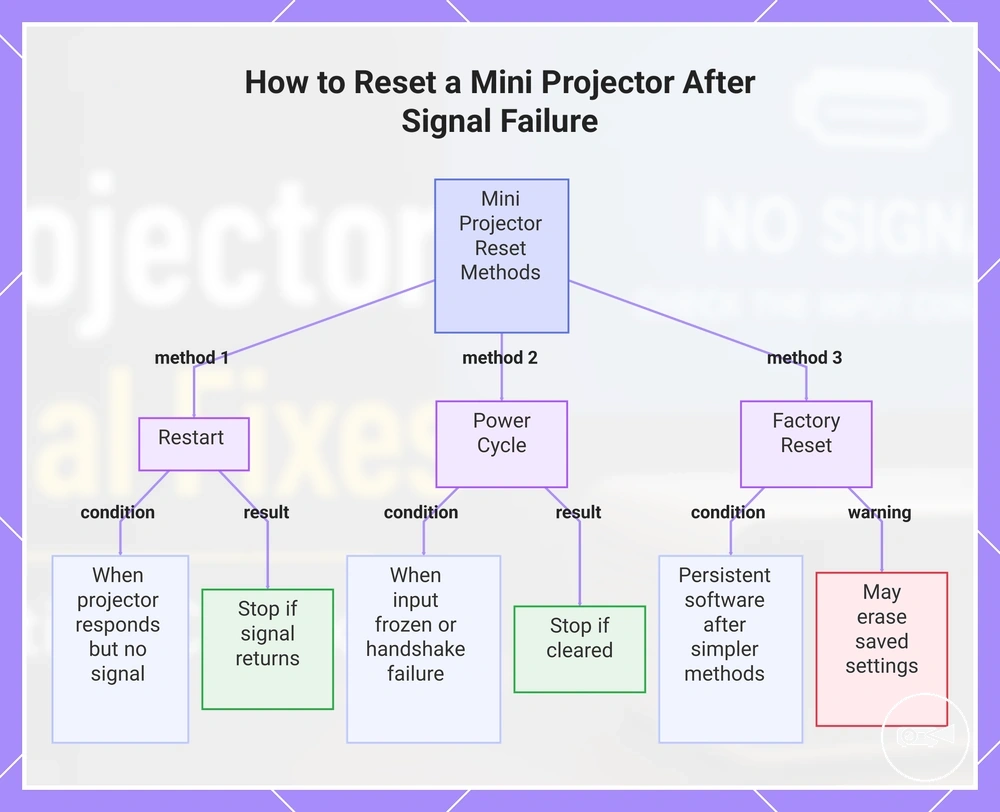
Resetting a mini projector is most useful when signal failure is caused by a temporary handshake failure, a frozen input state, or a firmware or menu lockup rather than a hardware problem. Start with a restart or power cycle because these methods can clear temporary software states without removing saved settings, while damaged cables, ports, adapters, or unsupported source devices require separate troubleshooting.
Decision: Use a restart when the projector responds but the signal does not return.
Decision: Use a restart when the projector responds but the signal does not return. Use a power cycle when the input state appears frozen or a temporary handshake failure is suspected. Reserve a factory reset for persistent software or configuration problems after simpler reset methods have failed because it restores default settings rather than repairing physical faults.
Use a power cycle when the input state appears frozen or a temporary handshake failure is suspected.
Before performing a factory reset, consult the model manual because reset procedures differ between projectors. A factory reset may remove saved network settings, display settings, installed apps, or other customised preferences depending on the model.
- Restart the projector and stop if the display signal returns normally.
- If the problem continues, perform a complete power cycle by turning the projector off, disconnecting power, reconnecting it, and starting it again. Stop if the temporary handshake failure or frozen input state is cleared.
- If the projector interface remains unresponsive because of a firmware or menu lockup, use a soft reset only if your model provides that option. Do not continue if normal operation is restored.
- Perform a factory reset only when restart and power cycle have not resolved the signal failure and a software or settings problem remains the likely cause. Follow the model manual instead of using unofficial button combinations.
This chart shows the three main reset methods for a mini projector after signal failure, including when to use each and their expected results.
When the Cable, Adapter, Port, or Projector Is the Fault
Fault isolation is most reliable when you change only one variable at a time and observe whether the display signal returns. Compare a known-good cable, an alternate source device, a different projector port, or a direct connection before concluding that a cable fault, adapter fault, port fault, source device, or projector fault is the likely cause.
Fault isolation is most reliable when you change only one variable at a time and observe whether the display signal returns.
Repeated failure after controlled testing increases the likelihood of a hardware fault, but it does not identify the exact component by itself. For example, if multiple known-good cables and more than one source device all produce the same no-signal result on the same projector, the projector or one of its input ports becomes the more likely fault. Escalate to repair only after the testing sequence is complete or when visible port damage, overheating symptoms, or repeated failure across known-good devices indicates a likely hardware problem.
| Test | Change made | Result | Likely fault |
|---|---|---|---|
| Known-good cable | Replace only the cable | Signal returns | Cable fault in the original cable |
| Alternate source device | Connect a different source device | Only one source device fails | Source device or its video output configuration is the likely fault |
| Alternate projector port | Use a different projector input | One port fails while another works | Port fault in the original projector port is the likely cause |
| Direct connection | Remove the adapter or intermediary device and connect directly, confirming the correct adapter direction | Signal returns | Adapter fault, incorrect adapter direction, or an intermediary device is the likely fault |
| Repeated failure across devices | Test multiple known-good cables and alternate source devices | No combination restores the signal | Projector fault becomes more likely and further hardware diagnosis or warranty assessment is appropriate |
If controlled testing consistently points away from the cable, adapter, and source device, broader interface compatibility may need separate review before replacing hardware. See mini projector connectivity for compatibility criteria beyond fault isolation.