
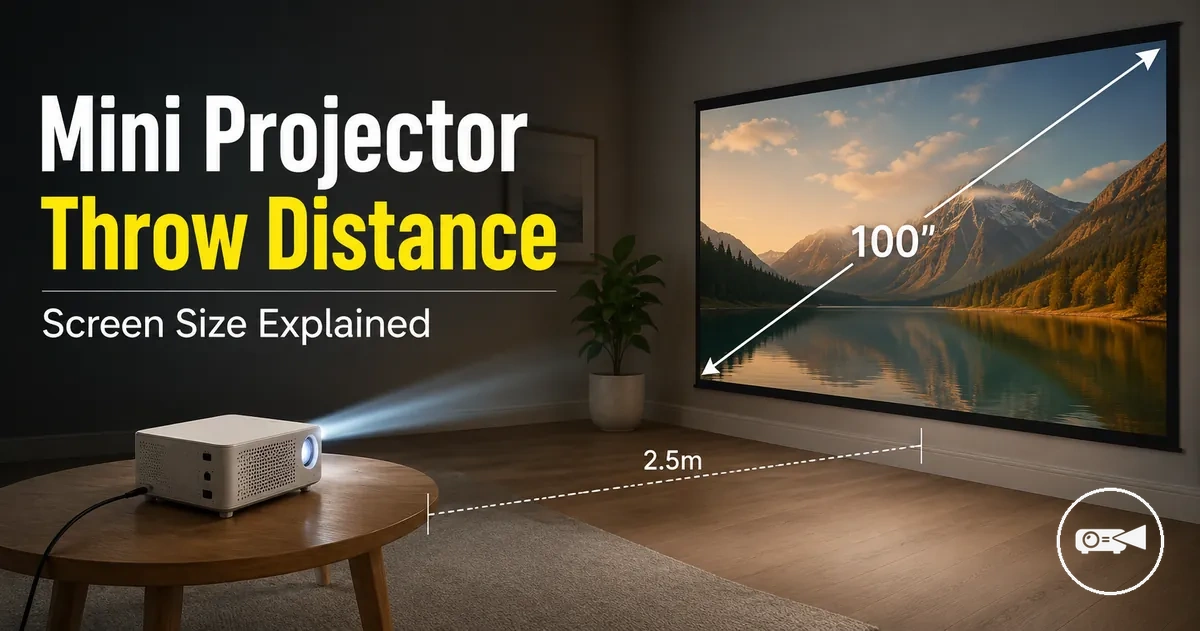
Mini Projector Throw Distance and Screen Size
A mini projector creates a larger or smaller picture according to the space between its lens and the projection surface. This makes throw distance and screen size linked sizing variables.
This makes throw distance and screen size linked sizing variables.
A room with limited depth may not provide enough projector distance for the screen diagonal you want, while a smaller viewing area can fit within a shorter space. ProjectorCentral defines throw ratio as distance divided by image width, so the estimated distance equals the projector's throw ratio multiplied by the required image width. Models with different lenses or zoom ranges can produce different image sizes from the same position. The available room depth, wall or portable screen dimensions, alignment, and placement stability should therefore be checked before selecting a mini projector.
Models with different lenses or zoom ranges can produce different image sizes from the same position.
Start by converting the target screen size into image width, then apply the model's throw ratio to estimate whether the projected image will fit the room and projection surface. Verify the estimate against the projector specification or a model-specific calculator before purchase because the supported throw range determines the final fit.
Table of Contents
Throw Distance, Throw Ratio, and Image Size Basics
Throw distance is the lens-to-screen or lens-to-wall distance that helps determine the projected screen size of a mini projector. Throw distance, throw ratio, and image width form the basic sizing relationship used to estimate diagonal size and assess room fit.
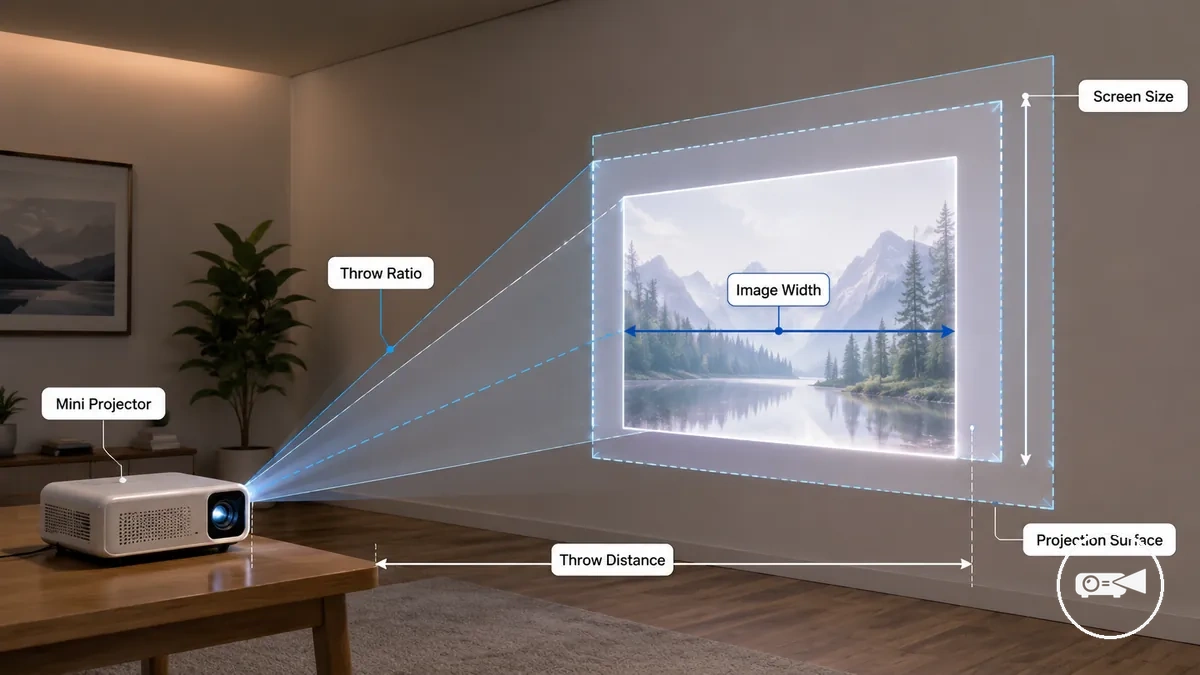
The formula organizes projection distance, throw ratio, and image width: throw ratio = throw distance ÷ image width, while image width = throw distance ÷ throw ratio. BenQ defines throw ratio through this distance-to-image-width relationship; diagonal size is the corner-to-corner screen measurement, so it must be derived from image width and the projector's aspect ratio. For example, at the same throw distance, a lower throw-ratio setting produces a wider image than a higher setting, while an optical zoom range allows more than one image width from the same projector position.
A calculator provides an estimate rather than a model-specific placement guarantee.
A calculator provides an estimate rather than a model-specific placement guarantee. The usable result is limited by the mini projector's stated throw-ratio or zoom range, lens design, placement tolerance, alignment, and projection surface; a flat, squarely aligned surface preserves the intended image geometry, while an angled or uneven surface can distort the image and reduce practical image quality.
How Throw Ratio Connects Distance to Image Width
A mini projector uses throw ratio to connect throw distance to image width: divide the projector distance by the throw ratio to estimate the width of the projected image. This relationship provides the practical sizing step between projection distance and screen size.
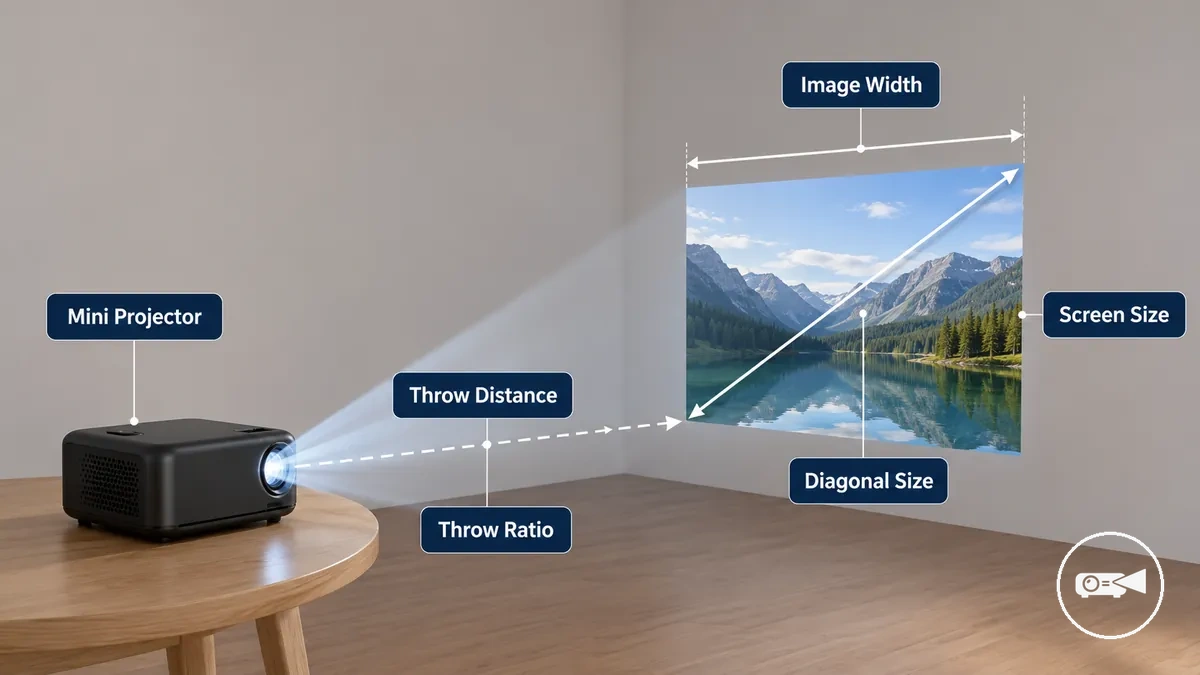
The following example calculates image width from a known distance and throw ratio: image width = throw distance ÷ throw ratio. For example, a hypothetical throw distance of 3 metres and a throw ratio of 1.5:1 produce an estimated image width of 2 metres. The diagonal size is then derived from that width and the projector's specified aspect ratio.
The diagonal size is then derived from that width and the projector's specified aspect ratio.
A calculator provides an estimate rather than a universal measurement because optical zoom, the manufacturer's measurement point, and model specifications can change the effective image width at the same throw distance. Check the mini projector's stated throw-ratio range and aspect ratio before treating the estimated image size or screen diagonal as model-specific.
Why Mini Projector Distance Ranges Are Estimates
Published mini projector throw distance ranges are planning estimates because the resulting screen size is tied to model-specific optical and measurement conditions. The visual below clarifies how projector distance relates to image size while supporting an initial room-fit decision.
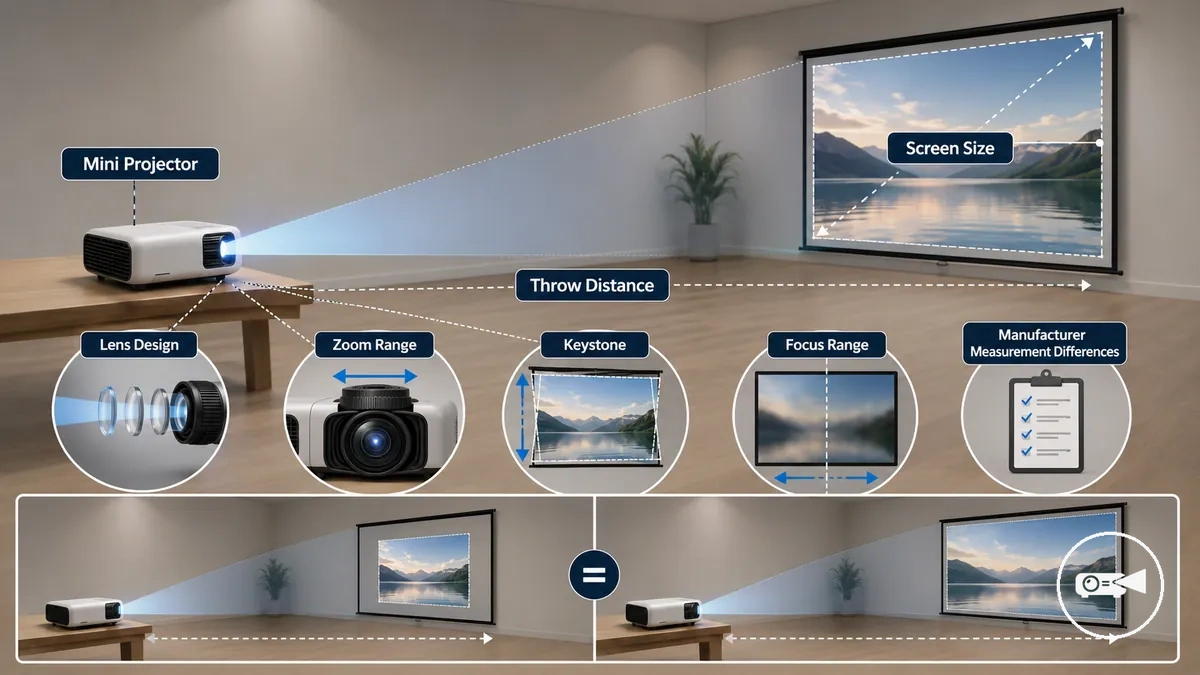
Lens design and zoom range determine how much image width a mini projector produces at a given throw distance, while keystone limits and focus range define the positions where alignment and image quality remain practical. Manufacturer measurement differences can also change the stated projection distance because specifications may use different lens reference points, zoom settings, aspect ratios, or image-size targets. For example, two models placed at the same distance can produce different screen diagonals when their throw ratios and optical configurations differ.
For example, two models placed at the same distance can produce different screen diagonals when their throw ratios and optical configurations differ.
A generic distance chart can narrow the likely placement range, but the specific model’s throw ratio, zoom limits, focus range, keystone guidance, and measurement conditions provide the model-aware estimate for screen size.
Calculating Screen Size From Projector Distance
Calculating screen size from projector distance starts with the available throw distance, then converts that distance into an estimated image width using the mini projector's throw ratio. The estimated image width can then be converted into a screen diagonal using the chosen aspect ratio, making this a practical way to plan screen size before installation.
The estimated image width can then be converted into a screen diagonal using the chosen aspect ratio, making this a practical way to plan screen size before installation.
The calculation follows a simple sequence because each value builds on the previous one:
| Input | Attribute | Estimated Value | Decision Effect |
|---|---|---|---|
| Known throw distance | Projection distance | Available installation space | Defines the maximum placement range |
| Throw ratio | Optical characteristic | Image width = Throw distance ÷ Throw ratio | Determines projected image width |
| Aspect ratio | Screen format | Calculated screen diagonal | Selects an appropriate screen size |
| Manufacturer calculator | Model-specific verification | Estimated placement confirmation | Checks room fit before installation |
For example, if a mini projector has a known throw distance and the manufacturer's specification lists its throw ratio, dividing the throw distance by the throw ratio provides an estimated image width. The aspect ratio then converts that width into an approximate screen diagonal. ProjectorCentral and manufacturer projection calculators use this same relationship to estimate image size while accounting for model-specific optical characteristics.
The aspect ratio then converts that width into an approximate screen diagonal.
Important limitation: A calculator provides an informed estimate rather than a guaranteed real-world result. Confirm the final screen size with the projector manufacturer's calculator or specifications because zoom range, brightness, resolution, viewing purpose, and placement adjustments can change the practical image size.
Using Throw Ratio to Estimate Image Width
Using throw ratio to estimate image width starts with a known throw distance and divides it by the mini projector's throw ratio to produce an estimated image width. That estimated width can then be converted into an approximate diagonal size using the selected aspect ratio, making the calculation a practical step for planning screen size.
The following checklist organises the calculation from known inputs to a verified estimate before final placement.
The following checklist organises the calculation from known inputs to a verified estimate before final placement.
- Known value: Use the available throw distance as the starting measurement because it defines the projector distance available in the room.
- Throw ratio: Divide the throw distance by the projector's specified throw ratio to estimate image width.
- Image width: Convert the calculated image width into an approximate diagonal size using the intended aspect ratio to estimate screen size.
- Example: For instance, if a projector specification lists a throw ratio and the installation distance is known, applying the ratio provides an estimated image width before calculating the screen diagonal.
- Verification: Confirm the estimate with the manufacturer's calculator or model specification because optical zoom and lens characteristics can produce different image widths for projectors installed at similar throw distances.
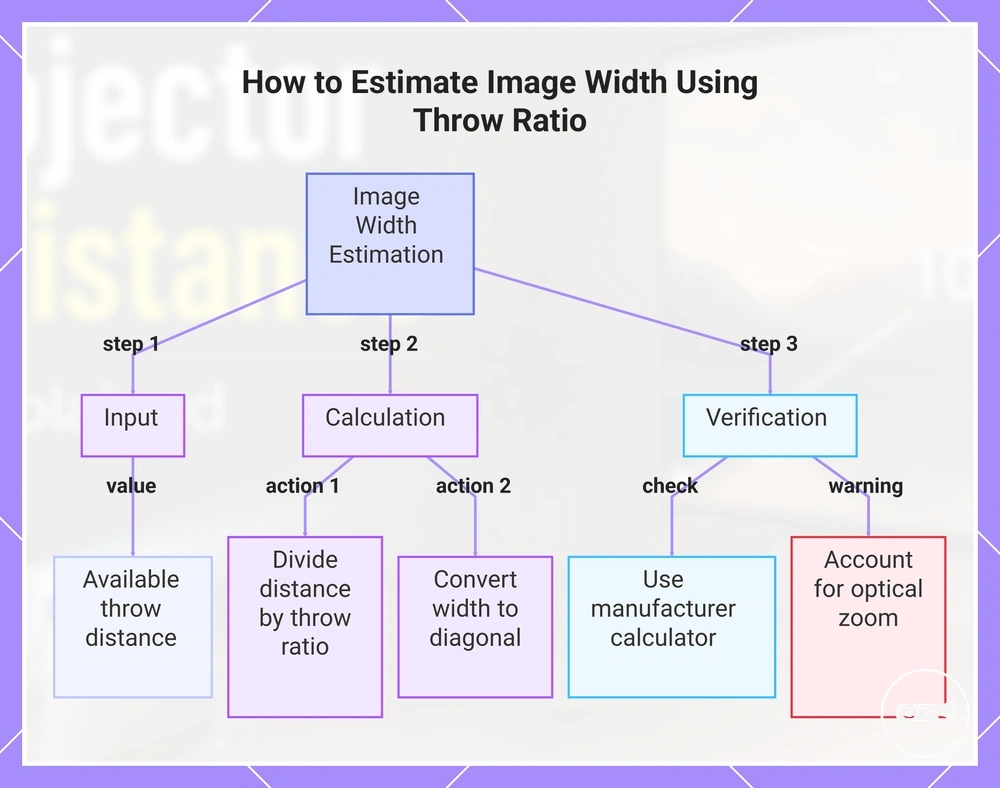
According to ProjectorCentral and manufacturer projection calculators, throw ratio defines the relationship between throw distance and image width, while the calculator applies each model's optical specifications to verify the estimated screen size. The calculation provides a reliable planning estimate, but the model-specific calculator remains the appropriate reference for confirming the final image size.
The calculation provides a reliable planning estimate, but the model-specific calculator remains the appropriate reference for confirming the final image size.
This chart shows the step-by-step process to estimate image width from throw distance and throw ratio, including verification with manufacturer specifications.
Checking Projection Calculators and Specification Sheets
Checking projection calculators and specification sheets verifies whether a manual screen size estimate matches the capabilities of a specific mini projector. Compare the calculated throw distance and screen size with the model's published specifications to confirm that the planned installation remains within the supported projection range.
The following checklist confirms whether the estimated screen size is realistic for the selected model.
The following checklist confirms whether the estimated screen size is realistic for the selected model.
- Model name: Verify that the calculator and specification sheet refer to the exact mini projector model because throw characteristics differ between models.
- Throw range: Check that the planned throw distance falls within the supported projection distance stated for the projector so the estimated image size remains applicable.
- Zoom range: Confirm whether optical or digital zoom is available because the supported zoom setting changes the achievable image width at the same installation distance.
- Image size: Compare the calculated screen size with the specified minimum and maximum image size to ensure the planned screen diagonal stays within the documented operating range.
- Measurement units: Match the units used by the calculator and specification sheet, such as metres or feet for throw distance and inches or centimetres for screen diagonal, before comparing values.
- Installation decision: Treat the calculator as a planning tool, then confirm the estimate during installation because projector alignment, placement, and room conditions can affect the final image size.
For example, if a manual calculation suggests an appropriate screen size for a known throw distance, compare that result with the manufacturer's calculator and specification sheet before mounting the projector. This cross-check helps confirm that the estimated image size is achievable for the selected mini projector under its documented operating conditions.
Room Size, Seating Distance, and Screen Fit
Room size should be checked before selecting a mini projector because the available space determines whether the desired screen size can be displayed comfortably. Compare the planned throw distance with the room depth, then confirm that the seating distance and wall dimensions support the intended screen fit without restricting placement.
Room fit is easier to evaluate when each physical constraint is reviewed together rather than in isolation.
Room fit is easier to evaluate when each physical constraint is reviewed together rather than in isolation. The table below organizes the main sizing variables that affect whether a projected image is practical for the available space.
| Input | Attribute | Estimated Value | Decision Effect |
|---|---|---|---|
| Room depth | Available throw distance | Measure the usable projector-to-screen distance | Confirms whether the projector can produce the intended screen size. |
| Wall width | Maximum image width | Projected image should remain within the usable wall area | Helps avoid image overflow or furniture obstruction. |
| Seating distance | Viewing comfort | Select a screen diagonal that matches the available viewing position | Improves viewing comfort without forcing an oversized image. |
| Projector placement | Installation tolerance | Allow enough space for alignment and focus adjustments | Supports easier positioning while maintaining image quality. |
| Screen height | Vertical fit | Keep the full image within the available wall height | Reduces cropping and excessive keystone correction. |
| Walking clearance | Room usability | Maintain a clear path around the projector and seating area | Prevents the projector location from interfering with normal room use. |
A small room often requires a smaller screen size because room depth limits throw distance, while a living room may allow a larger image if seating moves farther back. For a temporary setup, verify that furniture placement, wall width, and projection distance still support the planned screen fit before positioning the mini projector.
A small room often requires a smaller screen size because room depth limits throw distance, while a living room may allow a larger image if seating moves farther back.
When the same projector will also be used outside the home, consider how room-based planning differs from outdoor mini projector setup factors, where projection distance and available surfaces are evaluated under different installation conditions.
Small Room Limits for 60 to 100 Inch Screens
A compact room can support a 60 to 100 inch screen size only when the mini projector's required throw distance fits within the usable room depth and the viewer can sit behind that placement without crowding the image. Check projection distance first, then compare image width, wall width, and seating distance to determine practical screen fit.
Small-room fit depends on both projector placement and viewing comfort.
Small-room fit depends on both projector placement and viewing comfort. For a 16:9 image, a 60 inch screen diagonal produces an image about 52 inches wide, while a 100 inch diagonal produces an image about 87 inches wide; these approximate widths follow the aspect-ratio geometry rather than a specific projector specification.
| Input | Attribute | Estimated value | Decision effect |
|---|---|---|---|
| Room depth | Usable projector and seating space | Available depth after allowing for the screen, projector, viewer, and walking area | A shorter usable depth limits either throw distance, seating distance, or both. |
| Projector placement | Required throw distance | The model-specific projection distance for the selected screen diagonal | The planned image is unsuitable when the required distance exceeds the available placement range. |
| Screen diagonal | Approximate 16:9 image width | About 52 inches at 60 inches diagonal and 87 inches at 100 inches diagonal | The usable wall width must exceed the image width and leave space for alignment. |
| User position | Seating distance | A position that keeps the full image within a comfortable field of view | Moving the viewer too close can make a larger screen difficult to scan, even when projection is technically possible. |
For example, a temporary setup may accommodate a 60 inch image because its smaller width leaves more wall and placement tolerance, while a 100 inch image may exceed the available wall width or force the seating position too close. The full 60 to 100 inch range should therefore be checked against the mini projector's specification and the room's measured dimensions rather than treated as available in every small room.
Viewing Distance and the 4 6 8 Rule
The 4 6 8 rule can guide seating distance for a mini projector by matching the viewer’s position to the level of detail in the content. It uses multiples of screen height rather than screen diagonal, making it a practical comfort and readability check rather than a rule for calculating throw distance or screen size.
The 4 6 8 rule can guide seating distance for a mini projector by matching the viewer’s position to the level of detail in the content.
The rule organizes viewing distance by content type and viewing comfort:
- Detailed text: Position the viewer no farther than four times the screen height when small text or fine visual detail must remain readable.
- Mixed use: Use a maximum distance of six times the screen height for presentations or content combining text, graphics, and video.
- Casual video: A viewing position up to eight times the screen height suits passive movie or video viewing where fine text is not the main concern.
- Screen height: Measure the visible image vertically because the 4, 6, and 8 multipliers apply to screen height, not the advertised diagonal.
- Viewer comfort: Move closer when text is difficult to read or the image feels visually small, and move farther back when the screen exceeds the viewer’s comfortable field of view.
For example, a temporary mini projector setup used mainly for films can place seating farther from the screen than a setup used for spreadsheets or presentation text. Viewing distance affects readability and comfort, while throw distance and throw ratio determine the projected image width and must still be checked against the projector specification.
Choosing the Best Screen Size for a Mini Projector
Choose a mini projector screen size that fits the available wall, falls within the model’s stated throw distance range, and remains clear from the intended seating distance. The practical target is the largest screen diagonal that preserves adequate brightness, visible resolution, and comfortable viewing for the planned content.
The practical target is the largest screen diagonal that preserves adequate brightness, visible resolution, and comfortable viewing for the planned content.
Use the following checklist to filter screen size by room fit and projector capability rather than selecting the largest possible image:
- Throw distance: Keep the projector-to-screen position within the model’s specification for the selected screen diagonal; a larger image requires a longer projection distance unless the projector uses a shorter throw ratio.
- Brightness: Choose a smaller image when ambient light makes the projection look washed out, because concentrating the available light over less screen area produces a brighter-looking result.
- Resolution: Prefer a smaller, sharper image when text, interfaces, or fine detail are central to the viewing purpose; enlarging a low-resolution image makes its pixel structure and softness easier to notice.
- Seating distance: Reduce the screen diagonal when the closest practical seat makes the image difficult to scan, and increase it only when the farthest viewer can still resolve the required detail.
- Aspect ratio: Match the projection surface to the projector’s native image shape, such as 16:9 for widescreen content, because a mismatched ratio leaves unused screen area or requires cropping.
- Content type: Use a brighter, sharper image for presentations and text-heavy material, while films and casual video can support a larger image when the room is dark and detail remains acceptable.
For example, a mini projector may technically fill a large wall, but a smaller screen size is the stronger decision when the larger image appears dim, soft, or uncomfortable from the available seats. The final screen diagonal should therefore satisfy room fit, image quality, and viewing purpose before maximum size.
The final screen diagonal should therefore satisfy room fit, image quality, and viewing purpose before maximum size.
For a film-focused setup, compare the same constraints when choosing a screen size for movies, while retaining the projector specification as the limit for throw distance and supported image size.
This chart shows the key factors to consider when selecting a screen diagonal for a mini projector, grouped by room fit, image quality, and viewing purpose.
This chart shows the key factors to consider when selecting a screen diagonal for a mini projector, grouped by room fit, image quality, and viewing purpose.
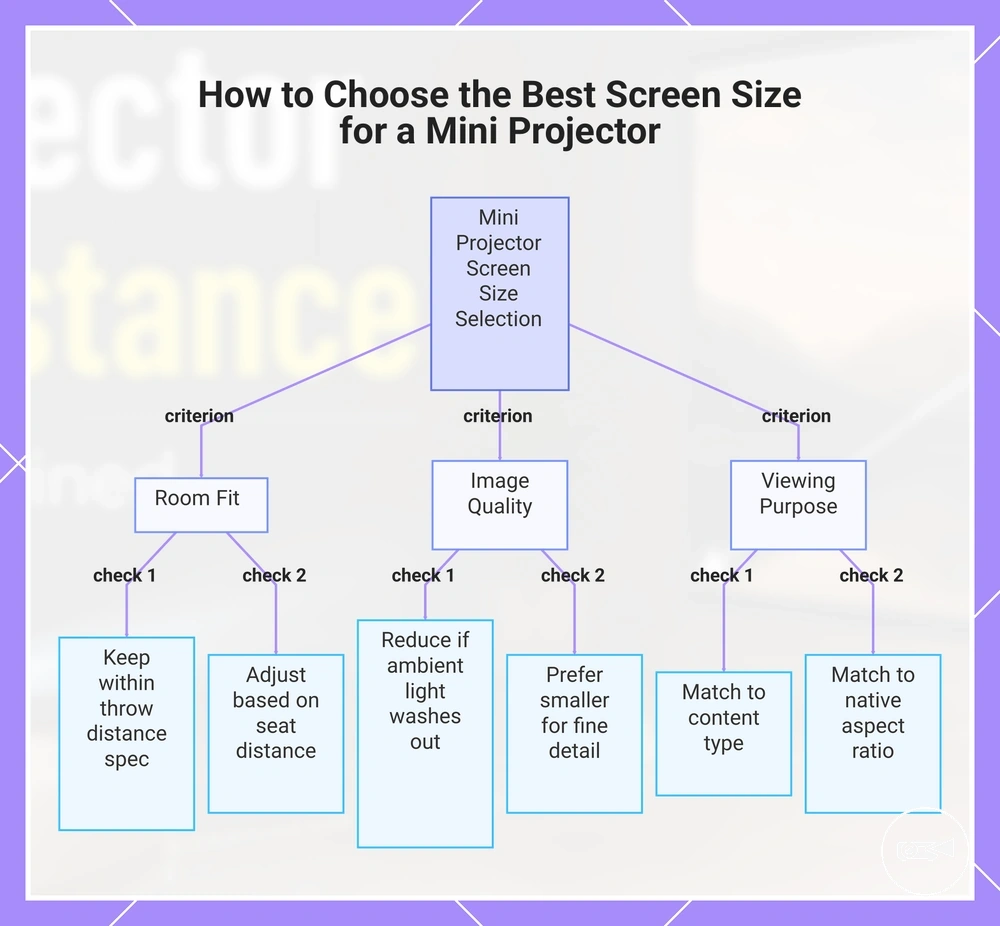
Image Size, Brightness, and Sharpness Balance
A mini projector should use a smaller screen size when increasing the screen diagonal makes the image look dimmer or less defined for the intended viewing purpose. The practical limit is the largest image that preserves usable brightness, visible resolution, stable focus, and comfortable viewing from the available seating distance.
A mini projector should use a smaller screen size when increasing the screen diagonal makes the image look dimmer or less defined for the intended viewing purpose.
The following criteria balance image size against the light and detail available from the projector:
- Image diagonal: Increasing the screen diagonal spreads the projector’s lumen output across a larger projection surface, so perceived brightness decreases when projector output and room conditions remain unchanged.
- Ambient light: Use a smaller or brighter-looking image when windows or room lighting reduce contrast, because ambient light makes dark areas appear lighter and fine detail harder to distinguish.
- Native resolution: Prefer a smaller screen size for text-heavy content when enlargement makes pixels, softness, or scaling artefacts more visible; a higher native resolution supports finer detail at the same image size.
- Focus and alignment: Reduce image size or correct projector placement when the centre is sharp but the edges remain soft, because excessive digital correction or an angled projection surface can reduce uniform sharpness.
- Viewing distance: A larger image can remain acceptable from farther seating, while closer viewers usually notice softness and pixel structure sooner.
- Throw distance: Confirm that the selected image width falls within the mini projector specification, because throw ratio and projector distance determine the achievable screen size before brightness and sharpness are judged.
For example, a large image may suit casual video in a dark room, while the same mini projector may produce a clearer result at a smaller screen diagonal for subtitles, presentations, or interface text. Choose the smaller, sharper, or brighter image whenever maximum size weakens readability, focus consistency, or overall image quality.
Aspect Ratio and Screen Dimensions
Aspect ratio changes the physical width and height of a projected image even when the screen diagonal stays the same. For a mini projector, selecting the correct aspect ratio helps determine whether the chosen screen size fits the available wall and matches the intended content format, making it a practical sizing decision rather than a display-format choice.
The table below shows how the same screen diagonal produces different dimensions depending on the aspect ratio.
The table below shows how the same screen diagonal produces different dimensions depending on the aspect ratio.
| Input | Attribute | Estimated value | Decision effect |
|---|---|---|---|
| Same screen diagonal | 16:9 aspect ratio | Wider image with less height | Usually suits modern widescreen video and requires more horizontal wall space. |
| Same screen diagonal | 4:3 aspect ratio | Narrower image with greater height | Fits legacy presentation content and requires less wall width but more vertical space. |
| Mini projector placement | Throw distance | Image width changes with the selected aspect ratio while projection distance remains based on the projector specification. | Verify that the projected width fits the available projection surface before choosing the screen size. |
| Content format | Screen fit | Matching the source aspect ratio reduces unused screen area or image cropping. | Select the screen dimensions that align with the primary viewing content. |
For example, two screens with the same diagonal can occupy different amounts of wall space because a 16:9 image is wider than a 4:3 image. Check the projected image width against the available wall and confirm that the mini projector's specified throw distance can produce the selected screen size without exceeding the room's physical limits.
Short Throw Mini Projectors for Compact Spaces
A short throw mini projector is compatible with a compact space when the target screen size cannot be produced from the placement distance available to a standard throw model. The practical decision is whether the shorter throw distance solves the room-depth constraint while preserving a stable placement surface and correct image alignment.
The practical decision is whether the shorter throw distance solves the room-depth constraint while preserving a stable placement surface and correct image alignment.
The comparison below shows how throw type changes placement needs for the same image-size target:
- Short throw: Produces the target image width from a shorter placement distance, making it suitable when furniture, walkways, or limited room depth prevent the projector from sitting farther back.
- Standard throw: Requires more projector distance for the same screen size but can provide greater placement flexibility when the room has enough depth and a clear projection path.
- Screen size target: Match the required screen diagonal to the model’s stated throw ratio and distance range; a short throw label alone does not confirm that every image size will fit the available space.
- Placement surface: Use a level, stable surface within the supported projection distance, because small position changes are more noticeable when the projector sits close to the screen.
- Setup flexibility: Choose short throw when reduced room depth is the controlling constraint, but retain standard throw when rear placement, easier cable routing, or movement around the screen area is more practical.
For example, a compact space with shallow room depth may not allow a standard throw mini projector to reach the intended screen size before the projector meets the rear wall. A short throw model can reduce the required placement distance, provided its specification supports the target image width and the available surface keeps the projection square to the screen.
Short throw therefore addresses a distance-and-fit constraint; it does not by itself establish higher brightness, resolution, or image quality.
Ultra-short throw projectors use a different near-screen placement pattern and often require more precise surface alignment, while a standard mini projector normally needs a clearer path from farther back. Short throw therefore addresses a distance-and-fit constraint; it does not by itself establish higher brightness, resolution, or image quality.
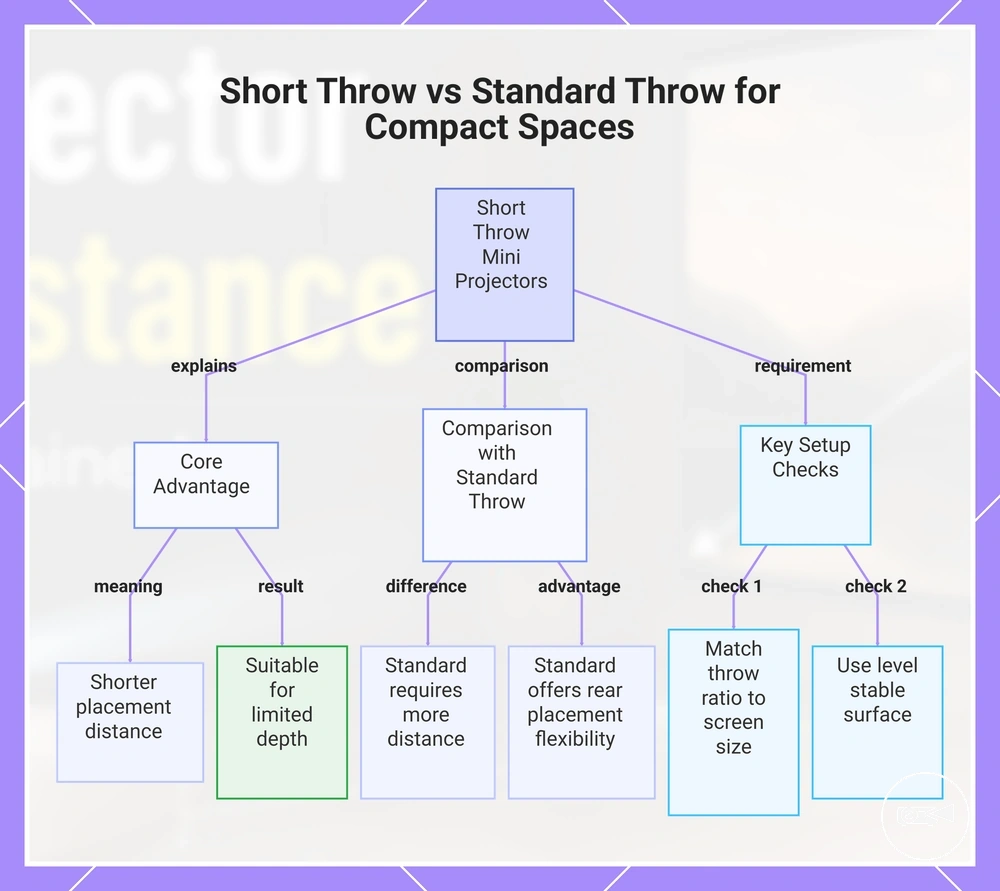
This chart compares short throw and standard throw mini projectors, showing how throw type affects placement distance, screen size matching, and setup flexibility in compact spaces.
This chart compares short throw and standard throw mini projectors, showing how throw type affects placement distance, screen size matching, and setup flexibility in compact spaces.
When Short Throw Placement Solves Distance Limits
Short throw placement is the right choice when the available throw distance is too short for a standard throw mini projector to produce the required screen size. The decision should be based on room fit, target image size, and placement constraints rather than on the assumption that short throw improves image quality.
The decision should be based on room fit, target image size, and placement constraints rather than on the assumption that short throw improves image quality.
The following criteria help determine whether short throw placement solves a practical distance limit:
- Available distance: Choose short throw when the projector cannot be positioned far enough from the screen for a standard throw model to reach the target image width.
- Target diagonal: A larger screen size in a compact space is easier to achieve when the projector's specified throw ratio supports that screen diagonal from a shorter placement distance.
- Furniture position: Short throw placement reduces the need to place the mini projector behind seating or at the back of the room, making furniture layout less restrictive.
- Cable reach: A shorter projection distance can simplify temporary installations by allowing power and video cables to remain closer to the screen location.
- Screen location: Confirm that the intended projection surface provides enough space for proper alignment, because placing the projector closer to the screen does not remove the need for accurate positioning.
For example, a living room with limited rear placement may not allow a standard throw projector to create the desired image size before reaching the back wall. In that situation, a short throw mini projector can satisfy the same screen size target from a shorter placement distance when its published throw ratio supports the planned setup.
When Standard Throw Remains Practical
A standard throw mini projector remains practical when the available throw distance is sufficient to produce the intended screen size without moving the projector beyond the usable room depth. Measure the available placement distance first, then compare it with the projector's specified throw ratio to confirm that the planned screen diagonal fits the room.
Measure the available placement distance first, then compare it with the projector's specified throw ratio to confirm that the planned screen diagonal fits the room.
The following criteria help determine whether a standard throw setup is suitable:
- Moderate room depth: The available projection distance is long enough for the desired image width without requiring a short throw model.
- Smaller screen target: A modest screen size can often be achieved within the available placement distance using a standard throw projector.
- Adjustable stand height: Height adjustment helps align the image with the projection surface while maintaining the planned throw distance.
- Acceptable viewing distance: Seating remains comfortably positioned relative to the selected screen size without forcing the projector into the viewing area.
- Verified specifications: Match the room depth and screen location to the manufacturer's stated throw ratio rather than assuming every standard throw mini projector produces the same image size.
For example, if a compact space still provides enough floor depth to position the projector at its specified placement distance, a standard throw model can achieve the required screen size without changing to a short throw design. The decision should be based on measured room dimensions and verified projector specifications instead of assuming one throw type is universally better.
Projection Surface and Screen Choice
Projection surface and screen choice directly affect usable screen size, image alignment, and perceived image quality when setting up a mini projector. A wall projection can work when the surface is flat and wide enough, while a portable projector screen provides a controlled projection surface that makes screen size and throw distance easier to reproduce consistently.
The comparison below highlights the factors that influence image fit before choosing a projection surface.
The comparison below highlights the factors that influence image fit before choosing a projection surface.
| Option | Attribute | Trade-off | Best use case |
|---|---|---|---|
| Wall projection | Surface flatness and available wall width | Irregular walls, texture, or limited width can reduce alignment accuracy and usable screen size. | Permanent rooms with a smooth, unobstructed wall. |
| Portable projector screen | Frame tension and portability | A tensioned screen helps maintain a flatter image surface, while portable models are easier to move but should be fully extended to minimise wrinkles. | Temporary rooms, shared spaces, or frequent setup changes. |
| Wall projection | Aspect ratio support | The available wall area must match the intended screen aspect ratio to avoid unused space or image resizing. | Rooms with sufficient wall clearance around the projected image. |
| Portable projector screen | Screen gain and alignment | Manufacturers such as BenQ and Elite Screens note that screen material and gain influence perceived brightness, while a dedicated screen also provides a consistent reference for image alignment. | Lower-light viewing where repeatable image placement is important. |
For example, a temporary meeting room may benefit from a portable projector screen because it provides a predictable projection surface even when suitable wall space is unavailable. In a living room with a smooth, uninterrupted wall, wall projection can still produce an appropriate image if the measured throw distance, screen size, and available wall width match the mini projector's specifications.
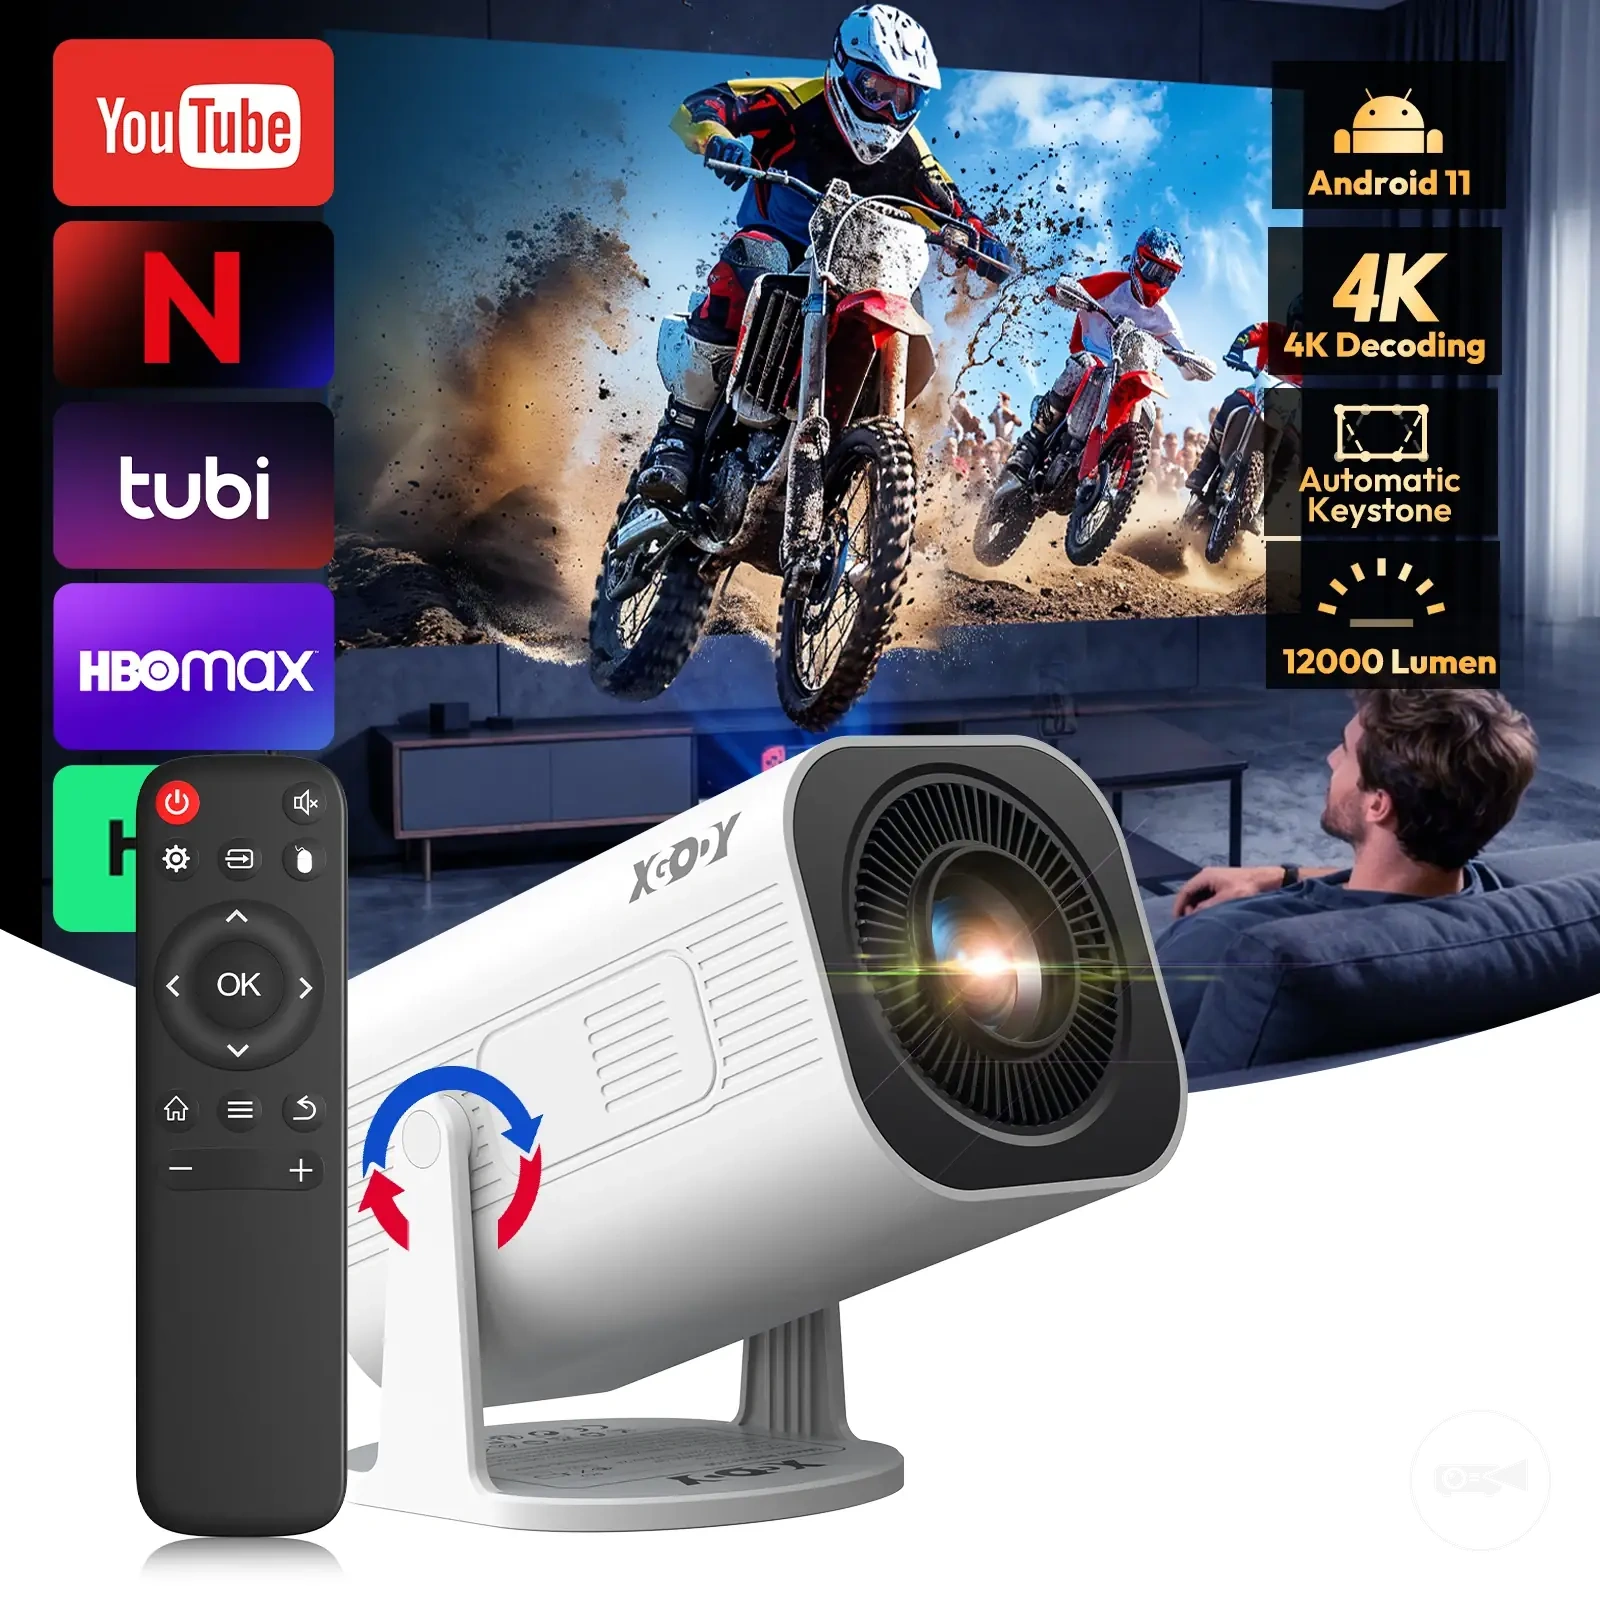
The products below are useful examples for comparing available options. Before buying, check that the compatibility criteria, key features, and product details match your needs.
Wall Projection Versus Portable Projector Screen
Wall projection suits a mini projector when the available wall is flat, reflective enough for the room conditions, and wide enough for the intended screen size, while a portable projector screen provides more consistent surface flatness, alignment, and image dimensions. The practical choice is the surface that preserves the required image size at the measured throw distance without introducing visible distortion or reducing usable image width.
The comparison below separates the practical surface attributes that affect fit and image-size reliability.
The comparison below separates the practical surface attributes that affect fit and image-size reliability.
| Option | Attribute | Trade-off | Best use case |
|---|---|---|---|
| Wall projection | Surface flatness and reflectivity | A smooth, light-coloured wall can provide a usable image, but bumps, texture, cracks, or uneven paint can reduce edge definition and make alignment less consistent. | A room with a clear wall that already matches the required image width. |
| Portable projector screen | Size consistency and edge definition | The fixed screen dimensions create a repeatable image boundary, while the usable screen size is limited to the screen's stated width and aspect ratio. | Setups where the same screen diagonal and alignment must be reproduced each time. |
| Wall projection | Setup time and available width | Projection can begin without assembling a screen, but furniture, doors, artwork, or narrow wall sections can restrict the maximum image size. | Permanent or occasional viewing where an unobstructed wall is already available. |
| Portable projector screen | Portability and surface tension | A portable projector screen can move between rooms, but loose fabric or incomplete tensioning can introduce wrinkles that disturb straight image edges. | Temporary rooms or shared spaces where the projection surface must move with the mini projector. |
For example, wall projection can be practical when a room has a smooth wall wide enough for the target screen size and the projector can remain correctly aligned at its required placement distance. A portable projector screen is more suitable when room changes, uneven walls, or repeated setup make consistent image size and edge alignment more important than the shorter setup time of using a wall.
Portable Screen Size and Placement Constraints
A portable projector screen is compatible with a mini projector setup only when its open width, stand footprint, height, and screen diagonal fit the room while preserving the required throw distance and alignment. The projector may produce the intended image size, yet the screen can still be impractical if its frame, tripod, or viewing position exceeds the available space.
The projector may produce the intended image size, yet the screen can still be impractical if its frame, tripod, or viewing position exceeds the available space.
The following checklist verifies whether the portable projector screen can physically fit the room and support the intended viewing purpose:
- Screen width: The fully opened screen must fit within the available room width without blocking doors, furniture, or walkways; otherwise, select a smaller screen size even if the mini projector supports a larger image.
- Stand footprint: The tripod legs or floor supports must remain fully extended on a stable surface; a footprint that overlaps seating or circulation space makes the selected screen impractical.
- Screen height and viewing angle: The viewing area should sit high enough to remain visible above furniture but low enough to fit beneath the ceiling and stay within the projector's alignment range.
- Projector alignment: The screen centre should align with the projector's optical path at the planned throw distance; excessive horizontal or vertical offset can reduce usable image area and require digital correction.
- Image requirements: The screen diagonal should remain within the mini projector's stated image-size range, while lower brightness or resolution can make a larger image less suitable for the intended viewing purpose.
- Storage space: The folded screen, tripod, and carrying case must fit the available storage area; wall projection may be more practical when surface flatness is acceptable and equipment storage is limited.
For example, a portable projector screen may fit an outdoor viewing area when opened but become unsuitable if the tripod cannot stand securely within the available footprint. The same screen may work indoors where a level floor, controlled projection distance, and clear sightline preserve alignment and consistent image size.
Placement Stability for Consistent Image Size
Keep the mini projector fixed at the calculated throw distance and lens angle after choosing the screen size. Stable placement preserves the measured image width, screen fit, and alignment instead of allowing small movements to change the projected area.
Stability protects the measured projector distance and screen fit.
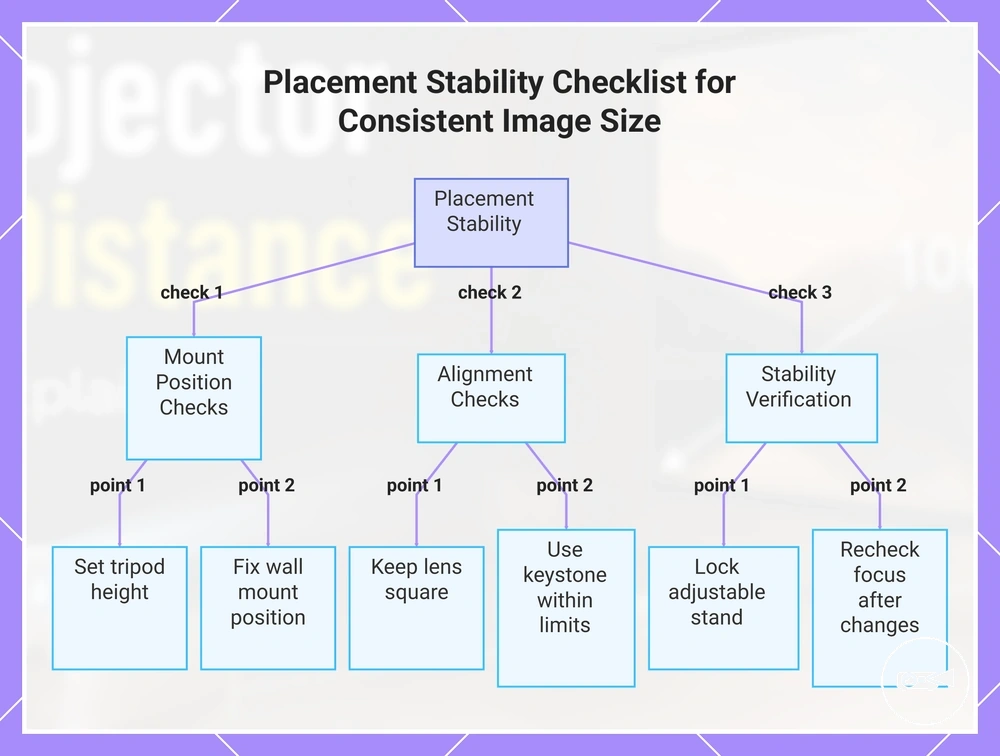
Stability protects the measured projector distance and screen fit. Use the following checklist to confirm that the support position preserves the chosen image size:
- Tripod height: Set the tripod at a height that places the lens near the intended projection axis; raising or lowering it later changes the lens angle and image position.
- Adjustable stand: Lock each stand adjustment after centring the image; an unlocked joint can tilt or shift the mini projector and reduce alignment consistency.
- Wall mount position: Fix the wall mount at the calculated throw distance and point it towards the screen centre; changing either position alters image size or introduces off-axis projection.
- Lens angle: Keep the lens as square to the projection surface as the room permits; a steep angle creates a trapezoidal image and increases reliance on keystone correction.
- Keystone limits: Use keystone only within the adjustment range stated for the model; correction reshapes the displayed image but does not replace correct physical alignment.
- Focus stability: Recheck focus after changing distance, height, angle, or screen diagonal; preserve the final focus setting once the projector and screen remain stationary.
For example, moving a tripod backwards after focusing increases the throw distance and image size, so the picture may extend beyond the selected screen. Returning the lens to the measured position restores the intended fit before final alignment and focus are checked.
For broader positioning and connection steps beyond size stability, follow the mini projector setup guidance.
For broader positioning and connection steps beyond size stability, follow the mini projector setup guidance.
If the projector remains stable but the picture lacks uniform sharpness, use blurry image troubleshooting to separate a focus issue from incorrect distance or lens alignment.
If the projector remains stable but the picture lacks uniform sharpness, use blurry image troubleshooting to separate a focus issue from incorrect distance or lens alignment.
This chart shows the key checks to confirm that stable projector placement preserves the chosen image size.
This chart shows the key checks to confirm that stable projector placement preserves the chosen image size.
Tripods and Adjustable Projector Stands
A tripod or adjustable stand is compatible with your selected mini projector setup when it can hold the projector at the required height and angle while maintaining the calculated throw distance for the chosen screen size. The stand's job is to preserve image size and alignment rather than change the projector's throw ratio or optical capabilities.
The stand's job is to preserve image size and alignment rather than change the projector's throw ratio or optical capabilities.
An adjustable stand helps fine-tune placement when a fixed wall mount is not practical or when the projection location changes between rooms. Height adjustment, tilt control, and a stable base make it easier to maintain focus and reduce the amount of keystone correction needed, because the projector can be physically aligned with the projection surface. For example, moving the stand slightly instead of relying on digital keystone typically preserves better image quality while keeping the intended image width at the calculated projection distance.
The checklist below verifies whether the selected stand supports the planned screen diagonal without changing the intended image size.
The checklist below verifies whether the selected stand supports the planned screen diagonal without changing the intended image size.
- Height range: The stand should raise or lower the mini projector enough to align the lens with the centre of the projection surface, reducing unnecessary keystone adjustment.
- Tilt control: Choose a stand with controlled angle adjustment so the projector can aim at the screen while maintaining focus across the entire image.
- Weight support: The stand's rated load should meet or exceed the projector's weight so the projection distance remains stable during use.
- Footprint stability: A wider, stable base helps prevent movement that could change throw distance or image alignment during temporary setups.
- Cable reach: Power and HDMI cables should reach the projector without pulling on the stand, which can shift image position or screen fit.
- Distance consistency: Position the stand so the lens remains at the estimated projection distance required by the projector's throw ratio and the target screen size.
Wall Mounts and Fixed Placement
A wall mount helps preserve a mini projector's measured throw distance and consistent screen alignment when the installation location will remain fixed. A stable mounting position reduces unintended movement that can change image size, focus, or wall projection alignment, making it easier to keep the intended screen size over time. This section focuses on maintaining reliable projector sizing rather than providing a complete installation guide.
This section focuses on maintaining reliable projector sizing rather than providing a complete installation guide.
Fixed placement works best after the required throw distance has already been estimated from the projector's throw ratio and the target screen diagonal. The wall mount should position the lens on the intended centerline of the portable projector screen or permanent projection surface because excessive keystone correction can reduce image quality, while proper physical alignment preserves focus and surface flatness. For example, if a projector is centered during the initial sizing calculation, reproducing that same lens position with a wall mount keeps the projected image close to the planned image width without repeatedly adjusting a tripod or adjustable stand.
The following checks confirm whether a fixed installation is practical while preserving the planned throw distance and screen alignment.
The following checks confirm whether a fixed installation is practical while preserving the planned throw distance and screen alignment.
- Mounting height: Position the lens at the model's recommended centerline so only minor keystone adjustment is needed, helping maintain image quality and focus.
- Throw distance: Install the wall mount only after confirming the required projection distance from the mini projector's specifications, because changing the mounting position changes the resulting screen size.
- Wall strength: Permanent mounting should be attached to a suitable structural surface using appropriate hardware. If the wall cannot support the installation, use an adjustable stand instead of drilling.
- Cable routing: Plan power and signal cables before fixing the mount so cable tension does not pull the projector away from its aligned position.
- Adjustment tolerance: Choose a mount that allows small alignment corrections after installation, since minor model-specific positioning changes may be needed to match the calculated image size.
- Rental-room considerations: If permanent drilling is restricted, a tripod or adjustable stand provides a non-permanent alternative while allowing the measured throw distance to be reproduced when repositioned carefully.
Screen Size Fit Before Buying a Mini Projector
A mini projector is a realistic fit when its specified throw ratio produces the target screen size within the measured room depth, while the planned brightness, resolution, and placement support remain suitable for the viewing purpose. This check turns the intended screen diagonal into a practical pre-purchase sizing decision.
This check turns the intended screen diagonal into a practical pre-purchase sizing decision.
The checklist below confirms whether the proposed throw distance and projection setup can produce a usable image before choosing a projector, screen, stand, or mount. For example, if the calculated image width fits the room but the larger screen makes the image too dim for the expected ambient light, reducing the screen diagonal is more practical than relying on placement adjustments.
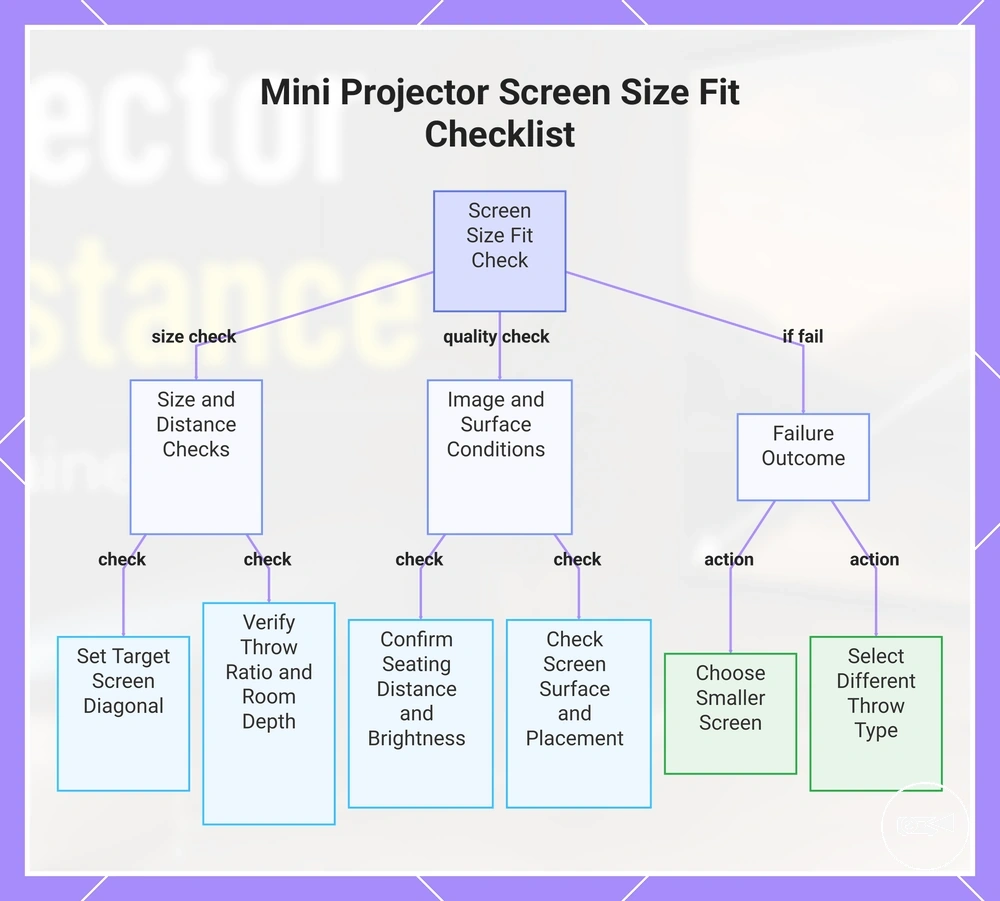
- Target screen diagonal: Set a specific diagonal that suits the viewing purpose; choose a smaller screen size when the available space or image brightness cannot support the original target.
- Measured room depth: Measure from the planned lens position to the projection surface and confirm that this projection distance falls within the model's stated throw-distance range.
- Throw ratio: Use the manufacturer's specified throw ratio to estimate image width at the measured distance; reject the placement when the calculated width does not match the target screen diagonal.
- Screen surface: Use a flat, unobstructed projection surface with stable alignment; visible waves, texture, or misalignment place a practical limit on image quality.
- Seating distance and resolution: Confirm that the planned seating position makes the selected screen size comfortable for the intended content and does not make limited resolution more noticeable.
- Brightness trade-off: Treat a larger image as a lower-brightness condition for the same projector output; reduce the diagonal when ambient light or viewing purpose requires a brighter image.
- Placement support and verification source: Confirm that a table, stand, or mount can hold the required lens position, then verify the throw ratio, supported image-size range, and placement limits in the mini projector manufacturer's specifications.
If any required distance, size, brightness, resolution, surface, or placement condition fails, choose a smaller screen or a mini projector with a different throw type before purchase. Use the mini projector buying guide to evaluate the remaining selection criteria after the room-fit decision is confirmed.
Use the mini projector buying guide to evaluate the remaining selection criteria after the room-fit decision is confirmed.
This chart shows the main checks to determine if a mini projector can produce the desired screen size within your room, and the action to take if any condition fails.
The products below are useful examples for comparing available options. Before buying, check that the compatibility criteria, key features, and product details match your needs.