Mini Projector Blurry Image Troubleshooting
A mini projector with a blurry image usually points to a diagnosable issue rather than one universal fault. The likely cause families are incorrect focus, lens contamination, unsuitable placement, poor source quality, incorrect settings, or model-specific hardware limits.
A mini projector with a blurry image usually points to a diagnosable issue rather than one universal fault.
If the picture looks soft, hazy, or only partly sharp, begin troubleshooting by identifying when and where the blur appears instead of assuming the mini projector is defective. A blurry image that changes when the focus wheel is adjusted points toward focus, throw distance, screen size, placement, or alignment, while unchanged blur can indicate dust, smudges, source compression, resolution, image settings, or a hardware limitation. Resolution, setup, and maintenance support image clarity but remain broader contexts covered in the mini projector guide.
Table of Contents
Why a Mini Projector Image Looks Blurry
A mini projector image can look blurry when the visible symptom points to incorrect focus, unsuitable placement, lens contamination, an uneven projection surface, poor source quality, incorrect settings, or a limiting hardware condition. Each cause remains conditional until the image pattern and setup are checked.
Each cause remains conditional until the image pattern and setup are checked.
The annotated example below shows why a mini projector image looks blurry by labelling the focus, lens, screen surface, and source signal. These labels group the common cause areas without treating any one condition as a confirmed diagnosis.
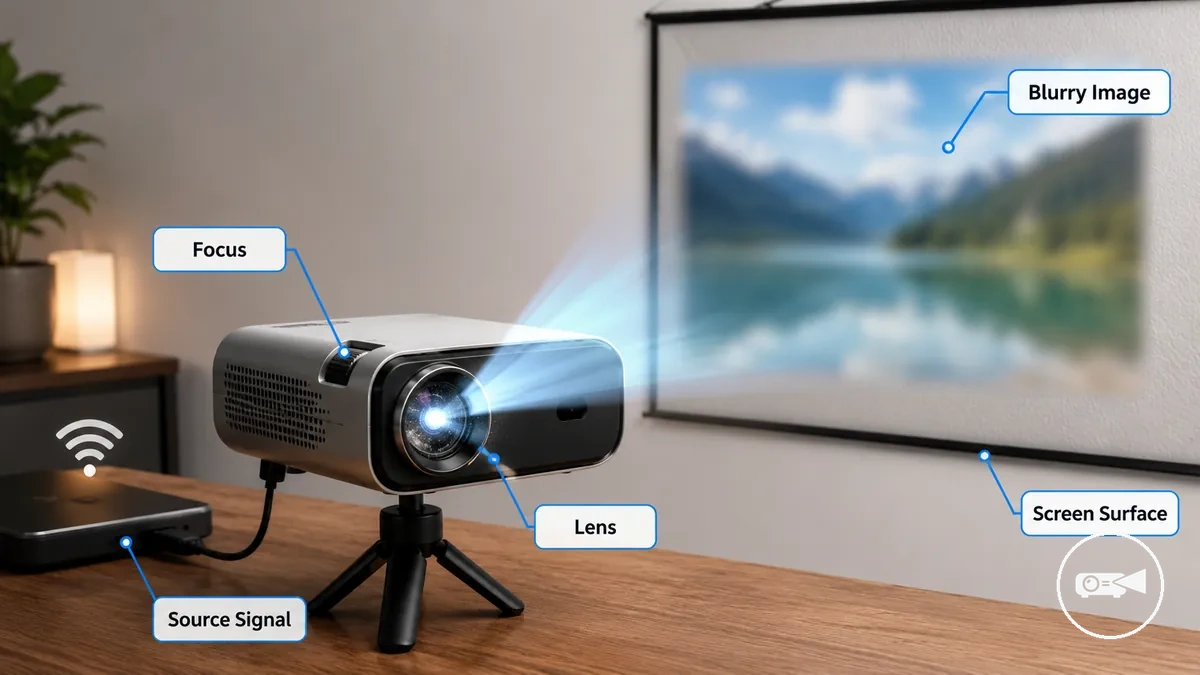
A blurry image should be diagnosed by its visible pattern before a fix is chosen. A picture that is soft across the full frame points first to focus, distance, or source resolution, while uneven blur points more strongly to angle, alignment, surface texture, or lens condition. For example, a sharp centre with soft edges suggests a different check from a uniformly hazy picture.
A blurry image should be diagnosed by its visible pattern before a fix is chosen.
The table organizes each symptom by likely cause area, the next check, and what the condition may mean. Match the visible pattern to the closest row before moving to detailed troubleshooting.
| Symptom | Likely cause area | What to check | What it may mean |
|---|---|---|---|
| Entire image looks soft or fuzzy | Focus | Focus control and projection distance | The focus setting may not match the current distance. |
| Edges look softer than the centre | Distance, angle, or alignment | Projector position relative to the projection surface | The mini projector may be angled or positioned outside its clearest setup range. |
| Image appears hazy | Lens contamination | Dust, smudges, or fingerprints on the lens | Contamination may be reducing visible contrast and clarity. |
| Image is uneven or textured | Projection surface | Wrinkles, texture, curvature, or uneven areas | The surface may be distorting part of the projected image. |
| Picture looks blocky or lacks detail | Source quality | Input resolution, compression, and source-device output | The source signal may contain less detail than the mini projector can display clearly. |
| Clarity changes after picture adjustments | Settings | Sharpness, keystone, scaling, and display mode | Image processing may be softening or reshaping the picture. |
| Blur remains after setup and source checks | Hardware condition | Whether the symptom persists after focus, placement, lens, surface, source, and settings checks | A persistent internal optical or hardware issue may require service or replacement because correctable setup causes have been excluded. |
Focus, distance, and alignment causes
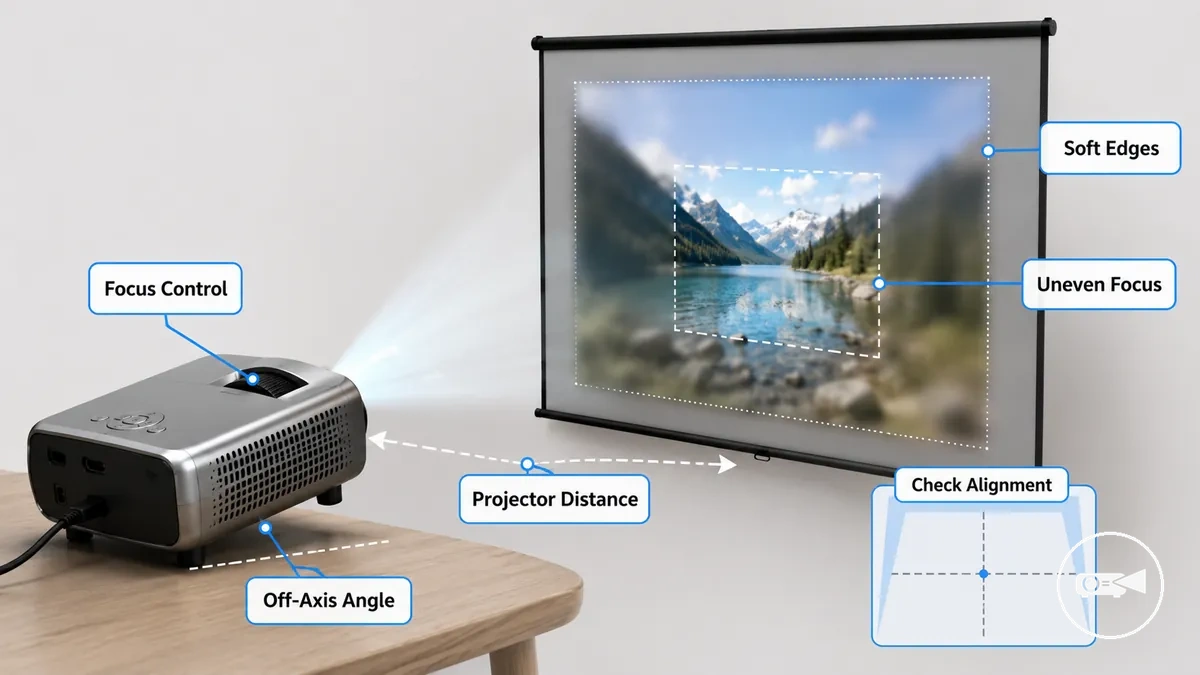
Focus position, projector distance, projection angle, and alignment can each create a different blur pattern within the projected image. In this local cause group, the most common visible signs are soft edges and uneven focus, which help distinguish positioning issues from other causes.
It illustrates how changes in position can alter image sharpness without implying a confirmed fault.
The diagram below highlights focus, distance, and alignment causes and shows how projector position affects blur. It illustrates how changes in position can alter image sharpness without implying a confirmed fault.
Match the visible symptom to the most likely local cause before making adjustments:
- Whole image looks soft: Focus position is likely outside the correct setting. Check the focus wheel or focus control.
- Image remains blurry after refocusing: Projector distance may fall outside the lens's usable focus range for the current image size. Check whether moving the projector slightly closer or farther improves clarity.
- One side appears softer than the other: An off-axis projection angle or poor alignment is the likely cause. Check whether the projector is facing the screen squarely.
- Centre is clearer than the edges: Uneven focus can occur when focus position, projector distance, and projection angle interact. For example, a projector tilted slightly upward may leave the centre sharper while the edges appear softer.
Lens, surface, and source-quality causes
A blurry image can remain even when the focus appears correct if lens condition, the projection surface, or source quality reduces image clarity. A hazy image from dust, smudge, or condensation differs from blur caused by a low-detail source, so check the lens, surface, and source separately.
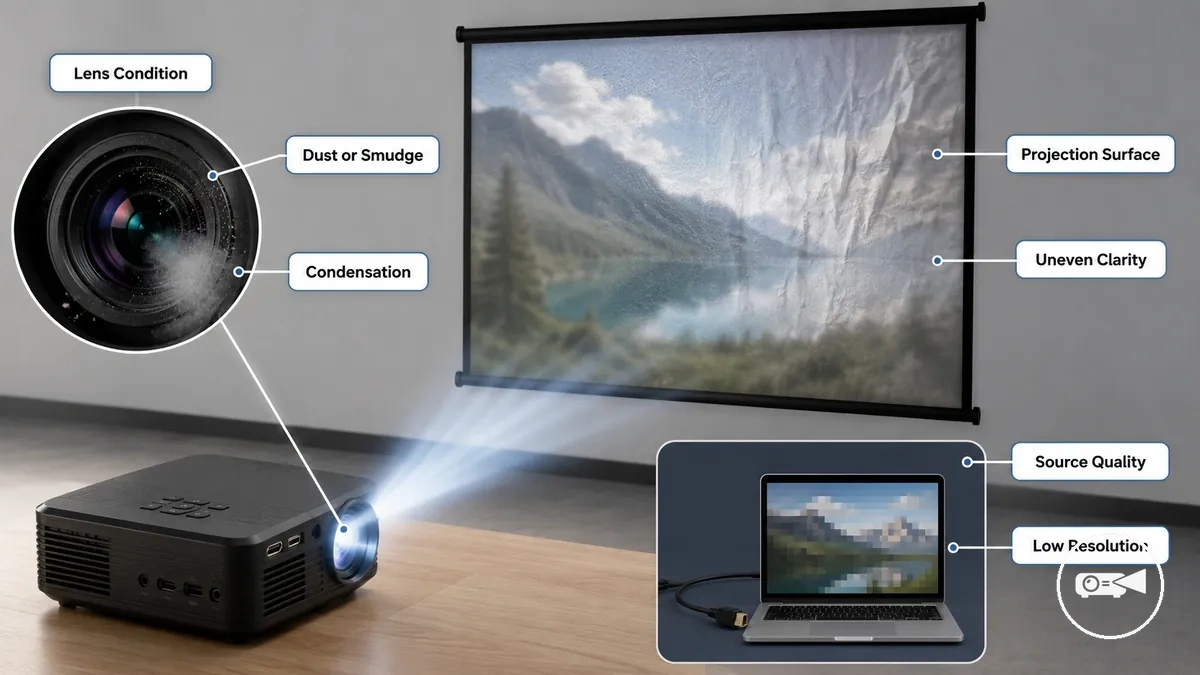
Match the visible symptom to the most likely cause:
- Lens: Dust, a smudge, condensation, or visible lens damage can create a hazy image or a soft image across the entire projection.
- Surface: A textured, wrinkled, or moving projection surface can produce uneven clarity, although the effect depends on the screen material and the projected content.
- Source: Poor source quality, including low resolution or heavy compression, can make the picture appear blurry even when the projector is correctly focused.
For example, a sharp projector aimed at a heavily compressed streaming video can still produce a soft-looking image because the missing source detail cannot be recreated. Clean optics can improve optical clarity, but they cannot restore image detail lost through low resolution or compression.
Basic Checks Before Changing Image Settings
A blurry projector image is often caused by a simple physical or input issue rather than incorrect projector settings. Completing a few basic checks first reduces false diagnosis and helps you choose the correct next step instead of changing settings unnecessarily.
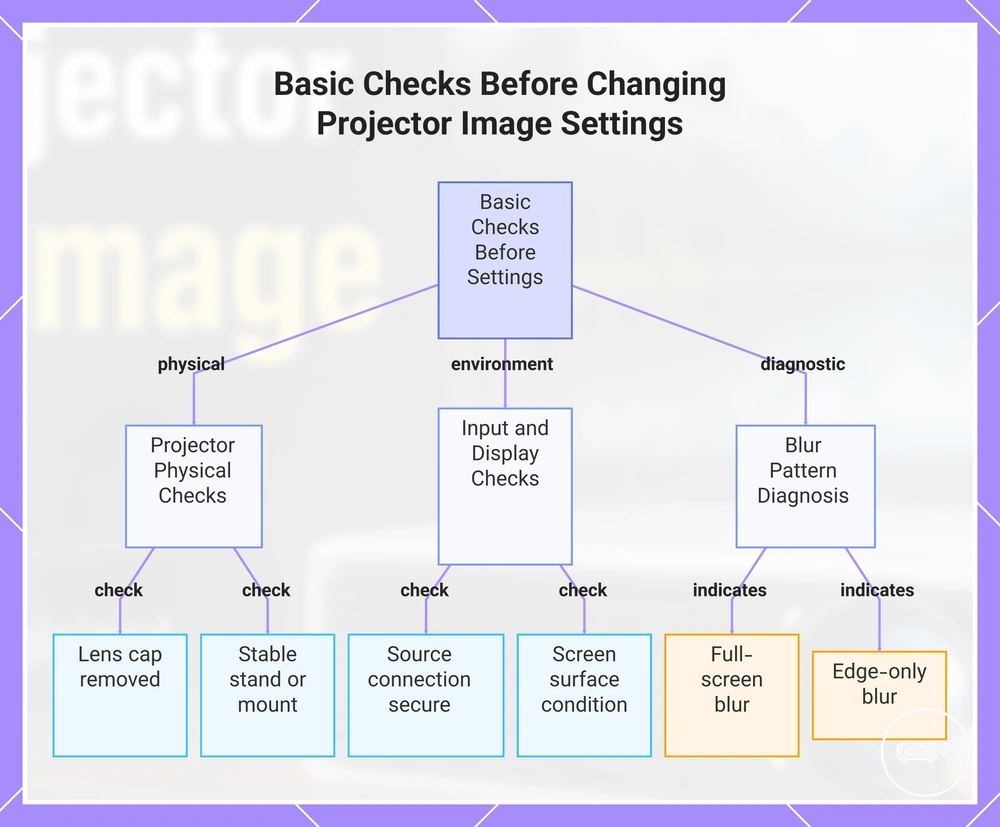
Use this checklist to verify the projector, image source, and viewing conditions before adjusting any image controls.
Use this checklist to verify the projector, image source, and viewing conditions before adjusting any image controls. Each item identifies what to inspect, why it matters, and which area to review next if the result indicates a problem.
- Lens cap or protective film: Confirm the lens cap has been removed and any protective film is no longer covering the lens. If not, inspect the lens before changing projector settings.
- Warm-up: Allow the projector to complete its normal warm-up period if the picture appears temporarily soft after power-on. If the image remains blurry, continue with focus adjustment checks.
- Stable stand or mount: Verify the projector is on a stable stand or secure mount. Visible movement or vibration can soften the picture, so review placement if instability is present.
- Source connection: Ensure the source connection is fully inserted and the correct input is selected. If image detail is still poor, continue with source quality or resolution checks.
- Screen surface: Inspect the screen surface for wrinkles, heavy texture, or movement that can reduce visible detail. If these conditions exist, review screen placement before changing image controls.
- Room light: Check whether strong room light is reducing perceived contrast and detail. If the image remains soft in dimmer lighting, continue with focus or lens condition checks.
- Edge blur: Determine whether the image is blurry across the entire screen or only shows edge blur. Full-screen blur points toward focus, lens condition, or source quality, while edge-only blur suggests placement or alignment should be reviewed next.
For example, if the centre of the image appears sharp but the corners are soft, placement is a more likely cause than image settings. If the entire picture looks equally blurry, focus, lens condition, or source quality should be investigated before making additional setting changes.
For example, if the centre of the image appears sharp but the corners are soft, placement is a more likely cause than image settings.
This chart outlines the essential checks to perform before adjusting projector image settings to avoid false diagnosis and identify the correct next step.
Focus Adjustments for a Sharper Mini Projector Image
Adjust focus only after the projector position and image size are stable. Moving the projector or changing the image size changes the focal point, so lock both in place before using the focus ring or digital focus control.
Adjust focus only after the projector position and image size are stable.
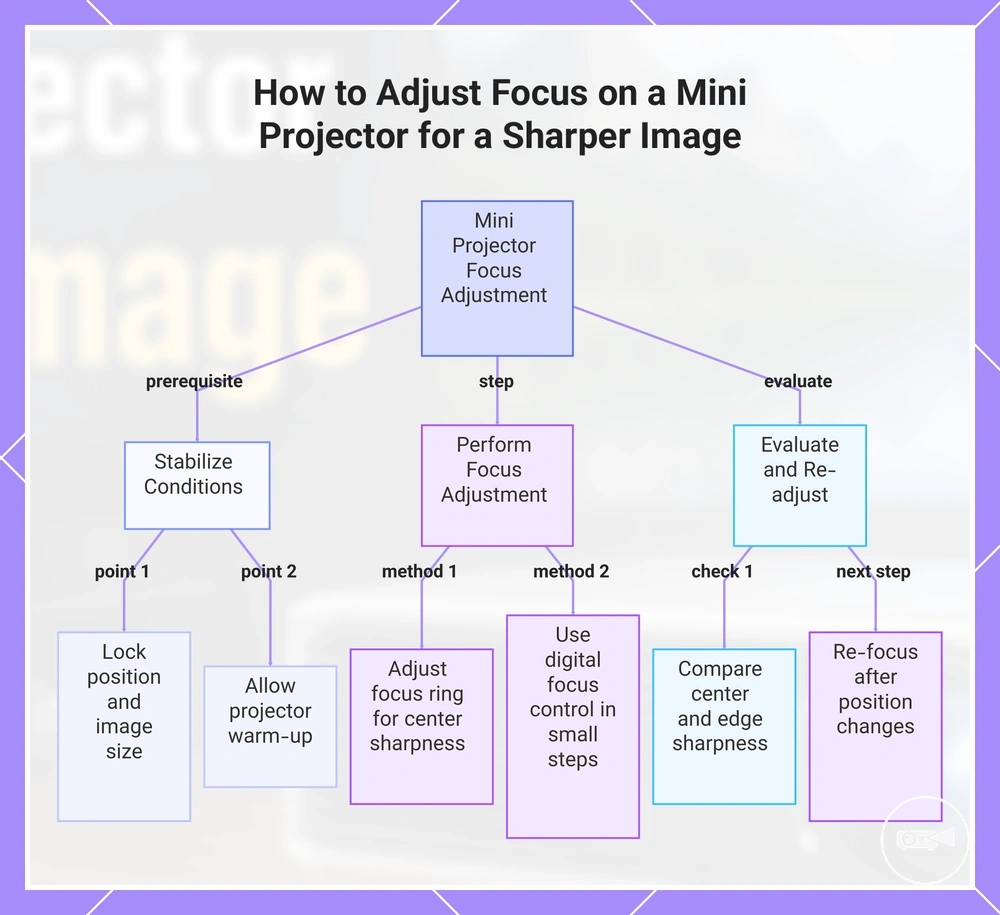
Follow these steps to adjust focus without confusing it with changes caused by distance or viewing angle.
- Allow the projector to complete its normal warm-up time before making any focus adjustment. If the image becomes stable after warming up, begin focusing and avoid correcting a temporary soft picture.
- Turn the focus ring or focus wheel using small adjustments while watching fine detail in the centre of the image. Stop when center sharpness is at its clearest, and avoid turning past that point if the picture becomes softer.
- Use the digital focus control, if available, in small increments while viewing the same central detail. Keep the setting that improves clarity and avoid repeated large changes that make it harder to judge the result.
- Compare the centre with the edges of the image after focusing. If the centre is sharp but edge sharpness remains poor, stop adjusting focus and review projector alignment or image size instead of forcing the centre out of focus.
- Repeat the focus process after changing the projector distance or image size. Make only small corrections each time, because every position change can alter the sharpest focus point.
For example, if text in the centre appears clear while the corners remain soft, alignment is more likely to need attention than the focus control. Focus adjustments can improve clarity only when the blur is caused by focus, and they cannot fully correct softness caused by low source resolution, lens damage, contamination, or projector design limits.
This chart shows the steps to correctly adjust focus on a mini projector, including preparation, adjustment methods, and post-focus evaluation.
This chart shows the steps to correctly adjust focus on a mini projector, including preparation, adjustment methods, and post-focus evaluation.
Placement, Throw Distance, and Screen Surface Problems
An incorrect projector position can make an image look unfocused even when the focus control is set correctly. Placement, alignment, and surface conditions change perceived sharpness, so check the projector's position before treating the problem as a focus fault.
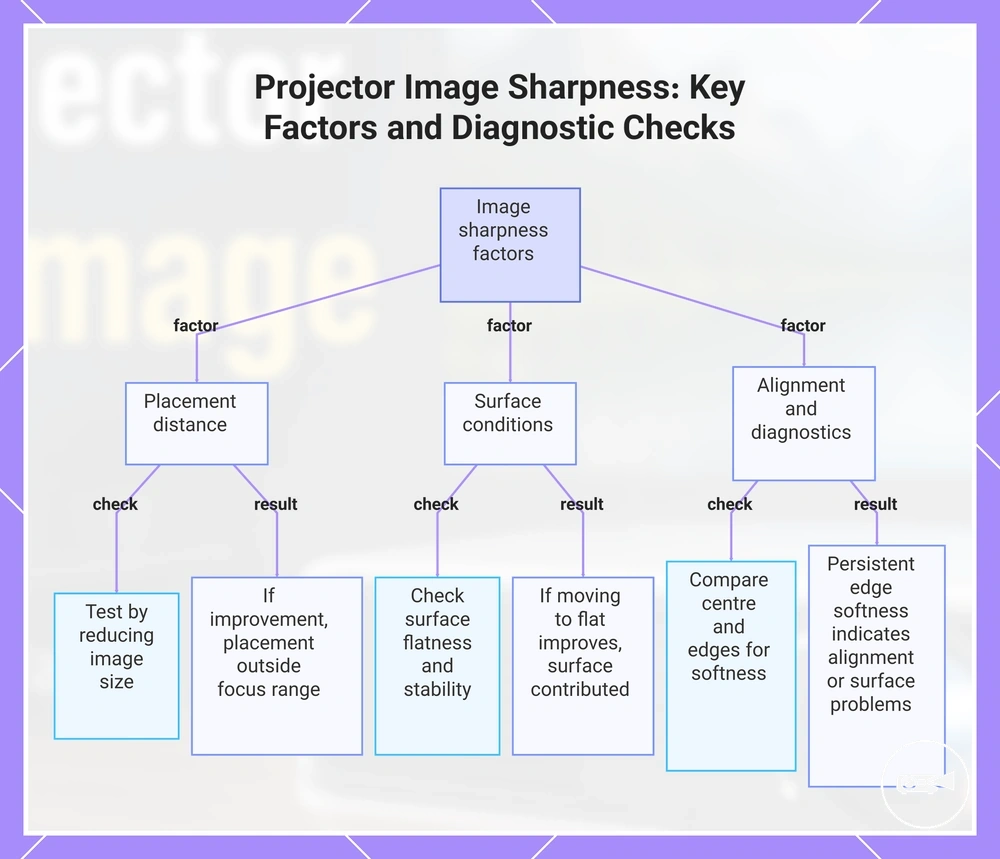
- Check whether the projector distance produces an image size that remains within the device's usable focus range.
- Reduce the image size and check whether the centre and edges become clearer.
- Confirm that the projection surface is flat, still, and free from visible folds.
- Test tripod or mount stability and remove any vibration that creates a soft image.
- Align the projector vertically and horizontally with the screen to reduce distortion.
- Reduce strong room light when it hides fine detail and makes blur harder to judge.
- Compare the centre with the edges; persistent edge softness can indicate alignment or surface problems rather than incorrect focus.
Throw distance and screen size affect the image size and the lens position needed for clear focus. Use the relationship between throw distance and screen size as the placement criterion, then keep both fixed while assessing clarity.
A smooth, stationary surface produces more even clarity than a rough or moving surface.
A smooth, stationary surface produces more even clarity than a rough or moving surface. Coarse wall texture, screen wrinkles, vibration, or an unstable mount can create local blur, distortion, and uneven edge detail even when the centre is focused.
If moving from a textured wall to a flatter surface improves the picture without changing focus, the projection surface was contributing to the softness.
For example, if reducing the image size improves both centre detail and edge clarity, the original placement was likely outside the projector's most usable focus condition. If moving from a textured wall to a flatter surface improves the picture without changing focus, the projection surface was contributing to the softness.
For example, if reducing the image size improves both centre detail and edge clarity, the original placement was likely outside the projector's most usable focus condition.
This chart shows the main factors that can cause a projector image to appear unfocused even when the focus is correct, and the diagnostic checks to identify the real cause.
Keystone Correction and Image Sharpness Loss
Keystone correction improves image shape, but stronger digital correction can reduce perceived sharpness, especially near the edges and corners. Geometry correction and image sharpness are related but not identical, and the visible effect depends on the projector model and the amount of correction applied.
| Physical alignment | Digital keystone |
|---|---|
| Corrects image geometry by adjusting the projector angle and improving optical alignment. | Corrects image geometry electronically without moving the projector. |
| Maintains more original image detail and has a lower risk of reducing edge clarity. | Higher correction strength increases the likelihood of corner softness and reduced fine detail. |
| Use when the projector can be physically repositioned. | Use when repositioning is limited or only a small geometry adjustment is required. |
Digital keystone reshapes the projected image instead of changing the lens focus. As the amount of digital correction increases, fine details and small text are more likely to lose clarity even though the picture becomes properly rectangular.
Digital keystone reshapes the projected image instead of changing the lens focus.
When practical, improve optical alignment by reducing the projector angle before applying heavy digital correction. Following good setup and picture adjustment practices first often reduces the amount of electronic correction required and helps preserve image sharpness.
When practical, improve optical alignment by reducing the projector angle before applying heavy digital correction.
For example, if presentation text becomes difficult to read only in the corners after increasing keystone correction while the centre remains clear, digital geometry adjustment is affecting text readability. Repositioning the projector to reduce keystone correction can restore better edge clarity without changing the focus setting.
Lens Cleaning, Dust, Smudges, and Condensation
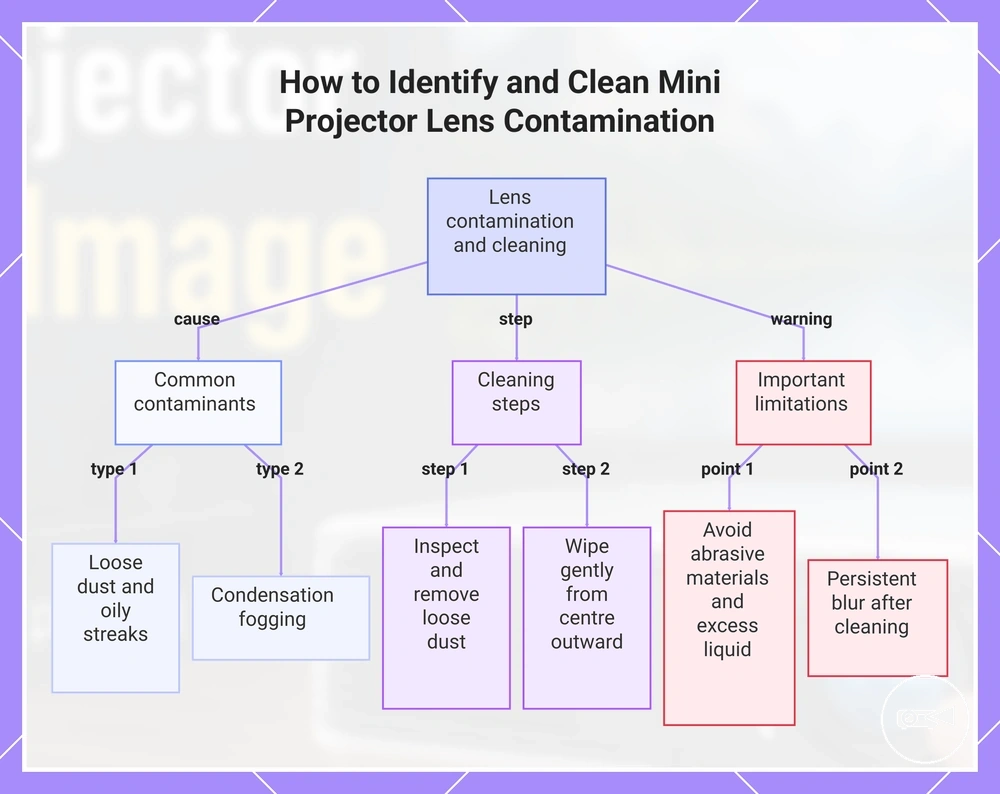
Dust, fingerprints, smudges, and condensation on a mini projector lens can make the projected image look hazy or blurry. Lens contamination scatters light across the image, so visible marks on the lens surface should be checked before changing focus settings.
Dust, fingerprints, smudges, and condensation on a mini projector lens can make the projected image look hazy or blurry.
Loose dust may appear on the lens surface or around its rim, while fingerprints and smudges leave oily streaks that reduce image contrast. Condensation creates temporary fogging after the projector moves between different temperatures; wait until the visible moisture has cleared before judging image sharpness.
Loose dust may appear on the lens surface or around its rim, while fingerprints and smudges leave oily streaks that reduce image contrast.
Use the following lens cleaning steps only after the projector is switched off and the lens has cooled:
- Inspect the lens surface and the area around it under soft light for dust, smudges, fingerprints, moisture, or scratches.
- Remove loose dust with a manual lens blower or a soft lens brush before touching the lens surface.
- Use a clean microfiber cloth and wipe gently from the centre towards the outer edge.
- For oily marks, apply a small amount of suitable lens cleaner to the cloth rather than directly to the lens.
- Stop wiping when the surface is clear, then allow any remaining moisture to evaporate before switching the projector on.
For example, if a hazy patch disappears after a gentle wipe with a microfiber cloth, the blur was caused by surface contamination rather than a focus setting. If condensation returns repeatedly, allow the projector to reach room temperature in a dry location before use.
If condensation returns repeatedly, allow the projector to reach room temperature in a dry location before use.
A visible scratched lens, marks beneath the outer surface, or persistent blur after careful cleaning can indicate coating damage or internal dust; exterior cleaning will not repair those conditions. Continued lens care and maintenance should focus on keeping the lens covered, dry, and free from loose debris, while internal contamination or damage should be assessed through the manufacturer's service process.
This chart shows the common causes of lens haziness, the correct cleaning steps, and important limitations to avoid damage.
This chart shows the common causes of lens haziness, the correct cleaning steps, and important limitations to avoid damage.
Resolution, Input Quality, and Display Settings
A blurry-looking image is not always caused by poor focus. Native resolution, source resolution, input quality, scaling, compression, and display settings can reduce visible detail even when the projector is correctly focused. Focus can sharpen the projected pixels, but it cannot restore detail missing from the source.
| Condition | What changes | Visible effect | What to check |
|---|---|---|---|
| Native resolution | The number of projected pixels available for the image | Scaled content may look softer than content matched to the projector's pixel grid | Check the projector's stated native resolution and the selected output resolution |
| Low-resolution source | The amount of source detail available before scaling | Fine text, edges, and small objects appear soft | Compare the image with a higher-resolution version of the same content |
| Compression | Fine image information is removed or simplified | Textures, edges, and text may look soft or blocky | Check the streaming quality setting or use a less-compressed source file |
| Wireless input | Signal quality and transmission compression | The image may lose detail or show temporary softness | Compare the wireless input with the same source connected through HDMI |
| Aspect ratio | The image is stretched, cropped, or rescaled | Objects and text may appear distorted or less clear | Select the aspect ratio that matches the source |
| Zoom | Digital enlargement increases scaling | Edges and text readability may decline as the image is enlarged | Reduce digital zoom and adjust projector placement where practical |
| Sharpness settings | Edge enhancement is increased or reduced | A low setting looks soft, while a high setting can create artificial outlines | Adjust the sharpness setting until text edges look natural |
Native resolution defines the projector's physical pixel grid, while source resolution defines how much detail reaches that grid. When the two do not align, scaling must add, remove, or redistribute pixels, which can soften fine details. This distinction is central to understanding resolution and image quality.
Compression and input quality can also make a focused image look soft.
Compression and input quality can also make a focused image look soft. Heavy streaming compression removes source detail, while a wireless input may apply more compression or become less stable than a direct HDMI connection. For example, if the same text appears clearer over HDMI than through wireless casting, the difference points to signal quality rather than the focus mechanism.
Display settings can change apparent clarity without restoring missing resolution.
Display settings can change apparent clarity without restoring missing resolution. A moderate sharpness setting may improve edge definition, while excessive sharpness creates halos; digital zoom enlarges the same available pixels and can reduce text readability. Use these controls to refine the visible result, not to replace source detail that is absent.
When Blurry Images Point to Hardware Limits or Damage
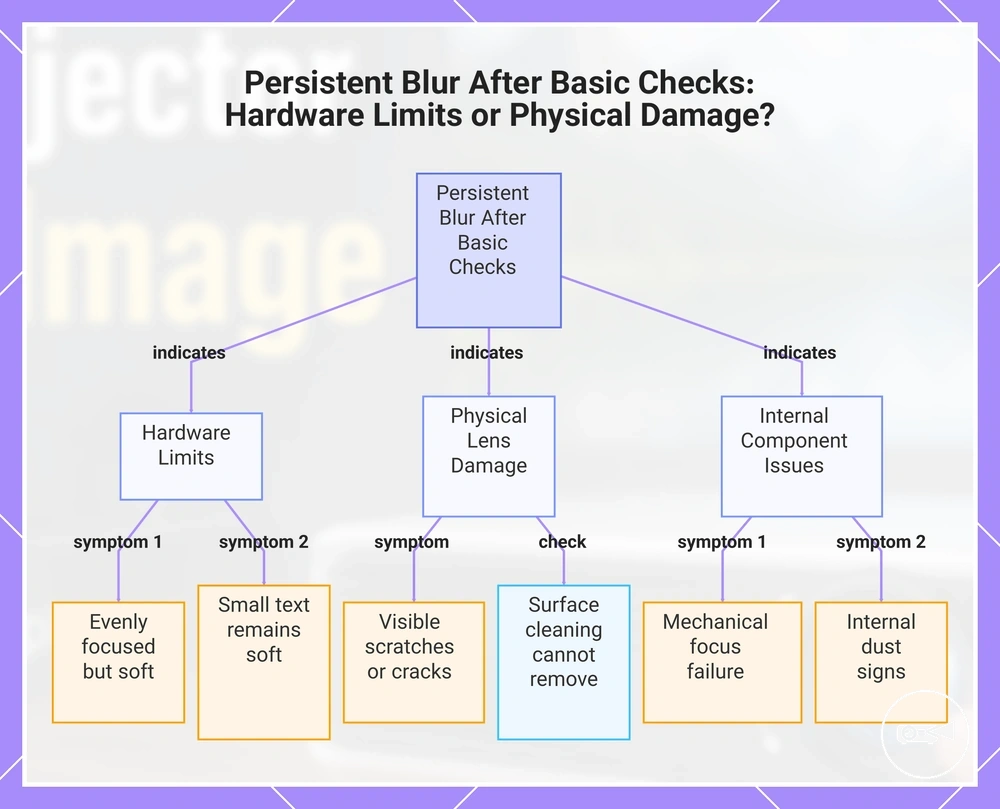
Persistent blur after focus and cleaning checks points to a different path from normal adjustment. If the image remains unchanged, shows uneven blur, or the focus control no longer responds normally, the cause is more likely to involve hardware limits, physical damage, or an internal problem.
- Unchanged blur: Stop repeating focus and cleaning steps when persistent blur remains the same across different content and projection distances.
- Uneven blur: If one side or corner stays softer than the centre, the pattern may indicate lens damage, optical misalignment, or another internal issue.
- Visible damage: Scratches, cracks, or chips on the lens are physical defects that surface cleaning cannot remove.
- Loose focus control: A mechanical focus ring or wheel that rattles, slips, or fails to change sharpness consistently may require inspection or service.
- Heat-linked softness: If clarity declines after the projector warms up and improves after cooling, stop repeated focus adjustments and investigate ventilation or an internal heat-related problem.
- Internal dust signs: Fixed dark spots, haze, or blurry patches that remain after the outer lens is cleaned may point to internal dust or contamination within the optical path.
- Model limits: If the image is evenly focused but lacks fine detail, the result may reflect the projector's native resolution and model capability rather than a focus fault.
Hardware limits set the maximum detail the projector can reproduce. A correctly focused image can still look soft when the source contains more detail than the projector's native resolution can display. For example, small text may remain difficult to read even though its edges become as sharp as the model allows.
Hardware limits set the maximum detail the projector can reproduce.
Lens damage, internal dust, and mechanical focus failure create different symptoms from a simple setup error. Visible scratches support a physical-damage conclusion, while fixed patches or a loose focus control suggest that further external adjustment has limited value.
Lens damage , internal dust , and mechanical focus failure create different symptoms from a simple setup error.
When these symptoms persist, stop repeated low-value adjustments and consider professional service, manufacturer support, or a broader evaluation of the mini projector's capability. These steps can help distinguish a model limitation from an internal fault without implying a certain repair or replacement outcome.
These steps can help distinguish a model limitation from an internal fault without implying a certain repair or replacement outcome.
This chart shows the main causes of persistent blur after focus and cleaning checks, distinguishing between hardware limits and physical or internal damage.