Mini Projector Maintenance for Longer Lifespan
Mini projector maintenance is routine care that protects image quality, cooling stability, safe operation, and usable lifespan. It covers the lens, body, vents, battery, light source, storage environment, and handling conditions. Safe cleaning means removing dust and smudges with a dry microfiber cloth while keeping liquid away from openings. Maintenance is prevention rather than repair.
Maintenance is prevention rather than repair.
A mini projector used in a dusty room, operated with blocked vents, or stored while still warm faces more avoidable wear than one kept clean, ventilated, and dry. For example, placing the projector on a clear surface supports airflow, while a dust cover or carrying case protects it during storage after it has cooled. This mini projector guide provides the broader context before the article moves into lens care, dust control, heat management, storage conditions, and wear signs such as dimming, unusual noise, or declining battery performance.
Maintenance reduces preventable wear, but it cannot reverse an aging light source, severe internal damage, or fixed design limits.
Maintenance reduces preventable wear, but it cannot reverse an aging light source, severe internal damage, or fixed design limits. Wear signs that continue after safe cleaning and airflow checks require troubleshooting, replacement, or service according to the mini projector model and its manufacturer guidance.
Table of Contents
What Mini Projector Maintenance Protects
Mini projector maintenance protects image quality, cooling efficiency, and operating reliability by reducing avoidable contamination and wear on essential components. It focuses on preserving the condition of the lens, vents, exterior surfaces, and storage environment so the projector continues to perform as intended under normal operating conditions.
Mini projector maintenance protects image quality, cooling efficiency, and operating reliability by reducing avoidable contamination and wear on essential components.
What Mini Projector Maintenance Protects is illustrated below, where the labeled parts identify the areas most affected by dust, airflow restriction, and everyday handling.
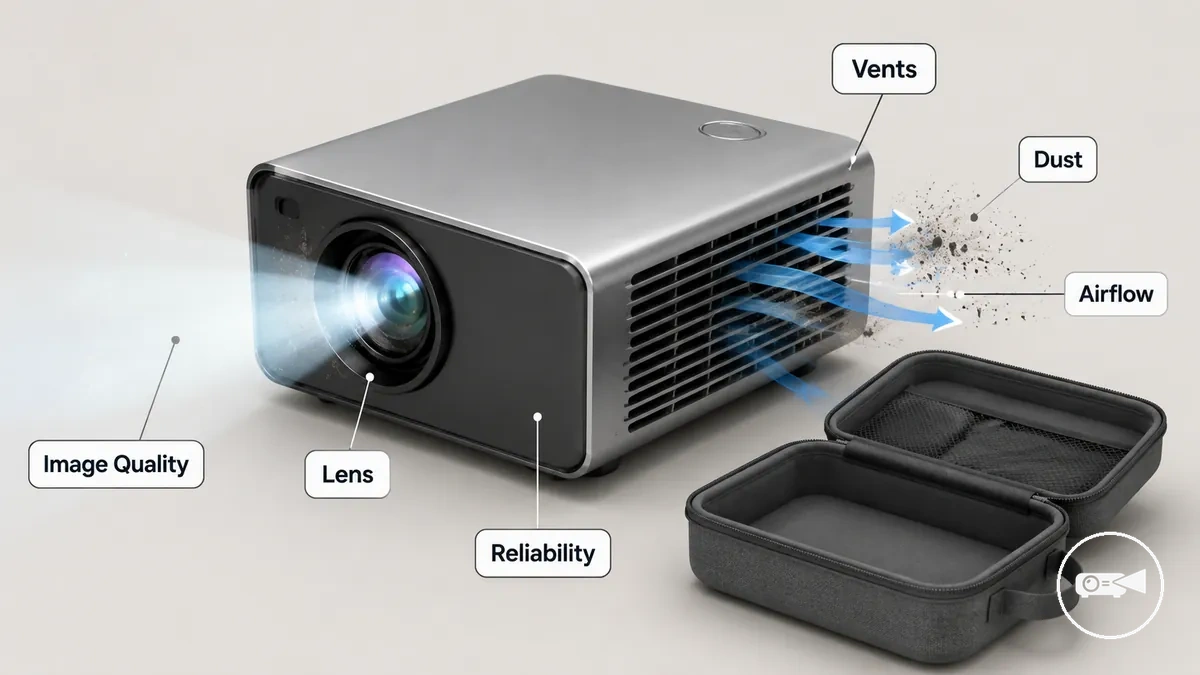
- Lens: A clean lens reduces dust and smudge buildup that can lower image quality by decreasing sharpness and clarity.
- Vents: Unblocked vents maintain airflow for effective cooling, reducing heat buildup that can affect operating reliability.
- Projector body: Routine exterior care limits dust accumulation around openings that support normal ventilation.
- Storage: Clean, dry storage reduces exposure to moisture and airborne dust that can affect sensitive projector parts during non-use.
- Handling: Careful transport and placement reduce the risk of scratches, impacts, and other physical damage that can impair dependable operation.
For example, dust covering the vents restricts airflow and raises operating temperature, while fingerprints or smudges on the lens reduce image clarity even when focus is correct. The level of protection maintenance provides is influenced by conditions such as dust exposure, operating heat, frequency of use, and the mini projector's design.
Mini Projector Lifespan Factors
Mini projector lifespan is influenced by multiple interacting attributes rather than a single fixed value. The light source, battery, airflow, dust exposure, and use intensity each affect usable life, while the overall outcome is shaped by the projector's design and maintenance conditions.
Mini projector lifespan is influenced by multiple interacting attributes rather than a single fixed value.
Mini Projector Lifespan Factors are illustrated below, where the diagram organizes the main conditions that influence usable life across different parts of the projector.
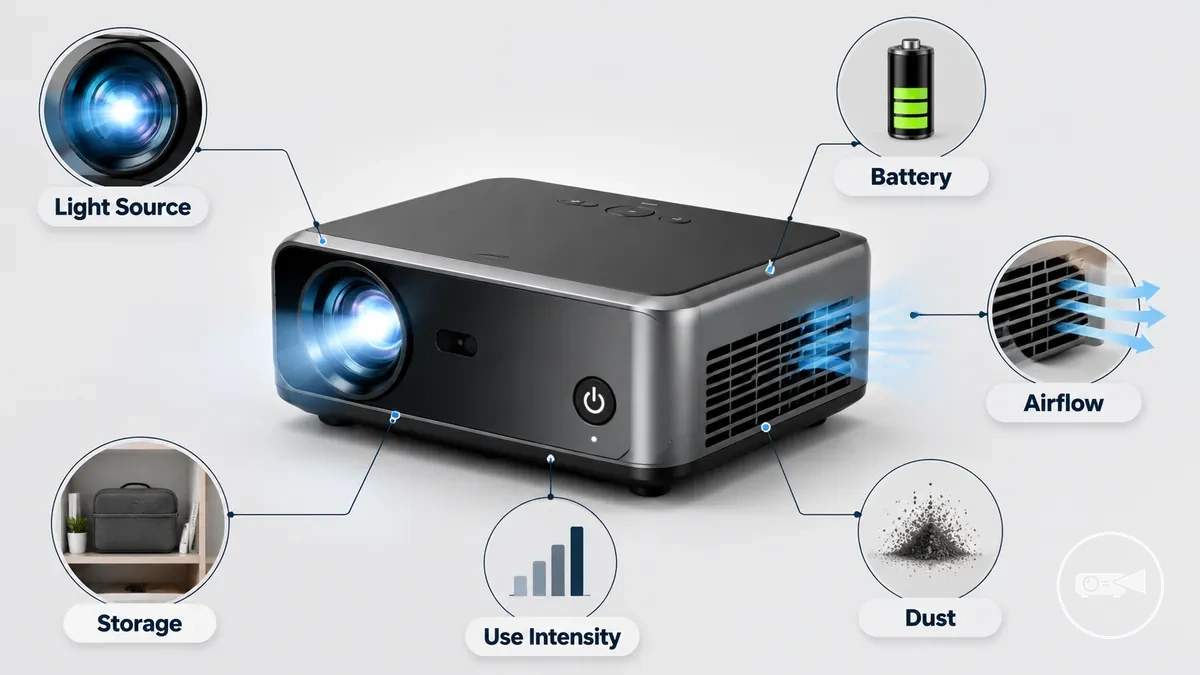
The light source is typically assigned manufacturer-rated hours that describe expected operating life before noticeable brightness decline, but actual service life is influenced by operating heat, airflow, and accumulated dust. Battery condition is affected by charge habits, where repeated exposure to high heat or frequent deep discharge contributes to capacity loss and reduced runtime. Clear vents support airflow that helps limit heat stress, while blocked vents allow heat to build more quickly. For example, a projector used occasionally in a clean, well-ventilated room is exposed to less heat and dust than one used for long sessions in a warm, dusty environment.
Clear vents support airflow that helps limit heat stress, while blocked vents allow heat to build more quickly.
These attributes work together instead of acting independently, so improving one condition can help reduce stress on others. Reviewing battery and power care alongside regular maintenance provides a more complete view of the factors that influence mini projector lifespan. A lightly used model with good ventilation generally experiences lower long-term operating stress than a similar projector used frequently with restricted airflow.
| Entity / Part | Attribute / Criterion | Value / Condition | Effect / Risk / Decision |
|---|---|---|---|
| Light source | Rated hours | Manufacturer-rated operating life before brightness decline | Higher heat and heavier use can accelerate visible brightness decline. |
| Battery | Charge habits | Regular charging with reduced heat exposure | Helps slow capacity loss and supports more consistent runtime. |
| Cooling system | Airflow condition | Clear vents with minimal dust obstruction | Reduces heat stress that can shorten component service life. |
| Usage pattern | Use intensity | Light, frequent, or poorly ventilated operation | Higher operating stress generally increases wear over time. |
Light source life and brightness decline
Light source life and brightness decline determine how long a mini projector continues to produce a comfortable image, even when the projector itself still operates. Perceived lifespan is often reached when brightness decline or visible colour shift reduces usable image quality rather than when the projector completely stops working.
Light source life and brightness decline are illustrated below, showing how gradual dimming can affect perceived lifespan before complete light-source failure.
Light source life and brightness decline are illustrated below, showing how gradual dimming can affect perceived lifespan before complete light-source failure.
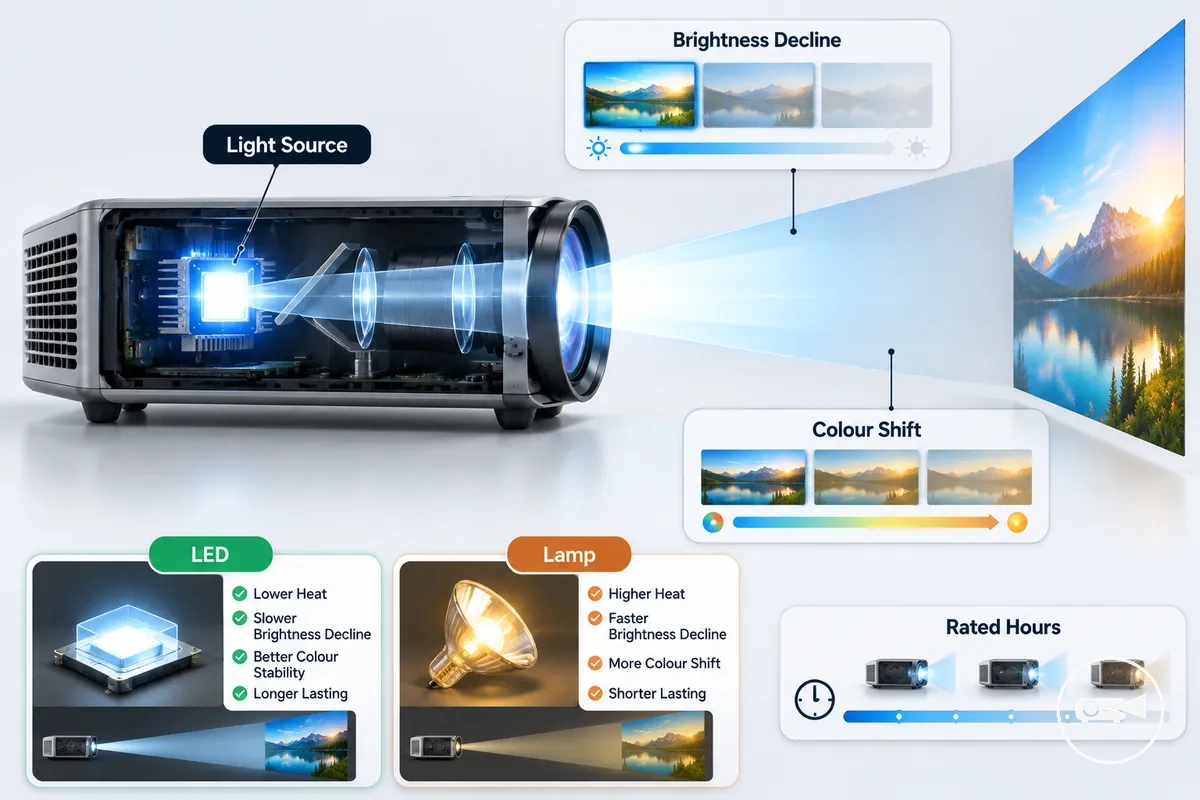
The light source controls the amount of light reaching the lens throughout the projector's lifespan. An LED light source typically shows gradual dimming, while a lamp-based light source can exhibit both brightness decline and colour shift as it ages. Manufacturer-rated hours indicate the expected operating life of the light source, but they do not guarantee unchanged brightness throughout that period. For example, a projector can continue displaying an image even after brightness has declined enough to make viewing less comfortable in the same room.
The light source controls the amount of light reaching the lens throughout the projector's lifespan.
A short comparison helps distinguish the main light-source attributes:
- LED: Usually fades gradually, with dimming reducing usable brightness over time.
- Lamp: Can develop both brightness decline and colour shift before reaching the end of its usable light output.
- Rated hours: Represent the manufacturer's operating-life indicator for the light source, not a promise of constant image brightness.
- Replacement limitation: Whether the light source can be replaced depends on the projector's design, so replacement should be confirmed for the specific model.
Heat, dust, battery, and handling conditions
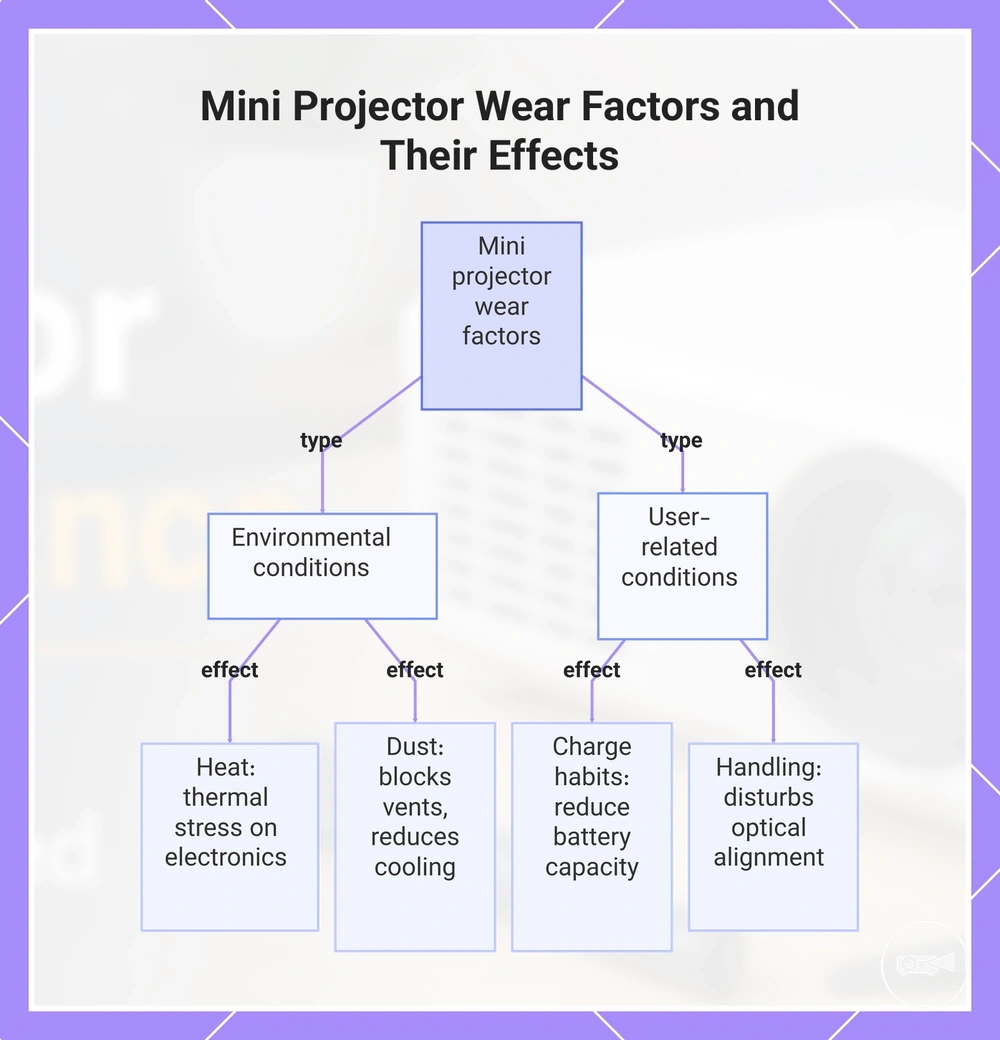
Heat, dust, battery condition, and handling affect different parts of a mini projector and can accelerate wear during normal use. The result is higher wear risk when these conditions repeatedly restrict cooling, reduce battery capacity, or disturb optical alignment.
Heat, dust, battery condition, and handling affect different parts of a mini projector and can accelerate wear during normal use.
The main condition-to-outcome relationships are:
- Heat → Electronics: Sustained high temperatures increase thermal stress on electronic components and can accelerate wear.
- Dust → Airflow: Dust around vents restricts airflow, which reduces cooling efficiency and raises internal heat.
- Charge habits → Battery capacity: Repeated charging in high heat or prolonged high-charge conditions can reduce battery capacity over time, shortening portable runtime.
- Handling → Alignment: Drops, impacts, or pressure can disturb optical alignment or damage internal parts, although the outcome depends on the force and the projector's construction.
This chart shows the main environmental and user-related conditions that accelerate wear in mini projectors and their specific effects on components.
How to Clean a Mini Projector Safely
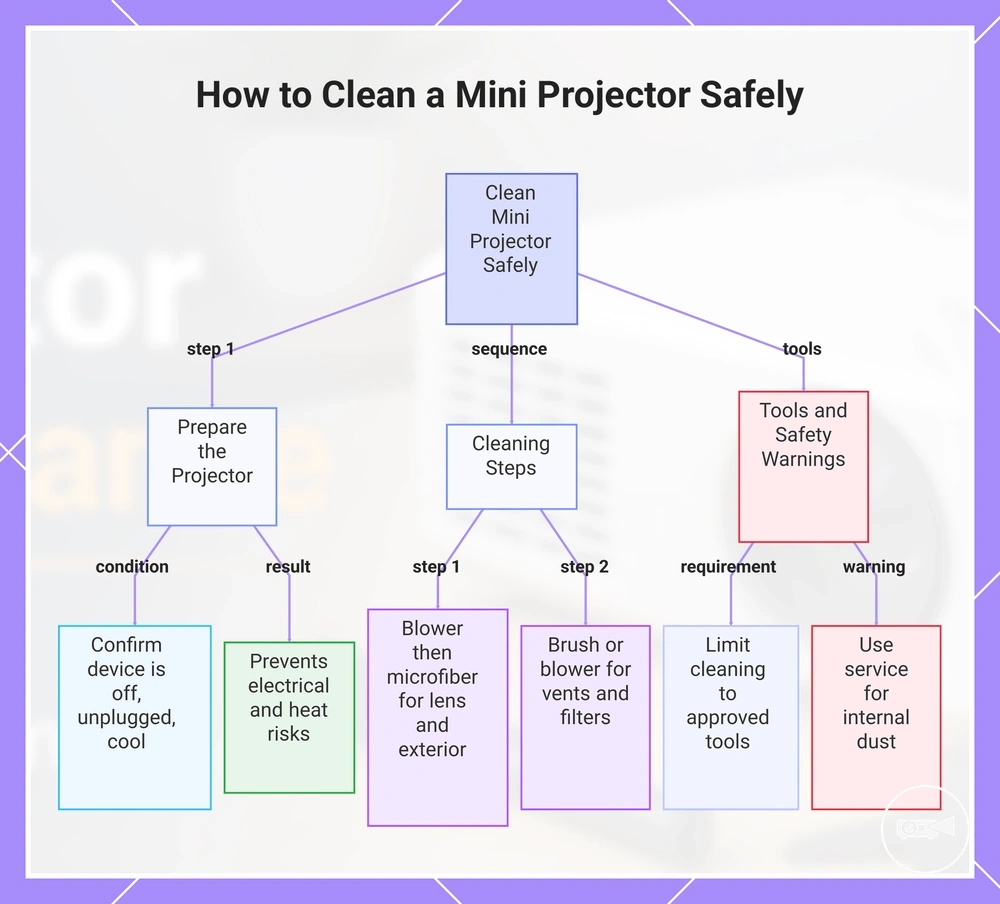
Clean a mini projector only after it is powered off, unplugged, and fully cooled. Safe cleaning should move from loose dust removal to gentle surface cleaning so the lens, vents, and exterior are not exposed to unnecessary pressure or moisture.
Clean a mini projector only after it is powered off , unplugged , and fully cooled .
Use this exterior-focused cleaning sequence:
- Projector: Confirm the projector is powered off, unplugged, and cool before touching it, which avoids contact with hot surfaces and powered components.
- Lens: Remove loose dust with a manual blower, then wipe lightly with a clean microfiber cloth. Use optical cleaner only when the manufacturer permits it, and apply it to the cloth rather than directly to the lens to reduce moisture and coating risk.
- Exterior body: Wipe the casing with a dry or lightly damp microfiber cloth. Keep liquid away from openings and do not spray the projector directly.
- Vents: Lift surface dust with a soft brush or manual blower while avoiding strong pressure that could push debris farther inside and restrict airflow.
- Filters: If removable filters are present, follow the manual to determine whether they should be brushed, replaced, or washed. Wash a filter only when the manufacturer identifies it as washable.
- Tools: Limit routine cleaning to clean microfiber cloths, a manual blower, a soft brush, and an approved optical cleaner. Avoid abrasive cloths, harsh chemicals, wet spraying, and high-pressure compressed air.
Internal dust is outside normal exterior cleaning because reaching it may expose delicate optical and electronic parts. For example, if visible dust marks remain after the lens and vents are cleaned, use the manufacturer's service guidance or a qualified repair service rather than opening the projector unless the manual expressly allows it.
This chart shows the safe cleaning sequence for a mini projector, including preparation, steps, and tool warnings.
This chart shows the safe cleaning sequence for a mini projector, including preparation, steps, and tool warnings.
Lens cleaning tools and coating-safe liquids
The projector lens needs gentler care than the exterior because its optical coating is more vulnerable to scratches and residue. Remove loose dust before wiping the lens, and use only lens-safe tools or liquids to remove smudges and fingerprints while protecting the coating.
The projector lens needs gentler care than the exterior because its optical coating is more vulnerable to scratches and residue.
Use the following tools for routine lens maintenance:
- Blower: Remove loose dust without touching the lens, reducing the chance of abrasive particles scratching the coating.
- Lens brush: Lift remaining fine dust with a clean, soft lens brush using light pressure only.
- Microfiber cloth: Wipe fingerprints and smudges with a clean optical microfiber cloth. Avoid paper towels or abrasive fabrics because they can mark the lens surface.
- Optical cleaner: Use a lens-safe optical cleaner only when dry cleaning does not remove stubborn marks. Apply the cleaner to the microfiber cloth instead of spraying it directly onto the lens.
For example, if fingerprints remain after dust removal, lightly moisten the microfiber cloth with an approved lens cleaner before wiping the lens in gentle strokes. Avoid household glass cleaners, direct spraying, and unsupported alcohol use because they can damage certain lens coatings or leave residue if the manufacturer does not approve them.
Dust removal from the body, vents, and filters
Remove dust from the projector body, vents, and air intake regularly to keep airflow unobstructed and support stable cooling performance. Clean only external surfaces and accessible airflow paths using gentle tools that lift dust instead of pushing it into the projector.
Clean only external surfaces and accessible airflow paths using gentle tools that lift dust instead of pushing it into the projector.
Use this checklist during routine dust cleaning:
- Body: Wipe the exterior with a clean microfiber cloth to remove dust and lint without scratching the surface.
- Vents and intake: Use a soft brush or manual blower to clear visible dust from vent openings and intake areas. Avoid high-pressure compressed air because it can force dust deeper into internal components.
- Filters: If removable filters are fitted, clean or replace them only as instructed in the manufacturer's manual. Wash a filter only when the manual identifies it as washable.
- Final check: Confirm that vent openings remain free of dust buildup before using the projector again. If internal dust cannot be reached safely, leave internal cleaning to manufacturer-approved service.
For example, if lint collects around the intake after using the projector in a dusty room, remove it gently with a soft brush before it restricts airflow. Keeping vents and intake areas clear reduces heat buildup while avoiding unnecessary handling of internal parts.
Internal dust and when not to open the projector
Internal dust marks the limit of routine maintenance because opening a mini projector can expose the optical chamber, fans, static-sensitive parts, and any warranty seals to unnecessary risk. Stop cleaning once only internal components remain affected and leave further work to professional service.
Arrange professional service if visible dust blobs remain in the projected image after exterior cleaning, if dust is visible inside the optical chamber, or if repeated overheating continues after external vents have been cleaned. For example, a dark spot that stays in the same position on every projected image is more consistent with internal dust in the optical path than dirt on the outer lens. These conditions indicate that the problem is beyond normal exterior maintenance and should be assessed according to the manufacturer's service guidance.
Operating Habits That Extend Projector Life
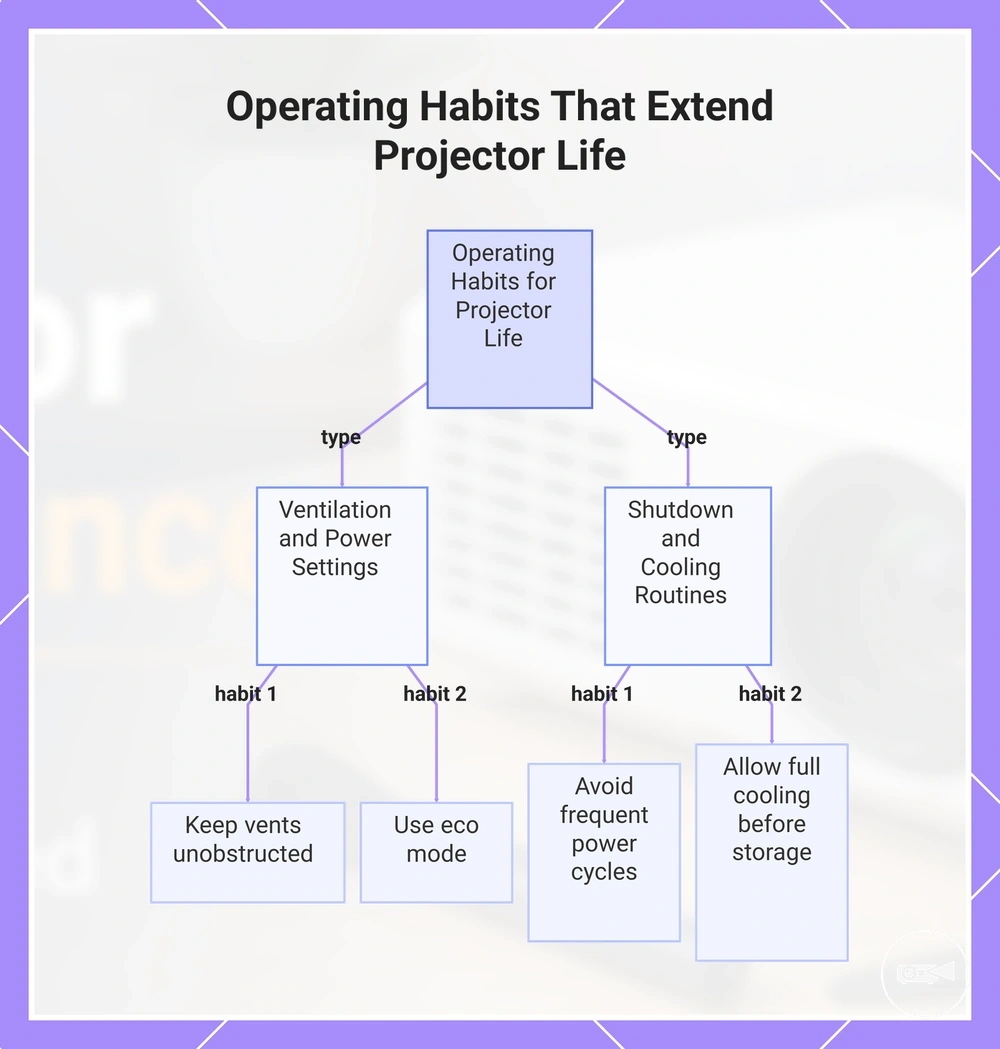
Operating habits are daily use behaviours that help reduce preventable component wear by controlling heat stress, maintaining stable power, and following sensible runtime practices. Consistent ventilation, appropriate power management, and complete cooling routines support long-term mini projector maintenance without implying a fixed lifespan.
Consistent ventilation, appropriate power management, and complete cooling routines support long-term mini projector maintenance without implying a fixed lifespan.
The following habits help reduce unnecessary heat and wear during normal use:
- Keep ventilation openings unobstructed throughout each runtime so airflow can remove heat effectively.
- Use eco mode when maximum brightness is unnecessary because lower light output generally reduces heat generation and component stress.
- Avoid frequent power cycles over short periods, as repeated heating and cooling place additional thermal stress on internal components.
- Allow the normal shutdown sequence to finish and give the projector sufficient cooling time before unplugging, packing, or moving it.
- During frequent portable use, let the projector cool before placing it in a bag or enclosed case to avoid trapping residual heat.
For example, a short presentation usually benefits from one complete startup and shutdown, while a long movie session is better handled by continuous operation followed by the full cooling cycle before storage. If your projector is used regularly for travel or extended viewing, these operating habits help reduce cumulative heat stress and component wear through consistent daily care. For additional guidance on reducing excessive operating temperatures, see overheating prevention.
For additional guidance on reducing excessive operating temperatures, see overheating prevention .
This chart shows the key daily operating habits that help reduce heat stress and component wear to extend projector life.
Cooling time, ventilation, and runtime limits
Keep the projector’s vents clear and maintain the manufacturer-specified clearance so airflow can remove heat throughout each runtime. Placement, dust level, and session length determine whether ventilation remains effective and how much cooling time is needed after use.
Keep the projector’s vents clear and maintain the manufacturer-specified clearance so airflow can remove heat throughout each runtime .
Use these condition-to-action checks during normal operation:
- If vents are blocked or dusty, stop using the projector until the obstruction is removed and airflow is restored.
- If fan noise becomes unusually loud while the case feels hotter than normal, pause the session and allow a full cooldown before reuse.
- If a heat shutdown occurs, leave the projector off until its cooling sequence finishes and the fan stops or the model’s indicator confirms completion.
- For a long runtime, take a cooling break when heat continues to build because sustained temperature rise increases thermal strain on internal components.
- Apply a fixed runtime limit only when the projector manual specifies one, because cooling design and shutdown behaviour differ by model.
Power cycles, eco mode, and shutdown habits
Careful power cycles, correct shutdown habits, and appropriate use of eco mode can reduce unnecessary heat and light-source stress during normal operation. These power habits support durability without providing a fixed lifespan increase.
These power habits support durability without providing a fixed lifespan increase.
Use these do-and-don’t checks for routine power care:
- Do use the projector’s power button for normal shutdown so its model-specific cooling sequence can finish before unplugging.
- Don’t repeat short power cycles unless needed, because repeated heating and cooling increases thermal stress on the light source and nearby components.
- Do use eco mode when lower brightness is acceptable, as reduced light output lowers operating heat compared with a higher-brightness mode.
- Don’t leave the projector in standby for an extended unused period when the manufacturer recommends a full shutdown instead.
- Do follow the stated battery charging routine for portable models, because incorrect charging habits can reduce available capacity and shorten unplugged runtime over time.
Safe Storage and Transport for Mini Projectors
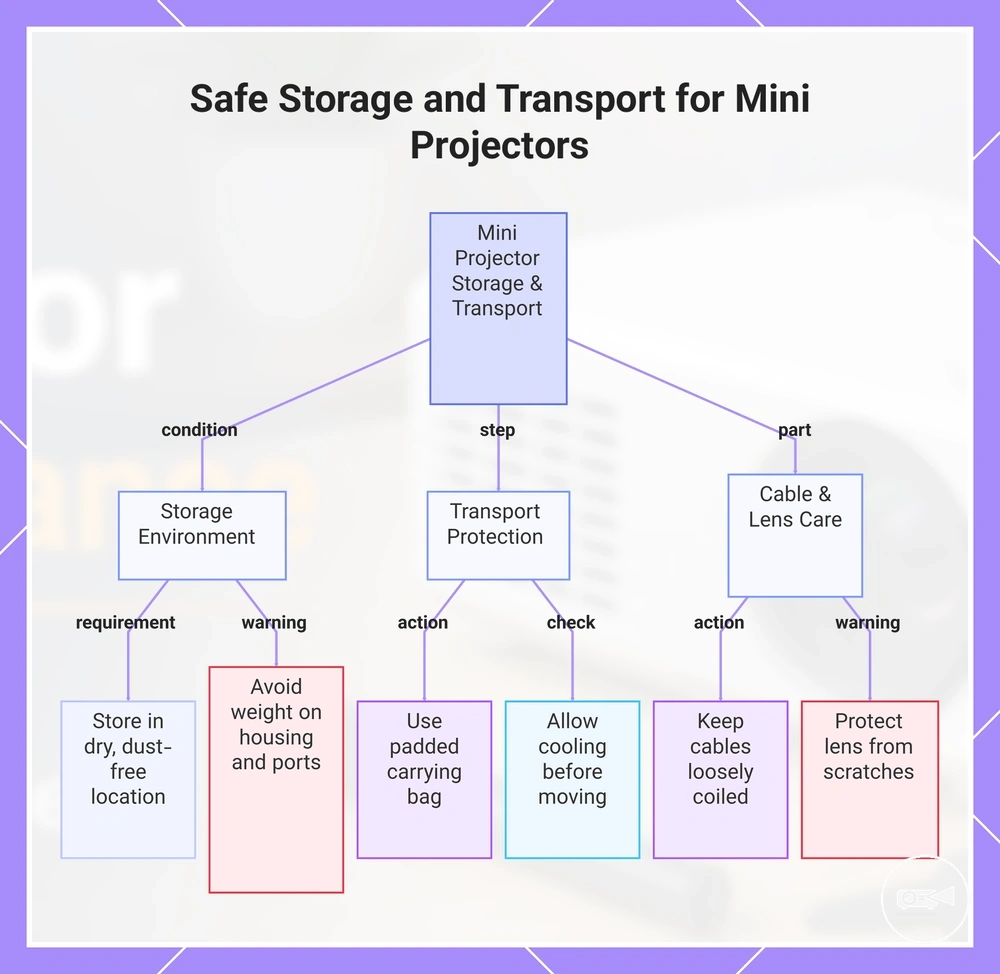
Safe storage and transport protect a mini projector from dust, moisture, impact, and unnecessary stress on its lens and cables. Because mini projectors are compact and frequently moved, proper storage conditions reduce the risk of physical damage during normal use.
Keep cables loosely coiled instead of tightly wrapped to prevent pressure on connectors.
Store the projector in a clean, dry location and avoid placing weight on the housing, lens, or ports. Use a case or carrying bag that holds the projector securely if you transport it, because reducing movement lowers impact risk. Keep cables loosely coiled instead of tightly wrapped to prevent pressure on connectors. For example, store the projector on a shelf at home after it has cooled, or place it in a padded carrying bag before travelling. If the projector is only being stored between uses, avoid leaving it in a hot vehicle or damp area because heat and moisture increase the risk of damage.
Store the projector in a clean, dry location and avoid placing weight on the housing, lens, or ports.
Use this checklist before storing or carrying the projector:
- Store the mini projector in a dry location away from dust and moisture.
- Protect the lens from scratches by preventing direct pressure during storage or transport.
- Keep cables loosely coiled and avoid trapping them against ports inside the case.
- Use a properly fitting case or padded carrying bag to reduce movement and impact during transport.
- Move the projector only after it has completed its normal shutdown and cooling process.
This chart shows the key storage conditions, transport precautions, and care steps to protect a mini projector from damage.
Dust Covers, Lens Covers, and Padded Cases
A dust cover reduces settled dust during storage, while a lens cover helps prevent scratches and smudges on the lens. A padded case or properly fitting carrying case helps reduce impact during transport when the projector has cooled and the case does not trap heat.
A dust cover reduces settled dust during storage, while a lens cover helps prevent scratches and smudges on the lens.
Use each cover or case for its intended type of protection rather than expecting one item to prevent every type of damage. For example, allow the projector to cool before placing it into a carrying case, then keep cables in separate compartments of the projector bag to reduce pressure on the lens, ports, and housing. Use the following guide when storing or transporting a mini projector:
- Use a dust cover after cooling to reduce settled dust while leaving vents uncovered during the cooling period.
- Fit a lens cover before storage or transport to reduce scratches and smudges from direct contact.
- Choose a padded case or carrying case that fits the projector securely to reduce movement and transport impact.
- Store cables in separate projector bag compartments to reduce cable pressure on the projector body, lens, and ports.
Heat, Moisture, Sunlight, and Cable Storage
Heat, moisture, direct sunlight, and poor cable storage can reduce a mini projector's long-term condition by affecting the battery, housing, lens, and connection points. Store the projector in a cool, dry, shaded location, and avoid conditions that place unnecessary environmental or physical stress on its components.
Good storage protects both the projector and its accessories.
Good storage protects both the projector and its accessories. For example, leaving a projector in a closed vehicle can expose it to prolonged heat, while tightly wrapped cables can place continuous pressure on plugs and ports. Use the following condition-to-risk guide:
- Heat: Prolonged heat can increase stress on the battery and outer housing during storage.
- Moisture: Moisture can affect internal electronics and leave marks or condensation on the lens.
- Direct sunlight: Continuous sunlight can raise the projector's temperature, especially inside a closed vehicle.
- Cable storage: Store cables with gentle bends and avoid pressure on plugs and ports to reduce connector strain and unnecessary wear.
Wear Signs That Maintenance May Not Fix
Dimming, overheating, persistent fan noise, blur, battery decline, and recurring spots can indicate either a routine maintenance issue or deeper component wear. Judge each symptom by its likely cause, whether it returns after a maintenance check, and whether its severity is increasing before choosing repair or replacement.
A maintenance-related symptom should improve after the relevant external check, while a non-maintenance cause remains unchanged or returns quickly.
A maintenance-related symptom should improve after the relevant external check, while a non-maintenance cause remains unchanged or returns quickly. For example, blur caused by a dirty lens can improve after careful cleaning, but blur that remains after the lens and focus are checked may point to an optical or focus fault. Persistent overheating after airflow is clear, or fan noise that continues after external dust is removed, is a service sign rather than a reason to repeat cleaning.
The table below separates likely maintenance causes from wear signs that maintenance may not fix.
The table below separates likely maintenance causes from wear signs that maintenance may not fix. Use blurry image fixes when blur remains the main symptom, but stop repeated cleaning attempts when a symptom persists, returns, or worsens.
| Symptom | Likely maintenance cause | Check | What it means |
|---|---|---|---|
| Dimming | Dust on the external lens or restricted airflow | Check that the lens is clean and the vents are unobstructed | Brightness that remains lower after these checks can indicate light-source wear or an internal fault requiring service or replacement evaluation. |
| Overheating | Blocked vents or external dust restricting airflow | Confirm that air paths are clear during normal operation | Overheating that recurs with clear airflow can indicate a cooling-system or internal hardware problem that needs repair assessment. |
| Fan noise | External dust affecting airflow | Remove accessible dust and compare the sound during normal use | Noise that remains loud, irregular, or worsening can indicate fan wear or another service issue. |
| Blur | Dirty lens surface or incorrect focus | Check the external lens and normal focus controls | Blur that remains after both checks can indicate optical misalignment, focus-system wear, or internal contamination. |
| Battery decline | No routine cleaning cause | Compare usable runtime after a full charge under the same type of use | A consistent downward change in runtime indicates battery wear and supports repair, warranty, or replacement evaluation. |
| Recurring spots | Dust on the external lens | Check whether the spots disappear after the accessible lens surface is cleaned | Spots that remain or return in the same image position can indicate internal contamination that requires service rather than repeated cleaning. |
Stop cleaning when the same symptom persists after the relevant external check, returns in the same form, or becomes more severe. At that point, compare repair cost, warranty coverage, remaining performance, and mini projector long-term value before choosing repair or replacement, with the final decision based on the model and the affected component.
Dimming, Overheating, Noise, and Recurring Blur
Dimming, overheating, abnormal noise, and recurring blur need diagnosis when they continue after a relevant maintenance check. Repeating the same cleaning action is not appropriate when the symptom returns under the same operating conditions.
The table distinguishes likely maintenance causes from wear signs that maintenance may not fix.
The table distinguishes likely maintenance causes from wear signs that maintenance may not fix. For example, a dim image caused by an obstructed lens may improve after the accessible surface is checked, while continuing brightness decline can indicate light-source wear. A heat shutdown with clear airflow, persistent fan noise, or visible spots that remain in the same image position are escalation cues rather than reasons for repeated cleaning.
| Symptom | Likely maintenance cause | Check | What it means |
|---|---|---|---|
| Dim image | Dust on the accessible lens or restricted airflow | Check the external lens and confirm that the vents are unobstructed | Dimming that remains after both checks can indicate brightness decline from light-source or internal component wear. |
| Heat shutdown | Blocked airflow or external dust around the vents | Confirm that the air paths remain clear during normal use | Overheating that causes another shutdown with clear airflow requires service diagnosis. |
| Abnormal fan noise | Dust affecting airflow around the fan | Remove accessible external dust and compare the sound during normal operation | Fan noise that remains irregular or becomes louder can indicate fan or bearing wear. |
| Recurring blur | Dirty lens surface or incorrect focus | Check the accessible lens and the normal focus control | Blur that returns after both checks can indicate focus-system wear, optical misalignment, or internal contamination. |
| Visible spots | Dust on the external lens | Check whether the spots disappear after the accessible lens surface is cleaned | Spots that remain in the same image position can indicate internal contamination that needs professional assessment. |
When Replacement Is More Practical Than Cleaning
Replacement is more practical than continued cleaning when maintenance no longer restores usable performance and the fault is not caused by accessible dust, blocked airflow, or incorrect focus. The decision should combine repair cost, device age, performance loss, and repair feasibility rather than rely on one symptom.
The checklist separates preventable cleaning problems from conditions that support professional evaluation or replacement.
The checklist separates preventable cleaning problems from conditions that support professional evaluation or replacement. For example, dust on an accessible lens remains a maintenance issue, while persistent light-source decline or ongoing battery degradation after normal checks indicates a component-level limitation.
- Device age: Replacement becomes more reasonable when an older projector develops repeated faults and declining reliability instead of an isolated maintenance issue.
- Light-source decline: If brightness remains noticeably reduced after the lens, settings, and airflow have been checked, professional evaluation can determine whether continued use or replacement is practical.
- Battery degradation: Consistently shorter runtime after a full normal charge indicates reduced battery capacity rather than a cleaning problem.
- Recurring overheating: Repeated heat shutdowns after the vents and operating clearance have been checked indicate that further cleaning is unlikely to resolve the cause.
- Repair cost: Replacement can be the practical decision when the quoted repair cost is close to the cost of obtaining a suitable alternative and the existing projector still has unresolved performance loss.
- Usage needs: Replacement is more practical when reduced brightness, runtime, stability, or image quality prevents the projector from meeting its regular viewing or presentation purpose.
Preventable maintenance issues should show a clear improvement after the relevant check, while end-of-life limitations remain or return under the same use conditions. Professional evaluation is appropriate when the cause is internal, the repair feasibility is uncertain, or the combined cost and performance outcome no longer supports continued use.
Mini Projector Maintenance Checklist
A maintenance checklist helps keep routine care consistent by organizing tasks according to use conditions rather than fixed intervals. Use it after normal operation, before storage, or following dusty use so maintenance remains practical without implying a guaranteed increase in projector lifespan.
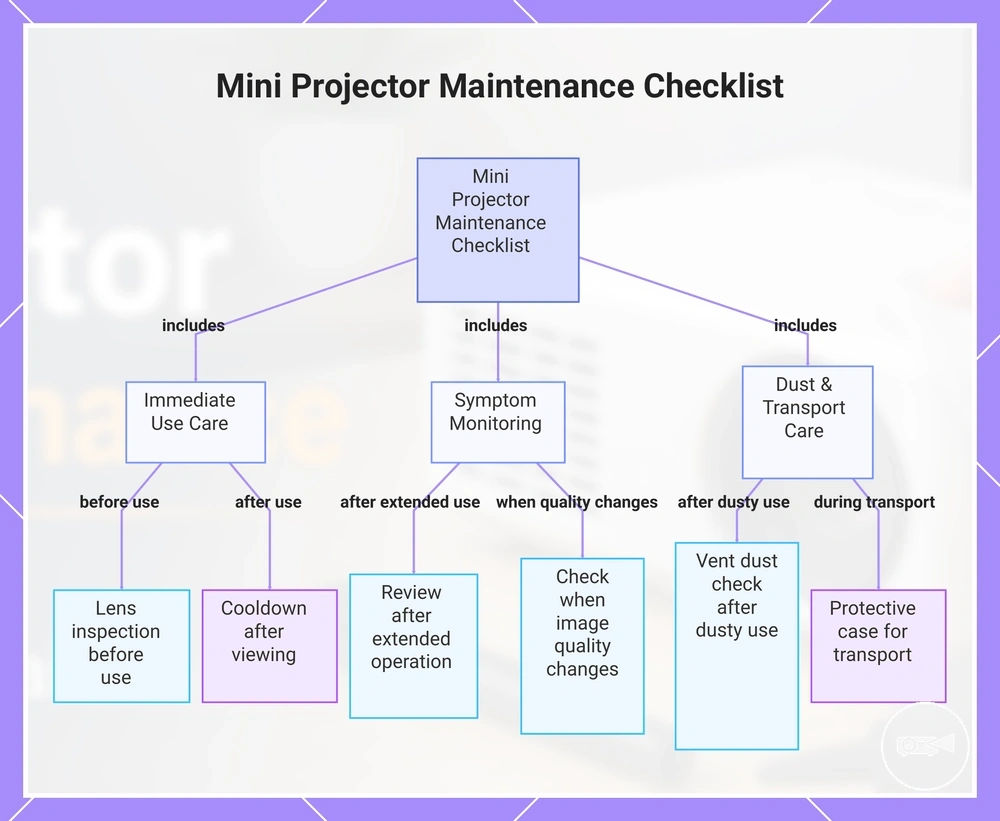
The checklist below consolidates routine cleaning, operation, storage, and symptom review into one place.
The checklist below consolidates routine cleaning, operation, storage, and symptom review into one place. For example, a projector used outdoors or in dusty conditions benefits from more frequent lens inspection and vent dust checks than one used occasionally in a clean indoor environment.
- Before each use: Perform a lens inspection for dust, fingerprints, or smudges, and clean the lens only when needed with a suitable microfiber cloth.
- After dusty use: Complete a vent dust check and remove accessible dust that could restrict airflow and increase operating heat.
- After every viewing session: Allow a full cooldown before disconnecting power, packing, or storing the projector.
- Before storage: Practice careful cable storage by loosely coiling cables to reduce connector and cable strain.
- During normal ownership: Follow the manufacturer's recommended battery charging habits instead of leaving the battery deeply discharged for extended periods.
- During transport or long-term storage: Use a protective case to reduce exposure to dust, moisture, and accidental impacts.
- After extended operation: Review the projector for unusual fan noise, excessive heat, recurring blur, or reduced image brightness.
- When image quality changes: Check accessible maintenance items before deciding that professional evaluation is necessary.
- After changes in operating conditions: Increase inspection frequency when the projector is used outdoors, travels frequently, or operates in dusty environments.
- Periodically: Confirm that external surfaces remain clean and that ventilation openings stay unobstructed during normal operation.
This maintenance checklist is intended to consolidate routine care rather than replace model-specific instructions. Follow the projector manual for filter maintenance, internal cleaning procedures, and service limits because these requirements are determined by the projector's design and features.
This maintenance checklist is intended to consolidate routine care rather than replace model-specific instructions.
This chart groups the mini projector maintenance checklist into three categories: immediate use care, symptom monitoring, and dust/transport care, showing the key tasks for each condition.